Posted by TheOldHokie on February 05, 2013 at 07:09:29 from (108.22.202.212):
In Reply to: 9N oil pump bushing posted by Ultradog MN on February 01, 2013 at 19:40:08:
Bulldozer said: (quoted from post at 02:53:18 02/05/13) I live in an area of machine shops with MSC store in the center. Most of the shops are all CNC high production shops for aerospace industry.
In fact I saw on sixty minutes there are lots of machine shop jobs out there, but the younger crowd do not want to do this job. They would rather have a "facebook" type job.
The classic hand crank machine shop is difficult to find.
Really do not know what other folks are doing and have searched the archives with no results on this oil pump bushing issue.
Surely not everyone is doing the co-axial indicator method on a vertical mill, which appears to be the high end setup.
Mercury marine shop manual includes this lapping procedure to condition rod wrist pin bushing.
The hand held spindle will find its own center, if the contract pressure from the abrasive cloth is uniform. This method might be OK if only .001" to .002" material removal is required.
Sanded one end of the split bushing to make a champher. It pressed into the cap without any scraping. Then realized that 50% of the bushing wall was going to have to be removed to make it fit the gear pump shaft. Forget hand held abrasive cloth lapping method as mentioned previously for this much material.
Ths oil pump bushing thing is one of the most difficult procedures of the engine rebuild in my opinion.
Like I said before the automotive machine shop used the specialized machine built for doing rod wrist pin bushings using a stone hone to hone the pump shaft bushing to size. Believe this machine is supposed to follow the center of the bushing. The bushing was honed orthonical to the cap face, however.
Anyway the bushing was not honed concentric and was offset towards the driven gear shaft.
Now the gear teeth will have to lap themselves, since there is noticable sliding friction when aluminum gear is rotated by hand, but does rotate and is not locked up.
Is it possible to get an adjustable reamer that is 1/2" nominal diameter?
Here is a link to a little How-To I put together on the subject a year or so ago. I think it is well worth reading for anyone contemplating doing this job. Oil Pump Rebuild
For those that would rather not read the How-To here's the bottom line. You are replacing the bushing because it has excessive wear on it. In doing that you must take care to maintain the original gear spacing. The location of the pump gear center lines is a critical dimension that was carefully controlled when the bores and pumping chambers were originally machined into the housing at the factory. Installing the bushing off center will alter that spacing - center too far apart or off center and the driven gear will hit the pumping chamber walls - too close together and the gears will bind.
That is Gear Design 101 but a lot of professional automotive "machinists" don't have e a clue they need to worry about it when they are given one of these pumps to rebuild or ream. They simply mash the bushing into the bore and then ream or hone to get the proper shaft fit. And when they are done the gears often rub or bind just Like Keith's. Of course the shop says:
" Not our fault - we used a $25K high precision rod machine to hone it to within .001 running clearance and .0005 TIR. The problem has to be those cheap imported parts you bought - they don't fit right." :evil:
The problem is not the parts - it's the machine work. I have redone more than one pump that was sent to me by a customer that had a professional shop botch the job using their high dollar rod sizing machine. A rod hone doesn't care about keeping the ID and OD of the small end bushing concentric. In a connecting rod wrist pin bore concentricity doesn't matter and the machine doesn't even attempt to control it. But it matters big time in that oil pump bushing.
You don't need a lot of high dollar machine tools to do the job right. I've never actually tried it but a good quality drill press with a solid work table and vise, a dial indicator, and a 9/16" HSS chucking reamer should work fine. I once had the good fortune to work with an old school master machinist and that is exactly the sort of task he would give to one of his apprentices as a lesson/test in hand setup and finishing ;-)
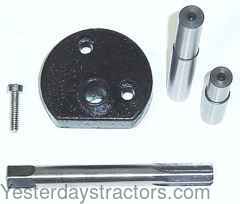
For people who want to DIY a better alternative is probably a hand reaming toolkit like the one Ken mentioned The kits are made specifically for this job, come with everything you need to do the job, and are easy to use:
Drive the the old bushing out of teh housing using the stepped drift provided in the kit.
Insert the centering pilot into the bore in the backside of the housing and use it to center the jig with the housing bore.
Once the jig is centered clamp it to the housing with the cap screw provided.
Now remove the centering pilot and from the backside of the housing press the new busing into the housing.
Flip the housing over and ream the bushing to size using the hand reamer inserted through the guide hole in the jig
Remove the jig and Voila!! - the bushing is reamed to size AND concnetric to the bore in the housing.
The jig and reamer kits are sold right her on YT for about $110 - I'll make you one for quite a bit less. Or put your your pump housing in a $5 USPS flat rate box and send it to me and I'll rebush it for the price of a case of Yuengling. Or better yet bring the pump and the beer to me and we can share a Yuengling or two when I'm done with the pump ;-)
TOH
This post was edited by TheOldHokie at 17:01:47 02/05/13 6 times.
We sell tractor parts! We have the parts you need to repair your tractor - the right parts. Our low prices and years of research make us your best choice when you need parts. Shop Online Today. [ About Us ]
Today's Featured Article - Identifying Tractor Noises - by Curtis Von Fange. Listening To Your Tractor : Part 3 - In this series we are continuing to learn the fine art of listening to our tractor in hopes of keeping it running longer. One particularly important facet is to hear and identify the particular noises that our
... [Read Article]
All Rights Reserved. Reproduction of any part of this website, including design and content, without written permission is strictly prohibited. Trade Marks and Trade Names contained and used in this Website are those of others, and are used in this Website in a descriptive sense to refer to the products of others. Use of this Web site constitutes acceptance of our User Agreement and Privacy Policy
TRADEMARK DISCLAIMER: Tradenames and Trademarks referred to within Yesterday's Tractor Co. products and within the Yesterday's Tractor Co. websites are the property of their respective trademark holders. None of these trademark holders are affiliated with Yesterday's Tractor Co., our products, or our website nor are we sponsored by them. John Deere and its logos are the registered trademarks of the John Deere Corporation. Agco, Agco Allis, White, Massey Ferguson and their logos are the registered trademarks of AGCO Corporation. Case, Case-IH, Farmall, International Harvester, New Holland and their logos are registered trademarks of CNH Global N.V.