Welcome! Please use the navigational links to explore our website.
PartsASAP LogoCompany Logo Auction Link (800) 853-2651

Shop Now

   Allis Chalmers Case Farmall IH Ford 8N,9N,2N Ford
   Ferguson John Deere Massey Ferguson Minn. Moline Oliver

Antique Tractor Paint and Bodywork

CNKS: painting your 460

Welcome Guest, Log in or Register
Author 
PaulW_NJ

06-02-2006 18:10:01


Report to Moderator

Hi CNKS - how is your 460 project coming? I"m doing a 340U which, while smaller, has many similarities. I recall you"re saying you remove as many components for cleaning and painting as possible, as do I. Here"s my question to you - last summer I cleaned, primed, and top coated from the hydraulics manifold below the dash forward. That was relatively straightforward - not unlike smaller tractors. But now I"m looking at the rear (which is why I stopped last summer where I did) - the wheels and fenders can be removed easy enough, but how are you planning to handle the FastHitch? - mine is pretty rusty and peeling, so it needs alot of attention. I really don"t see much hope in trying to get it all off, the components are heavy and don"t look readily separable. But there are many areas around the cylinder and hitch components that really don"t seem accessible with a wire wheel. Probably a good application for sandblasting, if I had the equipment. I also probably made a mistake by finishing the front half - do you think taping and wrapping the front half with poly will protect it from overspray? Would appreciate hearing how you are dealing with this. Any suggestions would be appreciated.

Thanks

Paul

[Log in to Reply]   [No Email]
PaulW_NJ

06-03-2006 05:41:45


Report to Moderator
 Re: CNKS: painting your 460 in reply to PaulW_NJ, 06-02-2006 18:10:01  
CNKS

Thanks for the description of your project, and your thoughts. It was a good reality check on my 340 project. Wow, you really do have it apart. That big 6 cyl block must not have been easy getting out. I"m sure it will look terrific when you"re done.

I replaced the front axle on mine because the doglegs were hopelessly frozen in the most extended position when I bought it. I removed, cleaned and painted the steering/power steering housing because I learned the hard way not to hammer on the shaft when trying to remove the steering wheel with a puller (popped the expansion plug on the bottom).

From what you say it sounds like getting the Fasthitch off is do-able. And if I don"t get it cleaned up properly and painted like the rest of the tractor, it really will never look "right" and I know I"ll never be happy. I"ll give it a try - I hope I can break it all free.

I did try to start getting Fasthitch components off - the depth control shaft? (vertical handle with straight line of gear teeth) but the bracket that holds it in is bolted with two slotted round headed "screws". Slots too narrow for a drag link socket. They appear like they"ll break a screwdriver before they let loose and nothing to grab onto. How did you get those out?

These number series Farmalls have alot more features that make them much more useful, but they are sure much more difficult to clean and paint properly. I went from a Cub to the 340U. What a difference! Think my next project will be a Super C, but not for awhile. Good luck!

[Log in to Reply]  [No Email]
Rod (NH)

06-03-2006 15:14:16


Report to Moderator
 Re: CNKS: painting your 460 in reply to PaulW_NJ, 06-03-2006 05:41:45  
Paul,

I don't know anything about IH stuff but I will add a comment. I sometimes wind up modifying a tool for a special need, like heating and bending a wrench to a special angle. I have also ground down drag link sockets to fit screw slots. By doing that you can make the fit near perfect with the screw slot and if you carefully use an impact wrench, say 3/8 drive with reduced inlet pressure, the screws usually come out fairly easily. The sockets are not that expensive to replace and getting the screw out without mangling the slot is worth it in most cases. This of course presumes that the screw slot is wide enough to make grinding down a drag link socket a reasonable solution. I've also used square drive screwdriver tips in a 3/8 impact at reduced pressure to "convince" a screw to come out. You need to have a snug fit of the driver in the slot for either method to be effective.

Rod

[Log in to Reply]  [No Email]
PaulW_NJ

06-03-2006 18:53:19


Report to Moderator
 Re: CNKS: painting your 460 in reply to Rod (NH), 06-03-2006 15:14:16  
Rod

Grinding down a drag link socket sounds like a good idea to try on those two screws . . . I"ve never tried anything like that but I"ll try it this week. I"ve got to believe they are 5/16" bolts, and considering they seem to be pretty well frozen in place, extra persuasion after a good soaking in Kroil, is certainly the only hope. Thanks for the idea.

Paul


[Log in to Reply]  [No Email]
CNKS

06-03-2006 14:11:12


Report to Moderator
 Re: CNKS: painting your 460 in reply to PaulW_NJ, 06-03-2006 05:41:45  
As to the two screws, I had to look at the parts manual, without which I will never get it back together -- but I don't see or remember the two screws, mine had all bolts, but it may not be original. I assume what you are calling depth control is what the parts book calls traction control. The slotted handle works an arm that hooks to the "ball pivot bracket" underneath the tractor that the fast hitch attaches to and is the main pull point. If not let me know and I'll look some more. Another reason for taking the fast hitch off. My bracket had a crack in it and the mounting bolts were loose, probably why it cracked. If I had bought the tractor to farm with, the whole thing probably would have fallen off. I'm in a lot deeper than I planned on. As I was disassembling, I kept asking myself "do I really want to do this?", as the pile of parts kept getting larger and larger. Going to take a lot longer to get it back together than it did to take it apart.

[Log in to Reply]  [No Email]
PaulW_NJ

06-03-2006 19:09:10


Report to Moderator
 Re: CNKS: painting your 460 in reply to CNKS, 06-03-2006 14:11:12  
third party image

CNKS

Your comments made me smile . . . how many times have I thought those same thoughts "do I really want to do this?". Sometimes it seems like an obsession, you just keep going and going. But I know I"ll never be satisfied until I do it the "right way". But yeah, deeper and deeper. I bought the 340U with the intention of putting together a loader tractor to help around my farm restoration. Unfortunately it"s been in the garage for two years in various states of assembly, and I"m still picking up heavy rocks in a wheelbarrow.

[Log in to Reply]  [No Email]
CNKS

06-03-2006 19:39:31


Report to Moderator
 Re: CNKS: painting your 460 in reply to PaulW_NJ, 06-03-2006 19:09:10  
I wish mine was that far assembled. Looks good. It looks like you have new tie rod ends. Where did you get those? -- I haven't checked yet, don't know if Case-IH has them or not. I need all 4, front and rear. I also need to get my radiator fixed, and the tachometer, and get a battery box made, and find some lights, and at least 27 other things. I should probably put the parts in my engine and install the front axle so it will look like I have made some progress. The front wheels on my Hi-Utility are supposed to be red, the regular utility has white ones like your 340 -- is that IH 901?

[Log in to Reply]  [No Email]
PaulW_NJ

06-04-2006 04:54:04


Report to Moderator
 Re: CNKS: painting your 460 in reply to CNKS, 06-03-2006 19:39:31  
third party image

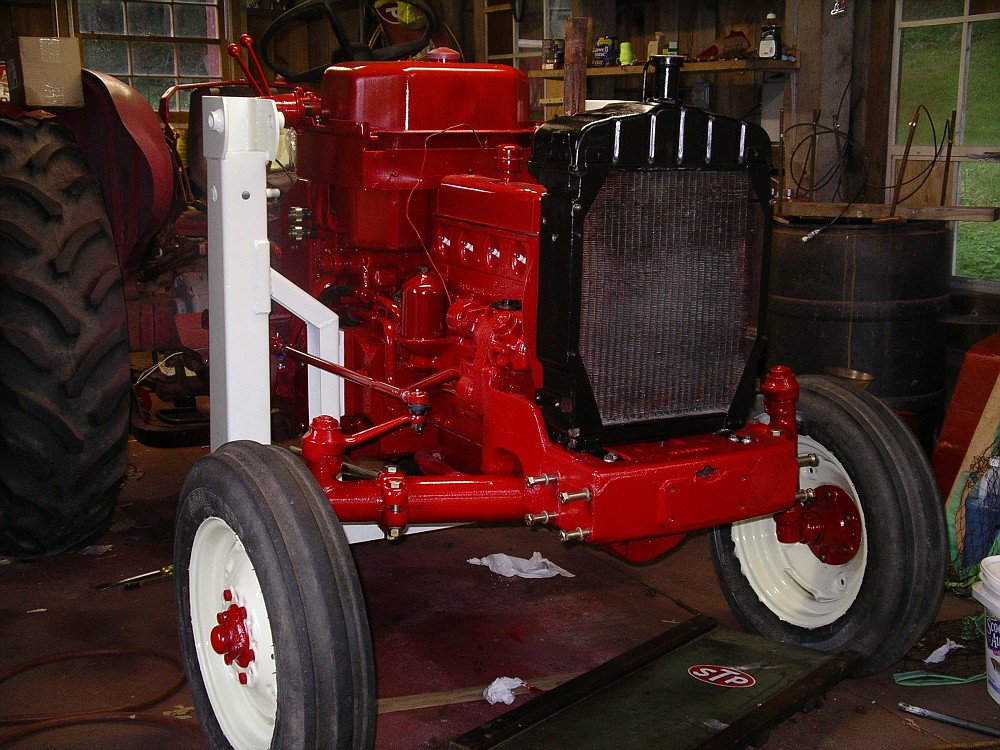
CNKS

My front tie rod ends were totally worn out - I priced them at Case/IH and I seem to recall they were $60 each. After gagging at that I visited my NAPA dealer. They made me a xerox of their ball joint catalog pages and I matched up thread size(s), length, etc. and purchased as set for something like $12 each. They were a perfect match. I"d be glad to fax you those pages - I see I circled part No. 269-2075, but I"d check your dimensions first.

My rear ends are a different story. I have power steering by the way. Instead of loose and worn, like the fronts, the rears joints were very tight and dry. They are not conventional in design - the head is at an angle. Case/IH replacements are $120 each. I drilled and tapped a hole to fit a zerk fitting into each, but discovered they are not lubricatable ends but rather packed with a sort of paper. I"ll try to force a bit of lube in there but thinking the rear ends get much less action than the fronts, I chose not to replace them.

The wheels and trim are IH901 - I was surprised how much green is in the color, but I confirmed it first from Rod"s table, and comments from a fellow on Red Power.com - it actually looks whiter in the photo than in real life. The loader frame is an IH 1701, which I bought separately, and I thought it should be a whiter so I used IH832? - I"ll check on that.

One of the more tedious jobs has been totally rewiring everything, as all of my gauges (except oil pressure) and tach were shot as well as the wiring insulation. I made a new harness and finished the rewiring just recently - it felt really good to fire it up and get it running again - I think I needed that before starting on the back half.

[Log in to Reply]  [No Email]
CNKS

06-04-2006 07:18:52


Report to Moderator
 Re: CNKS: painting your 460 in reply to PaulW_NJ, 06-04-2006 04:54:04  
I need a new wiring harness too. Photo's don't give the true color. I don't know that I have actually seen the true 901, thought yours looked too white. I'm about ready to have some PPG 8665 mixed, I thought it was sort of a cream color--but I'm going to take whatever is mixed. I have had trouble with the local PPG dealer in the past. The current employee knows me now and does a good job -- he should as I have spent a small fortune in there. Looks like I can get at least the front tie rod ends -- I don't have a fax, but do have a good NAPA dealer. I don't mind $60, as CIH is always going to be higher in price, but $120 apiece makes me flinch. As to the steering, I believe yours has the little dome shaped cylinder under the dash? -- has a piston in it. Due the the water in the fluid, mine was badly pitted, it still worked, but I had a machine shop put a sleeve in it, should be as good as new. If you have not had that apart, you probably don't want to look.

[Log in to Reply]  [No Email]
CNKS

06-02-2006 19:57:19


Report to Moderator
 Re: CNKS: painting your 460 in reply to PaulW_NJ, 06-02-2006 18:10:01  
I'm still working on it. The fast hitch can be removed and completely disassembled. Just put blocks under it. Actually, I don't remember if I took it off as a unit or disassembled as I removed it, that part wasn't much of a problem compared to some of the other things I have done. I had a machine shop replace most of the fast hitch bushings, which were badly worn. I sandblasted mine because it was simpler, I could have stripped and used an angle grinder on it. That would have taken a while. To clean and paint every square inch of the fast hitch, it has to be removed. It all depends on whether or not you want to paint everything, or just what can be seen without crawling under the tractor. You can't do a good job on the underside of the tractor with the fast hitch there either. As to masking, there are places where the engine, TA, and rear end bolt together that can be masked at the break, do that and you won't get overspray.
My whole tractor is completely disassembled, except that I did not do anything to the TA, transmission or rear end, except replacing the axle bearings. Hydraulics, steering, etc have been removed and painted separately. The only thing that I did not remove was the PTO. The painted engine block is hanging from an engine stand, it currently contains no moving parts, they are all in manufacturer's boxes waiting to be installed. The rear from the engine back is on jack stands. Front axle and spindles are disassembled. Currently trying to get all the "cooties" out of the paint on the hood and fenders, as I have a contamination problem that I have been unable to solve. Thus it all has to be color sanded and buffed, then repainted when I screw up. The fenders look pretty good (I have one I am not satisfied with yet, 2nd painting is now drying), the hood was hard to do, but much easier with a small buffer that Rod(NH) suggested. I bought this tractor almost 2 years ago, and while I have not worked on it every day, it is taking 3 or 4 times longer than I intended -- I'm going to stick to the letter series if I ever get done, a lot fewer parts to mess with.

[Log in to Reply]  [No Email]
[Options]  [Printer Friendly]  [Posting Help]  [Return to Forum]   [Log in to Reply]

Hop to:


TRACTOR PARTS TRACTOR MANUALS
We sell tractor parts!  We have the parts you need to repair your tractor - the right parts. Our low prices and years of research make us your best choice when you need parts. Shop Online Today. [ About Us ]

Home  |  Forums


Copyright © 1997-2023 Yesterday's Tractor Co.

All Rights Reserved. Reproduction of any part of this website, including design and content, without written permission is strictly prohibited. Trade Marks and Trade Names contained and used in this Website are those of others, and are used in this Website in a descriptive sense to refer to the products of others. Use of this Web site constitutes acceptance of our User Agreement and Privacy Policy

TRADEMARK DISCLAIMER: Tradenames and Trademarks referred to within Yesterday's Tractor Co. products and within the Yesterday's Tractor Co. websites are the property of their respective trademark holders. None of these trademark holders are affiliated with Yesterday's Tractor Co., our products, or our website nor are we sponsored by them. John Deere and its logos are the registered trademarks of the John Deere Corporation. Agco, Agco Allis, White, Massey Ferguson and their logos are the registered trademarks of AGCO Corporation. Case, Case-IH, Farmall, International Harvester, New Holland and their logos are registered trademarks of CNH Global N.V.

Yesterday's Tractors - Antique Tractor Headquarters

Website Accessibility Policy