"does the clutch have to be engaged when you measure the 90 clearance or not engaged?"
Engage the clutch.
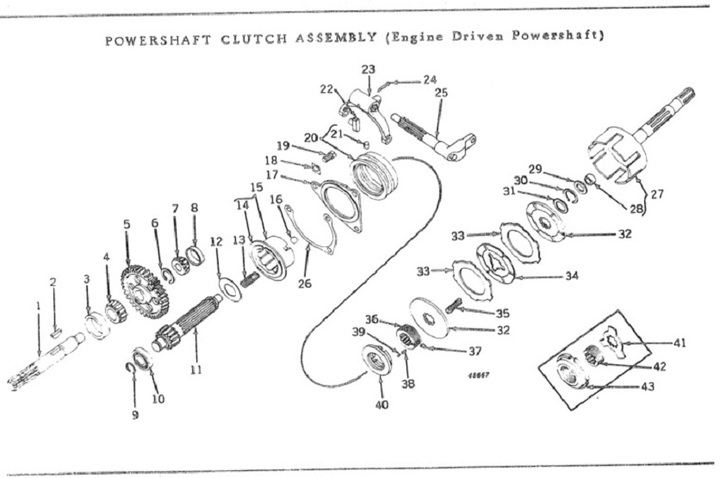
Take a look at the diagram below.
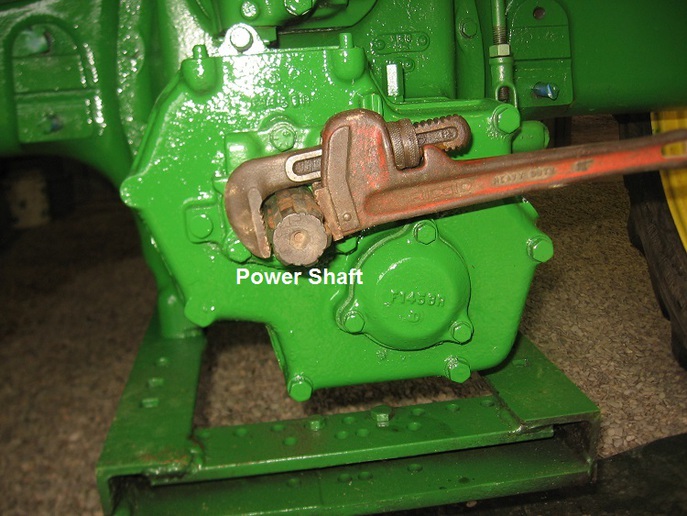
Note the adjusting cam (Key 40), locking screw (Key 37), clutch brake facing (Key 17), cam disk (Key 15), power shaft (Key 1), and clutch brake plate facing (Key 32).
Reviewed the SERVICE MANUAL FOR JOHN DEERE DEALERS MODEL 70 DIESEL TRACTOR (GENERAL PURPOSE AND STANDARD in the Engine Driven Power Shaft section under the CLUTCH ADJUSTMENT topic on pages 135-10-7 and 135-10-8.
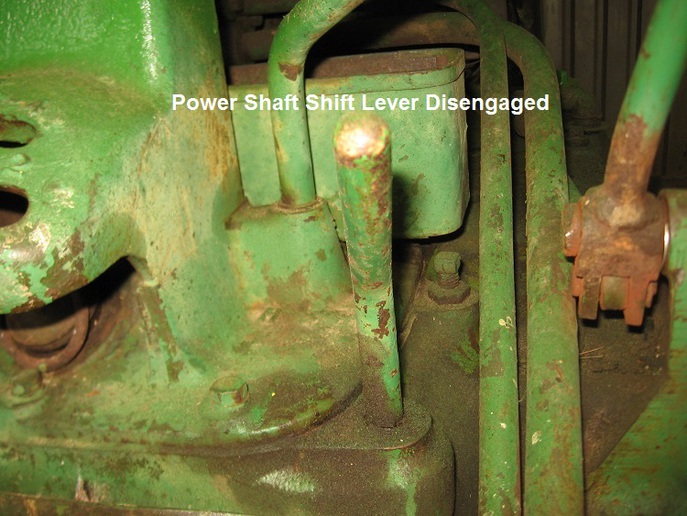
"Before attempting to adjust the clutch be sure the power shaft shift lever is in the disengaged position.
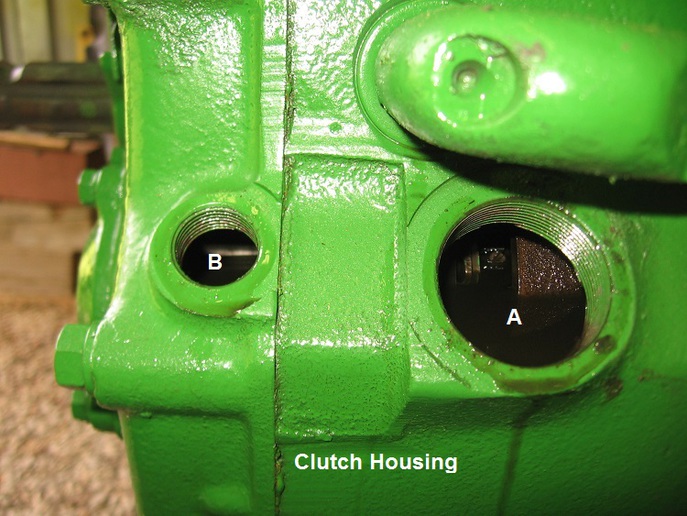
Now remove large plug �A� and small plug �B� from the right side of the clutch housing.
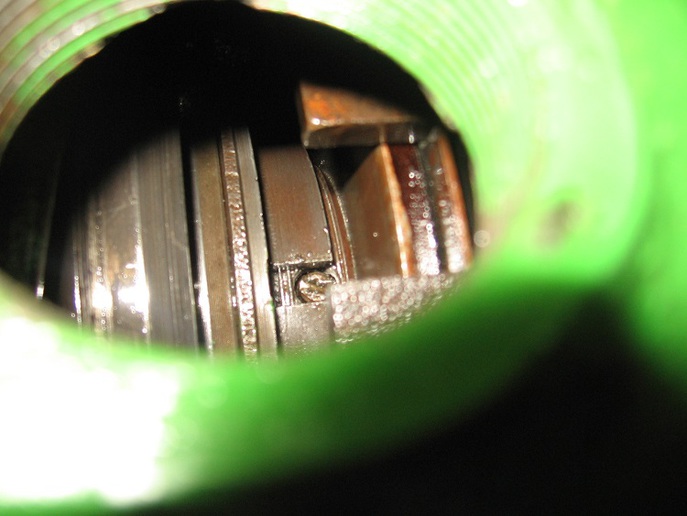
The large opening will expose the adjusting cam and locking screw provided for making clutch adjustment. The small opening will permit you to check clearance between the clutch brake facing and cam disk.
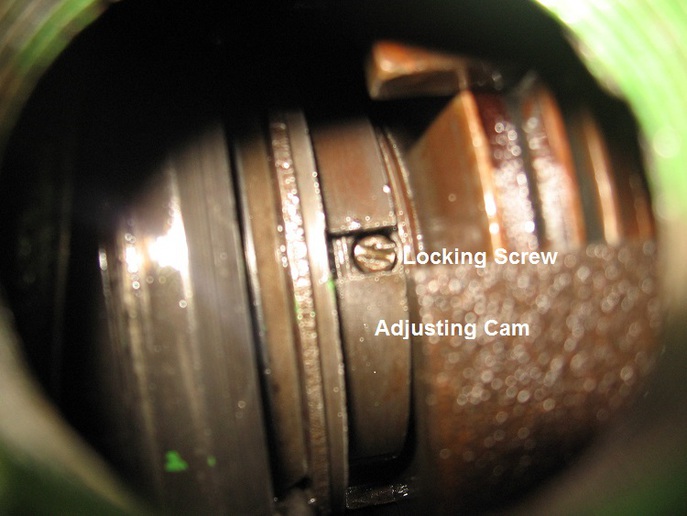
With power shaft clutch engaged, peer into the large opening and see if you can locate the locking screw in one of the notches of the clutch adjusting cam.
If the screw cannot be seen, engage the clutch, then, using vise grip pliers or a suitable wrench on the power shaft, turn the shaft (and cam)a few degrees. The adjusting cam will turn only with the power shaft clutch engaged.
Disengage clutch and again see if the locking screw is visible. It may be necessary to engage the clutch, turn the power shaft, and disengage the clutch several times before the locking screw is correctly positioned. The screw must be visible before proceeding with the adjustment.
Engage the clutch. Working through the small opening, use a piece of wire .090-incb in diameter to measure clearance between clutch brake plate facing and flange of cam disk. On a properly adjusted clutch this clearance is .090-inch minimum. NOTE: 3/32-inch welding rod gauge is satisfactory for minimum clearance.
Working through the large opening, turn the adjusting screw cam locking screw in until its head clears the slot in the adjusting cam. Now turn the adjusting cam in a counter-clockwise direction (viewed from the rear) to tighten the clutch moving the adjusting cam only one notch at a time while checking clearance through the small hole. Turning the cam counter-clockwise, which tightens the clutch, will increase the clearance. Turning the cam clockwise, which loosens the clutch, will decrease the clearance.
After the .090-inch clearance has been obtained, rotate the clutch and check clearance in two or three different positions to make sure that adjustments satisfactory in all positions.
When the adjustment is completed, turn the locking screw outward, into one of the notches of the adjusting cam. Replace the plugs.
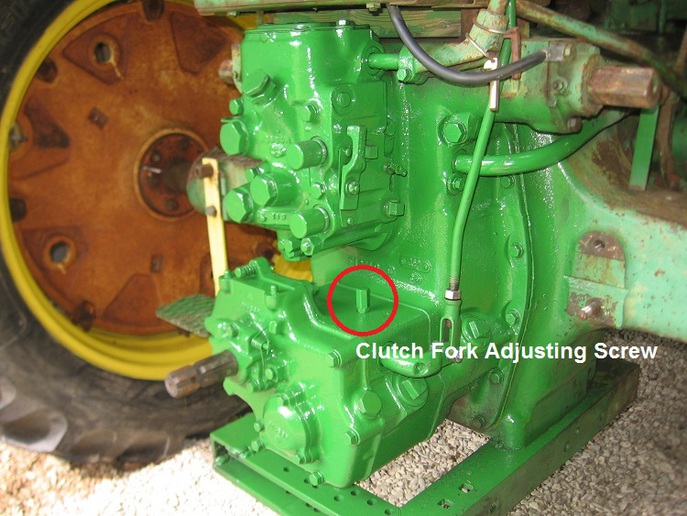
If tractor is equipped with a clutch fork adjustment screw (tractors with Serial No. below 7031300), remove cap nut, engage clutch and turn adjusting screw in until it touches fork. Back adjusting screw off � turn; then secure it in place with lock nut and replace cap nut."
Upload one or more videos to your post. Photo filesizes should be less than 300K and Videos, less than 2MB. Formats allowed are gif, jpg, png, ogg, mp4, mov, and avi. Be sure to use filenames without spaces or special characters, and filetypes of 3 digits lower case.
We sell tractor parts! We have the parts you need to repair your tractor - the right parts. Our low prices and years of research make us your best choice when you need parts. Shop Online Today. [ About Us ]
Today's Featured Article - Talk of the Town: How to Crank Start a Tractor - by Staff. This interestin discussion is from the Tractor Talk Discussion Forum. Remember that safety is your first priority - make sure you know what you are doing before attempting a potentially dangerous activity!
... [Read Article]
Latest Ad:
1964 I-H 140 tractor with cultivators and sidedresser. Starts and runs good. Asking 2650. CALL RON AT 502-319-1952
[More Ads]
All Rights Reserved. Reproduction of any part of this website, including design and content, without written permission is strictly prohibited. Trade Marks and Trade Names contained and used in this Website are those of others, and are used in this Website in a descriptive sense to refer to the products of others. Use of this Web site constitutes acceptance of our User Agreement and Privacy Policy
TRADEMARK DISCLAIMER: Tradenames and Trademarks referred to within Yesterday's Tractor Co. products and within the Yesterday's Tractor Co. websites are the property of their respective trademark holders. None of these trademark holders are affiliated with Yesterday's Tractor Co., our products, or our website nor are we sponsored by them. John Deere and its logos are the registered trademarks of the John Deere Corporation. Agco, Agco Allis, White, Massey Ferguson and their logos are the registered trademarks of AGCO Corporation. Case, Case-IH, Farmall, International Harvester, New Holland and their logos are registered trademarks of CNH Global N.V.