Posted by Geo-TH,In on December 06, 2015 at 15:23:49 from (172.78.24.253):
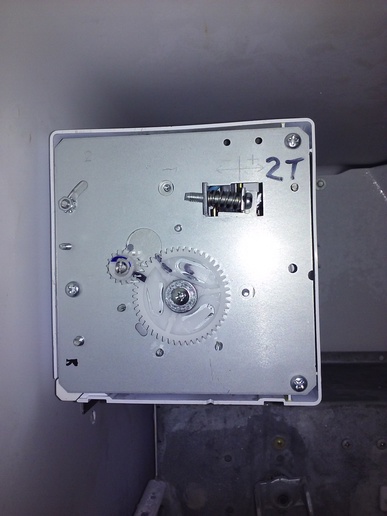
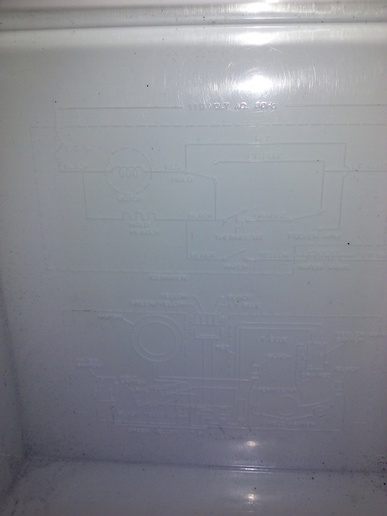
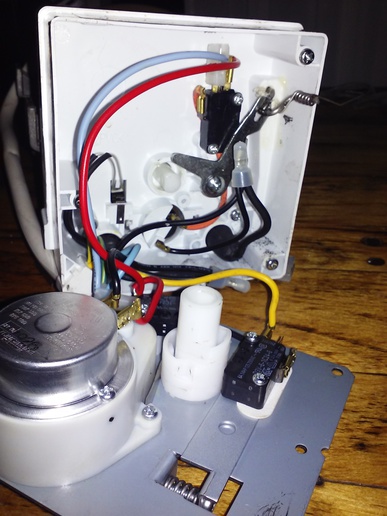
I learned many things that may be helpful to those who what the challenge of fixing their ice maker. First I discovered that on the backside of cover is a circuit diagram, without it I couldn't have fixed it. My ice maker wouldn't fill with water, it would spin like it was dumping but no ice. If I would poured water in the tray, it would make ice. I also learned if you put too much water in tray, the cubes will be fused together at the top. Nice to know when you adjust the water level on the ice maker. To do that there is a screw with a spring. In the first and third pic, you will see next to the screw 2T ( I goofed and posted pic twice.) I turned my screw 2 turns out towards the + direction. I removed the large plastic gear that turns the timing cam and also dumps the ice out of tray after a heating element thaws the tray. I slowly turned the cam while measuring the ohms between the black wire, power, and the yellow wire that sends power to the water solenoid that fills the ice maker. When the micro switch hit the right place on cam, power to be sent to solenoid. The crazy thing is, the power doesn't get to the solenoid directly, it first travels through the tray heating element, element is in series with solenoid.
My first post Keith suggested changing the water filter, which I did and the flow rate improved 3 times. Tim mentioned the light switch in freezer door. That's important too. While I was watching the ice maker go through it's cycle the first time, no water came out. I was watching it with the door open, lights on. It started making a second cycle because no water filled the tray. I took a glass and learned no water was coming out the door either. So I pushed the door switch in, light went out and when the large gear got to the correct place, WATER STARTED FLOWING.
So was it the filer or the water level adjustment or both? Not sure, just glad I figured it out. Thanks to all for your suggestiohns. I never like spending money on repairs. I have learn how things work and I feel like I went to school on ice makers today.
Upload one or more videos to your post. Photo filesizes should be less than 300K and Videos, less than 2MB. Formats allowed are gif, jpg, png, ogg, mp4, mov, and avi. Be sure to use filenames without spaces or special characters, and filetypes of 3 digits lower case.
We sell tractor parts! We have the parts you need to repair your tractor - the right parts. Our low prices and years of research make us your best choice when you need parts. Shop Online Today. [ About Us ]
Today's Featured Article - Tractor Operator Safety - Loader & Backhoe Operation - by Staff. Loader Operation Do not transport anyone in the loader bucket. Always carry the loader bucket low for maximum stability and visibility, whether the bucket is loaded or empty. Always use the recommended amount of counterweihting to ensure good stability. Be careful when handling large objects such as round bales, logs,
... [Read Article]
All Rights Reserved. Reproduction of any part of this website, including design and content, without written permission is strictly prohibited. Trade Marks and Trade Names contained and used in this Website are those of others, and are used in this Website in a descriptive sense to refer to the products of others. Use of this Web site constitutes acceptance of our User Agreement and Privacy Policy
TRADEMARK DISCLAIMER: Tradenames and Trademarks referred to within Yesterday's Tractor Co. products and within the Yesterday's Tractor Co. websites are the property of their respective trademark holders. None of these trademark holders are affiliated with Yesterday's Tractor Co., our products, or our website nor are we sponsored by them. John Deere and its logos are the registered trademarks of the John Deere Corporation. Agco, Agco Allis, White, Massey Ferguson and their logos are the registered trademarks of AGCO Corporation. Case, Case-IH, Farmall, International Harvester, New Holland and their logos are registered trademarks of CNH Global N.V.