Need Input on Welding a Loader

nrowles

Member
It has been a nightmare trying to get this loader on my tractor. I finally have everything mounted and working but the lift cylinders hit the tie rods when bring them all the way down. The easiest way I have come up with to get around this is to move the bottom of the loader cylinder to the outside of its straddle, as you can see in the picture below (I had to link the picture. For some reason I can't get it to post right). I don't have the bucket on so there is no load on the tractor. I went through full motion with the lift arms and mounting these to the outside of the straddle will work.

So my question is what is your input on the best way to make a new straddle? My buddy is out of town right now but he is going to help me when he gets back. He is the welder, but figured I would get some input first so I can make the best educated decision.

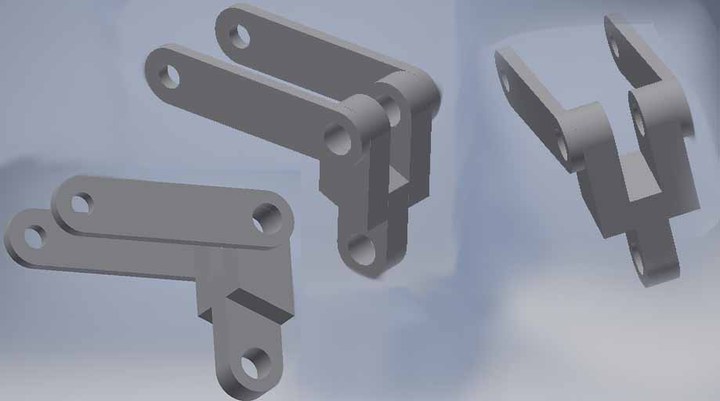
This was my idea. Get some angle iron. Weld it to the frame between the drain plug to the left and the cylinder pin to the right. Bring it out and angle to the right. Drill my hole for the pin. Put a piece of flat iron on the bottom and weld to the frame.

Does this seem like a good idea? Any other suggestions? Is it ok to weld to the frame since it holds the internal hydraulic fluid? Is 3/8" steel adequate? Am I missing anything?

 
I think you are gonna break something with it mounted like that.....and don't weld on
the boom reservoir, it could explode. If you moved the saddle higher on the frame,
would that work? Ben
 
Welding to the reservoir is going to put flakes of ash and burnt Hydraulic oil in the system. If taking the lift cylinder 3 or 4 inches higher, but in the same alignment as the original location between the mount plates, I would make an extension going upward and put straps around the back of the post. No welding to the post!. Another way is to relocate the post outward by the 2 inches it appears to need. We cannot see very much of the full situation to assess other possible solutions. If clearance is that tight, I would make sure my solution didn't twist on the post as your idea will do. Hitting the tierods is way bad, but you may be using the bucket lower than flat ground. Most loaders can dig at least 6 inches below flat. Jim
 
Short answer is NO!!!! Your moving the force away form the center line of the mount. It will have more bending force on it than it would when mounted centered. Over time you will twist the loader frame.

Put your bucket on and see if you can put stops on the cylinders so the loader does not go all the way down. IF not than you need to move the entire upright out and modify the mount going to the tractor. Your basic trouble is your loader is too narrow for your tractor. This is hard to do much with and still have a strong/safe loader.

Post a picture of your entire loader looking at it form the side and front. Maybe we can come up with another idea. Your moving the cylinder mounting clevis is not the best one.
 
What happens if you swap your cylinders side to side. The street el will now be on the outside. Does that cause another problem.
 
Well you guys are a breath of fresh air (sarcasm). This is why I asked. I have another thought posted at the end with more pictures. And yes, the front bumper is out of whack on this loader, it is over 50 yrs old. After reading this, please let me know your thoughts on my additional idea listed at the end and if Centash and Janicholson's idea is still a better/easier one. If so, how do you suggest strapping the new/extended straddle?

It seems the best idea so far is Centash and Janicholson's to extend the saddle upwards and STRAP to the loader frame. On the non-reservoir side, I assume I can weld to the frame?

Centash/Janicholson.......I have noted your idea to extend the current straddle upwards and STRAP to the reservoir. What type of STRAP do you recommend? Any others have input on this? Also, I cannot extend rear of loader frame outwards, I'm already maxed.

JD......I have thought about fabricating the front mounting so the frame sits a little wider, which would give me clearance on tie rods and also give me more room for the front hood and bonnett, which is going to be very tight. I wasn't sure if this would work though because I would have to put pressure on the frame to widen it which means it is not its natural stance. Also it seemed to be more difficult than my other idea (which has now been an afterthought).

Check Break.........I'm not sure I understand your question. I did move the cylinder to the outside on both top and bottom but that seemed way too "Wonky". That's why I tried to keep at least one end in its original straddle.

Another idea I had. Note this idea would require me to have a new hose made for each side, which is why I went the other route. Not a big deal but just an additional cost. In the first picture, what if I extended the bracket at top of cylinder and put the cylinder end where I have marked in Green? This will give me clearance on my tie rods well. Note: After typing this whole thing out, I like Centash/Janicholson's idea better as long as I can get it strapped good.

G6Y4gE6.jpg


IXblOm6.jpg


QcyRghG.jpg


FNTKStQ.jpg
 
Are you figuring for the wheels being turned too? As you turn the wheels the tierods will move out away from the engine.

With the cylinder mounted at the point marked in green you will have a little less lifting power than you do now. That's not necessarily a bad thing because it might keep you from doing damage to the tractor and loader.
 
(quoted from post at 06:02:32 10/26/16) Are you figuring for the wheels being turned too? As you turn the wheels the tierods will move out away from the engine.

With the cylinder mounted at the point marked in green you will have a little less lifting power than you do now. That's not necessarily a bad thing because it might keep you from doing damage to the tractor and loader.

Ah yes, This evening I will turn the wheel and see how the tie rod travel is.
 
I'd try sliding the front axle in one hole. By narrowing the front end you might get the clearance you need. I can see the tweak in the frame. I got that loader on a 601 Ford.
 
(quoted from post at 06:24:52 10/26/16) I'd try sliding the front axle in one hole. By narrowing the front end you might get the clearance you need. I can see the tweak in the frame. I got that loader on a 601 Ford.

I already have the axle in as far as I can. For one, I had to move the alternator down to make the loader fit and moving the tie rod/axle in would hit the alternator. Now that loader is on, I might be able to bring the alternator back up a bit, but not sure. Two, the way the bolt holes align, that would put the only two bolts supporting the axle right next to each other. I'd like to keep them spread out more with having a loader on. Just my opinion.
 
Whipped this concept up this AM with a solid modeling program (Inventor). A 3/4" grade 8 bolt through the strap holes, should be perfect. 3/8" strap.
have the other pieces plasma cut. then welded together as shown. A Hitachi alternator is smaller and wires the same as a Delco S=#2, L=#1 terminals.
Jim
a240925.jpg
 
(quoted from post at 07:19:06 10/26/16) Whipped this concept up this AM with a solid modeling program (Inventor). A 3/4" grade 8 bolt through the strap holes, should be perfect. 3/8" strap.
have the other pieces plasma cut. then welded together as shown. A Hitachi alternator is smaller and wires the same as a Delco S=#2, L=#1 terminals.
Jim
a240925.jpg

Wow that's fancy. Just so I am clear on this. In my picture below, the red circle would go in the existing straddle. The yellow is the new straddle. The red and yellow would get standard 3/4" pins. From yellow to white goes back the side of the frame (roughly 2 feet). The white gets a 3/4" grade 8 bolt. All pieces are welded together.

On the side that doesn't have the reservoir, do you think I can weld to the frame rather than going the strap method? If I can, that would seem to be easier, quicker, cheaper.

cqkCaYi.jpg
 
The assumptions are that the red and yellow holes are the size of the established straddle and cylinder holes.
The length of the straps would be adjusted to fit rearwards so the grade 8 bolt is tight against the reservoir. The opposite side could be welded on
with 4 inch straps and no bolt. 14231 is the part Number of the Hitachi alternator. Jim
 
[i:ec6cd4e102]Check Break.........I'm not sure I understand your question. I did move the cylinder to the outside on both top and bottom but that seemed way too "Wonky". That's why I tried to keep at least one end in its original straddle. [/i:ec6cd4e102]

Remove the right cylinder. Install it on the left side. Remove the left cylinder and install it on the right side.
 
(quoted from post at 08:06:48 10/26/16) The assumptions are that the red and yellow holes are the size of the established straddle and cylinder holes.
The length of the straps would be adjusted to fit rearwards so the grade 8 bolt is tight against the reservoir. The opposite side could be welded on
with 4 inch straps and no bolt. 14231 is the part Number of the Hitachi alternator. Jim

Very helpful. Thanks.
 
Unable to edit. After looking at your photos, it would be easier to rotate each lift cylinder 180 degrees than it would be to move them to the opposite side. Pull the bottom pin and rotate. The port will now be on the outside and from the looks of things the front axle will protect it.
 
(quoted from post at 13:21:24 10/26/16) Unable to edit. After looking at your photos, it would be easier to rotate each lift cylinder 180 degrees than it would be to move them to the opposite side. Pull the bottom pin and rotate. The port will now be on the outside and from the looks of things the front axle will protect it.

I'm not sure you are following my issue. Either that or I can't understand what you are trying to tell me.

The tie rods move outwards from the tractor as they go to the front. When lowering the loader arms, the lift cylinders themselves are lowering into the tie rods.

What do you think is in the way or what 2 things do you think are making contact?
 
My mistake. I was thinking the hydraulic hose and fitting at the base of the cylinder was hitting the tie rod and radius rod. I see now that your cylinder is hitting the tie rod and radius rod farther forward, closer to the front axle.
 
I appreciate all the help. I am at last resort. I have posted a new thought towards the end of this post. Unfortunately none of the ideas so far will work. I have spent HOURS and HOURS on this over the last couple days.

I can't move axle in because I had to relocate the alternator due to loader install and bringing the axle in the tie rod hits the alternator. I have nowhere else to go with the alternator and I can't see that one slightly smaller will help.

I can't widen the width of the entire loader. It is maxed.

I will explain this one since this is what we had in mind. I will try to not make it confusing. What many of us thought would work as far as moving the bottom straddle up will not work. To get clearance on the tie rod I would have to move the straddle up around 6-8 inches. In addition to really flattening the cylinder, it also compresses it too much and I wouldn't be able to get my bucket down far enough. Reason I would have to go 6-8 inches is because the cylinder is making contact on the inside of cylinder (see 1st picture for reference). So I don't get near inch-for-inch clearance on how much I raise it. I'm mostly just getting the clearance on the tie rod travel. Meaning if I raise the cylinder straddle 6", my contact point is let's say 3" back on the tie rod, only giving me maybe 1.5" of additional clearance which isn't near enough. And that doesn't account for clearance lost in steering.

This is really the only other thing I can come up with.

Let's start at the top. Everything is welded. Yellow square is 4x4 2" thick. The green line is 3/8". The white are holes. The black line around the holes is on the inside and is 3/8" for pin support. I am basically replicating the existing bracket, but on the side of the arm. I am going to use a heavy duty, tight fitting bolt and go through all 3 brackets to tie them all together.

For the bottom of the cylinder, I will drain the fluid because it needs fresh in anyways, and I will flush the reservoir a couple times with the drained fluid after done. The black line indicates where the main reservoir is welded on top of heavier tube frame. The yellow indicates heavy angle iron welded to the entire bottom, coming out a few inches from the side, and up a few inches. The 2 green lines are pieces of steel welded in to tie the angle iron to the side. The white dot is the drilled hole. Again using a heavy duty bolt to tie all mounting holes together.

Will this work, and if not, why?

FNTKStQ.jpg


Xxc0tqc.jpg


KYZpg7G.jpg
 
The guys suggesting move the front wheels in are on the right track. Many others have mounted those loaders on that tractor without modifications, forget about making a new straddle. If the only thing preventing moving the front wheels in is the modified alternator mount, I would search the Ford forum on this site for different ways to mounts the alternator, or temporarily go back to a generator. Moving the wheels in will also let you move the lower cylinder mount back to the correct position. Mounting the cylinder outside like that more than doubles the stress on the lower cylinder pins.
 
(quoted from post at 06:31:00 10/27/16) The guys suggesting move the front wheels in are on the right track. Many others have mounted those loaders on that tractor without modifications, forget about making a new straddle. If the only thing preventing moving the front wheels in is the modified alternator mount, I would search the Ford forum on this site for different ways to mounts the alternator, or temporarily go back to a generator. Moving the wheels in will also let you move the lower cylinder mount back to the correct position. Mounting the cylinder outside like that more than doubles the stress on the lower cylinder pins.

I would agree this is the way to go if I can get the alternator moved and keep the axle strong. I tried last night to move the alternator but I can't figure out how to get it out of the way. Can't go up, down, in, or out even with metal fabrication. Just no room. Maybe move it to the other side since no power steering pump?

One other thing that was preventing me from moving the axle in was I can only go one more adjustment and that puts my 2 axle bolts directly next to each other. It would seem to me you would want your axle bolts spread out as much as possible especially with a loader and this type of axle, but I could be wrong. Is it fine that way with the 2 axle bolts so close together? Drill a new hole so I can spread axle bolts out?

I am curious how that doubles the stress on the bottom pins with my last idea. If I am keeping my cylinders in line with new mounting and I'm creating a straddle around the cylinder hole, there is no difference on stress to the pin. I could see if I simply move the cylinder to the outside and stuck a pin through with no outside pin support fabricated. My idea has pin support on both sides of the cylinder mounting hole.
 
Edit........If I can get the alternator out of the way, I may be able to slide my axle in and keep my bolt holes further apart. Will be multiple adjustments in rather than just one.

I think I need to take a break from this for a few days. I'm losing it.
 

You should look into another style alternator. For your needs there are alternators that are much smaller in diameter and they will mount where the old generator did. This would be the easier thing to do over modifying the loader.

On narrowing your front axle. You should be able to do so and have the bolts further apart than right next to each other.
 
Update. I was able to move the axles in and keep the bolts further apart. Not sure what I was thinking.

Now my current alternator doesn't fit for sure even with fabrications. Anybody know the dimensions of the Hitachi 14231 alternator mentioned? Can't find them online.
 

We sell tractor parts! We have the parts you need to repair your tractor - the right parts. Our low prices and years of research make us your best choice when you need parts. Shop Online Today.

Back
Top