Nyquil Junkie
Member
I was going to call this thread "ran when parked" but... anyway... Here we go.
I got this 52ish 8N a while ago to do more or less one job, that is to turn compost and clean off the cows feeding station. Pretty simple straight line in-out up down work. It should do well.
But first, it needs some new parts and work to get it up to good working condition. I have gleened a great deal of knowledge from all you guys just reading, (I'm about 400 pages in...a long way to go) and so far you all have given me some great advice and tips. Thanks!
This old thing needs a whole new wiring job, it doesn't charge the battery, amp meter is dead, some of its been spliced and repaired and so, since it has to be an almost daily use tractor, I'm just going to make it as new as possible where possible. I have a new 12v conversion kit, even though it was already converted it probably isnt done right (it has a resistor it shouldn't, but it runs good... ) so.. all new stuff standing by. I removed all the plugs today, they came out pretty easy, all were evenly worn, and clean. As rusted as they were I was ready for a fight but.. nope.
Other than the rusty spark plugs, there is no rust on the engine. I got the hood off despite the loader. I don't plan on putting it back on its rusty and in my way so..I'll fabricate a more loader friendly hood.

I dropped the air filter cup, looks like clean oil and no gunk in the bottom. I'll see later if the upper cans mesh is good later. But this was good... someone was maintaining this old thing before it was parked out in the field I got it from.

The fuel tank inside is very clean, the bowl upper screen as you see... pretty spotless. The valve is stiff but it has a new cork ring and screen in it. Again, someone was maintaining it so it appears.

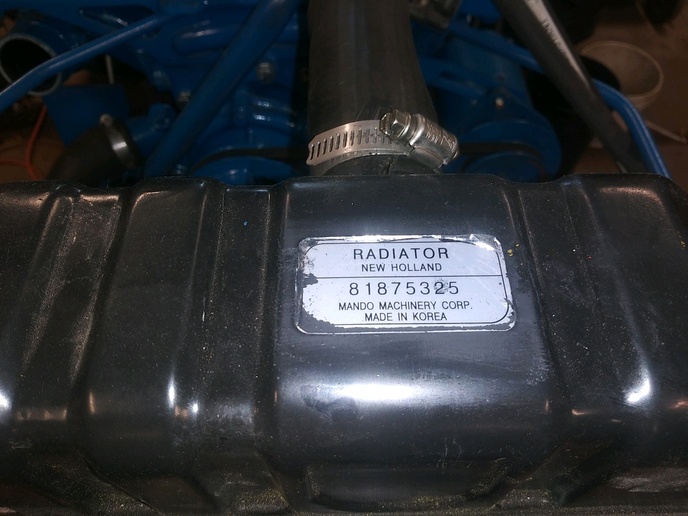
I discovered the origin of the new radiator... lol.

I drove it about 1000 feed down a driveway (a steep gravel one, that was fun...) and it pulled itself up on a trailer, and back off it and to its current parking spot. So... if it doesn't run or work right when I'm done, "it ran when parked" is what I'll tell myself along with "what did you put back together wrong?"
It needs the main sump drained and refilled, it has some water contamination in there from sitting. Needs an engine oil change, its kinda dirty on the stick. New oil filter, clean the filter tank out... new plugs and wires.. Not sure what type of wires is correct for the system so if you guys know, (im sure ya do) point me in the right direction.
Since it was running fine, I'm not touching the distributor or carb. It started easy, it pulled strong, the governor worked perfectly fine. With some luck this will be a painless repair and refit job.
I found this tractor sitting in some guys field, they were using it to grade the driveway a few times a yr. They put the wagner loader on it a few yrs ago to lift roofing material up to the roof on his house. So it has not been used as a loader its whole life, which I took as a good sign, its not beat up from yrs of doing that. They got it with the property yrs ago, and by the look of the land, all it could have been used for was mowing or grading.... it was a pretty hilly rough property.
The loader is a WM3 on the tag. The controller valve leaks, but only where the spool exits the case so... I'm hoping thats just an O ring or 2. The lift cylinder on the left leaks, but the gland nut is cranked in all the way so I assume the V packing is crushed down to nothing. The right cylinder is dry and the gland nut is backed out a good way, so, My guess is that packing is either new or in good shape, by the pipe wrench bites on it, I'm going to say someone recently repacked that one.
Does it lift? Who knows. It goes up and down, whines and bit, I'm sure its low on oil. I'm gonna drain and replace that too. The pump drips a little around the shaft, but I'll put a drip pan under it and take my chances... its an acceptable drip.
Along the way I'll run a compression test and snake my 2 lense bore scope into the cylinders and take some pics. I should be able to get a good view of the valves. Lets hope its all nice and clean in there.
If you guys spot me doing something stupid, please do point it out. I've never dug into an 8N before. Looks like a beautifully simple machine.
More to come as I dig deeper. So far it looks like a good one.
and it ran when parked... LOL
This post was edited by Nyquil Junkie on 09/10/2022 at 09:04 am.
I got this 52ish 8N a while ago to do more or less one job, that is to turn compost and clean off the cows feeding station. Pretty simple straight line in-out up down work. It should do well.
But first, it needs some new parts and work to get it up to good working condition. I have gleened a great deal of knowledge from all you guys just reading, (I'm about 400 pages in...a long way to go) and so far you all have given me some great advice and tips. Thanks!
This old thing needs a whole new wiring job, it doesn't charge the battery, amp meter is dead, some of its been spliced and repaired and so, since it has to be an almost daily use tractor, I'm just going to make it as new as possible where possible. I have a new 12v conversion kit, even though it was already converted it probably isnt done right (it has a resistor it shouldn't, but it runs good... ) so.. all new stuff standing by. I removed all the plugs today, they came out pretty easy, all were evenly worn, and clean. As rusted as they were I was ready for a fight but.. nope.
Other than the rusty spark plugs, there is no rust on the engine. I got the hood off despite the loader. I don't plan on putting it back on its rusty and in my way so..I'll fabricate a more loader friendly hood.
I dropped the air filter cup, looks like clean oil and no gunk in the bottom. I'll see later if the upper cans mesh is good later. But this was good... someone was maintaining this old thing before it was parked out in the field I got it from.
The fuel tank inside is very clean, the bowl upper screen as you see... pretty spotless. The valve is stiff but it has a new cork ring and screen in it. Again, someone was maintaining it so it appears.
I discovered the origin of the new radiator... lol.
I drove it about 1000 feed down a driveway (a steep gravel one, that was fun...) and it pulled itself up on a trailer, and back off it and to its current parking spot. So... if it doesn't run or work right when I'm done, "it ran when parked" is what I'll tell myself along with "what did you put back together wrong?"
It needs the main sump drained and refilled, it has some water contamination in there from sitting. Needs an engine oil change, its kinda dirty on the stick. New oil filter, clean the filter tank out... new plugs and wires.. Not sure what type of wires is correct for the system so if you guys know, (im sure ya do) point me in the right direction.
Since it was running fine, I'm not touching the distributor or carb. It started easy, it pulled strong, the governor worked perfectly fine. With some luck this will be a painless repair and refit job.
I found this tractor sitting in some guys field, they were using it to grade the driveway a few times a yr. They put the wagner loader on it a few yrs ago to lift roofing material up to the roof on his house. So it has not been used as a loader its whole life, which I took as a good sign, its not beat up from yrs of doing that. They got it with the property yrs ago, and by the look of the land, all it could have been used for was mowing or grading.... it was a pretty hilly rough property.
The loader is a WM3 on the tag. The controller valve leaks, but only where the spool exits the case so... I'm hoping thats just an O ring or 2. The lift cylinder on the left leaks, but the gland nut is cranked in all the way so I assume the V packing is crushed down to nothing. The right cylinder is dry and the gland nut is backed out a good way, so, My guess is that packing is either new or in good shape, by the pipe wrench bites on it, I'm going to say someone recently repacked that one.
Does it lift? Who knows. It goes up and down, whines and bit, I'm sure its low on oil. I'm gonna drain and replace that too. The pump drips a little around the shaft, but I'll put a drip pan under it and take my chances... its an acceptable drip.
Along the way I'll run a compression test and snake my 2 lense bore scope into the cylinders and take some pics. I should be able to get a good view of the valves. Lets hope its all nice and clean in there.
If you guys spot me doing something stupid, please do point it out. I've never dug into an 8N before. Looks like a beautifully simple machine.
More to come as I dig deeper. So far it looks like a good one.
and it ran when parked... LOL
This post was edited by Nyquil Junkie on 09/10/2022 at 09:04 am.