Bob's Front Mount External Coil conversion

Hobo,NC

Well-known Member
Location
Sanford, NC
Bob does this get a passing grade...


mvphoto31811.jpg


mvphoto31812.jpg


mvphoto31813.jpg


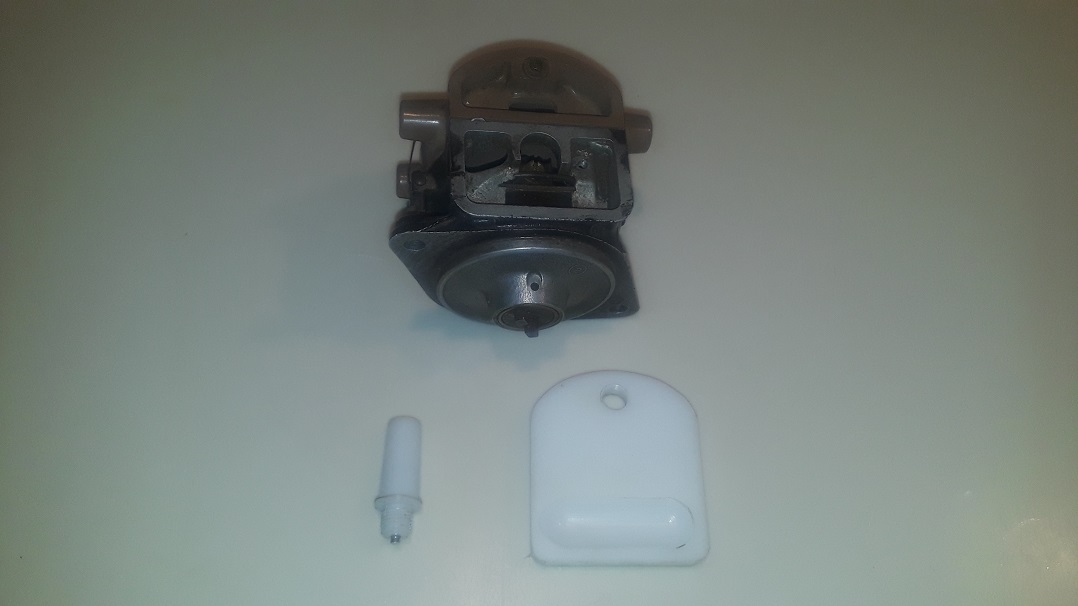
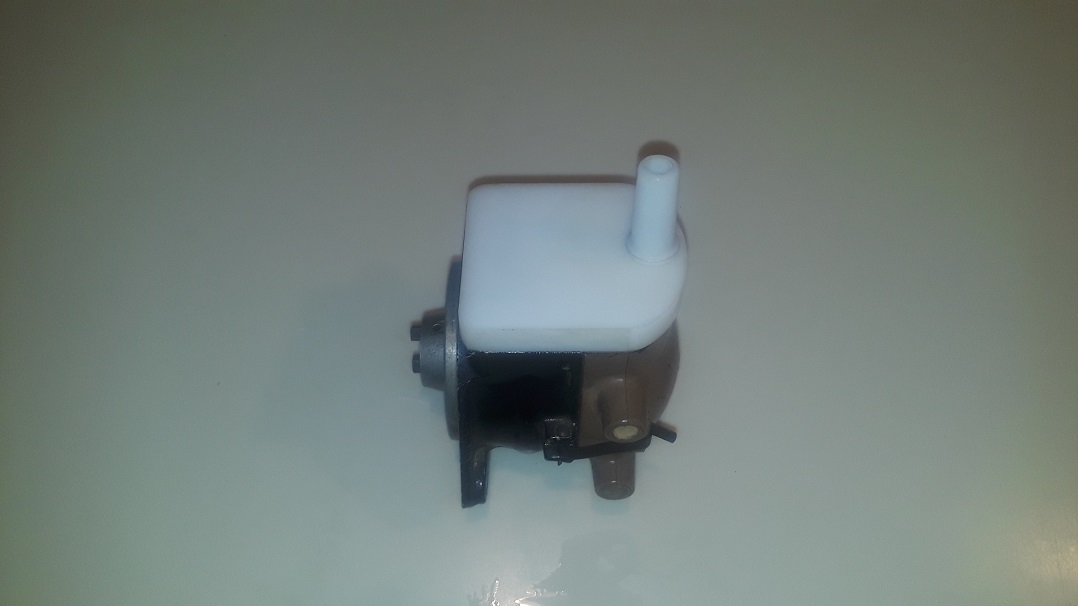
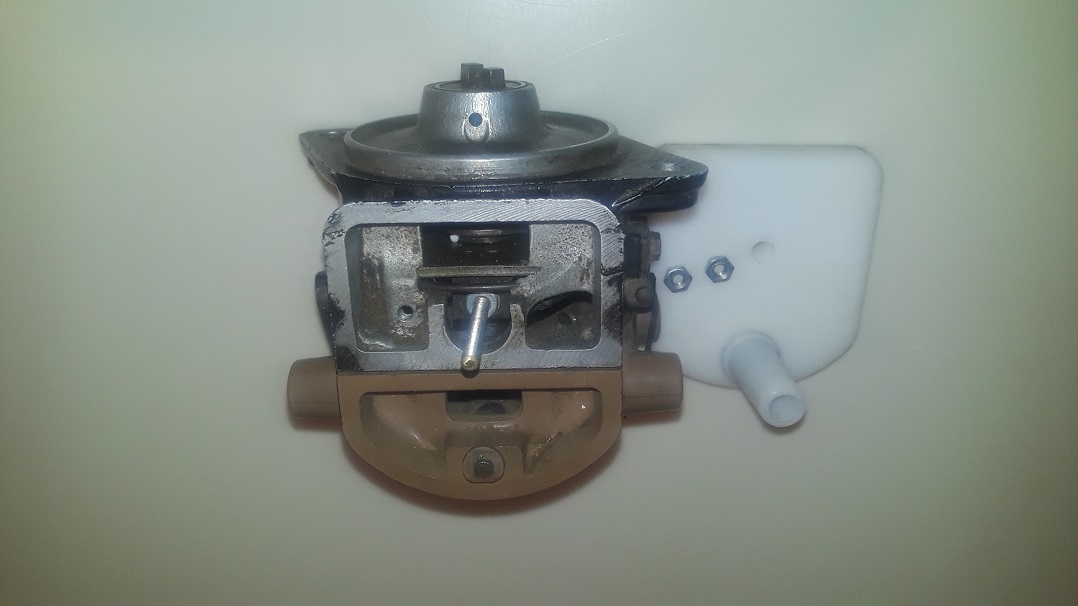
I kept waiting for a used cap to fall in my lap could not wait any longer so cut up a good 8N side mount cap for the coil tower... I had about a hour to 1-1/2 in my first one... I have about 6/7 layers of fiberglass on it my thinking was to add a little support to the coil tower...


https://forums.yesterdaystractors.com/viewtopic.php?t=737609&highlight=improved
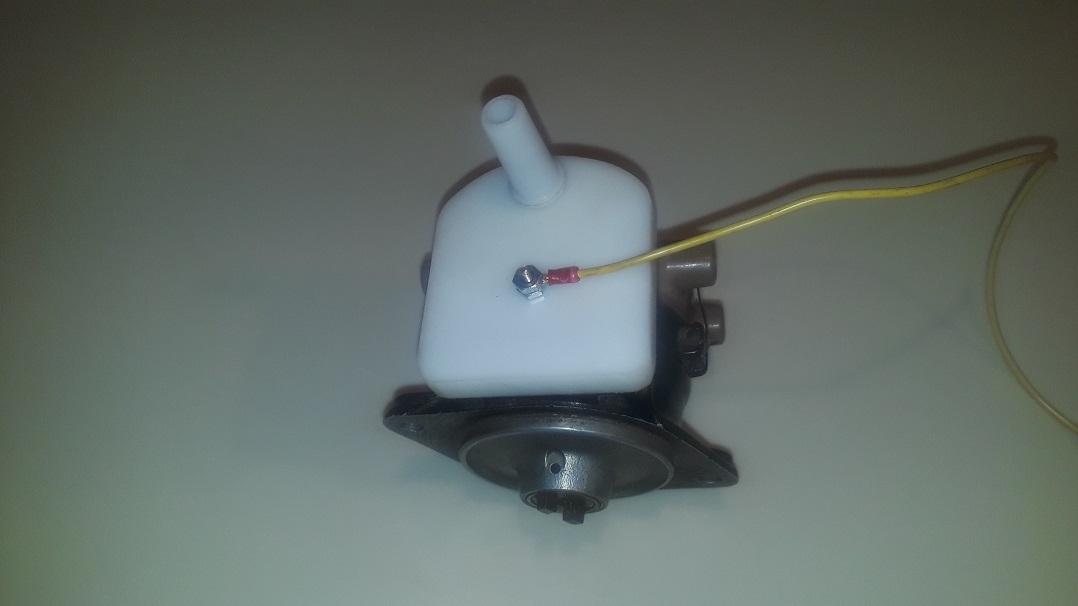
 
It looks good Hobo,Good Job.Strange as I was thinking about making one also just yesterday,similar to that but with a flat piece of 1/8" fiberglass and extend it to the rear to cover the top of the distributor.With room for a thin flat cork gasket after the condenser is removed.With a water proof condenser mounted to the round can coil bracket,Then make a new wire bail to hold it tight against the gasket.
 
NICE job!

Wonder hoe big of an order it would take for a reliable outfit to make a "run" of caps like that?
 

All I have on hand now is Belden carbon core wire and coil tower boots will have to dig thru my stash for some end clips... Do you have any suggestions on where to buy coil wire parts...

Thanks
 
(quoted from post at 07:16:39 02/24/19)
All I have on hand now is Belden carbon core wire and coil tower boots will have to dig thru my stash for some end clips... Do you have any suggestions on where to buy coil wire parts...

Thanks

Napa should have all the wire and copper bits you need. I see on ebay you can get a distributor cap for .99cents and rob the center contact out of it. To bad you can't make a cover that allows the condenser to stay in its original spot, nice and protected.
 

I have some scrap 1/2" aluminum plate and a mill so I recon I can make a cap to go over the condenser I just never thought about dat... Good idea...

I have the napa numbers they are not what I want/like... I want crimp on ends I rounded up 4 from my stash for now...
 

Coil wire parts and terminal crimper... I do like that crimper :) BTW when you strip the coil wire use a wire stripper use the 10 ga hole do not use the crimper and a razor blade that part shucks...


mvphoto32057.jpg


mvphoto32059.jpg


Gonna add another way to go... Male post for the cap...


mvphoto32061.jpg
 
(quoted from post at 01:39:06 02/24/19) NICE job!

Wonder hoe big of an order it would take for a reliable outfit to make a "run" of caps like that?

I'm pricing 50 units out as I type.
  • [*:7cf74eda9a]CNC cut acetal top covers - 50 @ 6.00 each = $300[*:7cf74eda9a]Sacrificial Honda distributor caps (Standard Ignition) for coil towers - 50 @ $4.00 each = $200[*:7cf74eda9a]New front mount distributor caps - 50 @ $8.00 - $400[*:7cf74eda9a]Miscellaneous hardware and shipping charges - $50[/list:eek::7cf74eda9a]Looks like $950 or a bit more for materials. Add ~$20 each for labor and you get a unit price of $35-$40.

    TOH
 
(quoted from post at 18:33:01 07/04/19)
(quoted from post at 01:39:06 02/24/19) NICE job!

Wonder hoe big of an order it would take for a reliable outfit to make a "run" of caps like that?

I'm pricing 50 units out as I type.
  • [*:79753daffb]CNC cut acetal top covers - 50 @ 6.00 each = $300[*:79753daffb]Sacrificial Honda distributor caps (Standard Ignition) for coil towers - 50 @ $4.00 each = $200[*:79753daffb]New front mount distributor caps - 50 @ $8.00 - $400[*:79753daffb]Miscellaneous hardware and shipping charges - $50[/list:eek::79753daffb]Looks like $950 or a bit more for materials. Add ~$20 each for labor and you get a unit price of $35-$40.

    TOH
 
(quoted from post at 21:05:25 07/04/19)
(quoted from post at 18:33:01 07/04/19)
(quoted from post at 01:39:06 02/24/19) NICE job!

Wonder hoe big of an order it would take for a reliable outfit to make a "run" of caps like that?

I'm pricing 50 units out as I type.
  • [*:e7068c91a1]CNC cut acetal top covers - 50 @ 6.00 each = $300[*:e7068c91a1]Sacrificial Honda distributor caps (Standard Ignition) for coil towers - 50 @ $4.00 each = $200[*:e7068c91a1]New front mount distributor caps - 50 @ $8.00 - $400[*:e7068c91a1]Miscellaneous hardware and shipping charges - $50[/list:eek::e7068c91a1]Looks like $950 or a bit more for materials. Add ~$20 each for labor and you get a unit price of $35-$40.

    TOH
  • im Ponn has had that rendering out there for years. Doesn't look real promising that it will come to fruition any time soon. :(
 
(quoted from post at 21:24:47 07/04/19)
(quoted from post at 21:05:25 07/04/19)
(quoted from post at 18:33:01 07/04/19)
(quoted from post at 01:39:06 02/24/19) NICE job!

Wonder hoe big of an order it would take for a reliable outfit to make a "run" of caps like that?

I'm pricing 50 units out as I type.
  • [*:52ce347ee4]CNC cut acetal top covers - 50 @ 6.00 each = $300[*:52ce347ee4]Sacrificial Honda distributor caps (Standard Ignition) for coil towers - 50 @ $4.00 each = $200[*:52ce347ee4]New front mount distributor caps - 50 @ $8.00 - $400[*:52ce347ee4]Miscellaneous hardware and shipping charges - $50[/list:eek::52ce347ee4]Looks like $950 or a bit more for materials. Add ~$20 each for labor and you get a unit price of $35-$40.

    TOH
  • im Ponn has had that rendering out there for years. Doesn't look real promising that it will come to fruition any time soon. :(


  • These will get made in as yet to be determined quantities.

    TOH
 

I charged $80 for my conversion parts (cap, block off plate and coil wire) and $300 labor for the installation of the EI and associated parts... The hard part is drilling, tapping for the block off plate I did not have my ducks in order and used what screws I had on hand.. I sealed it with RTV its not going anywhere....

It should have a 100% margin...

My hot tip is to ease the instillation of the block off plate for the guy that is not well tooled for the job. I am sure you can figure that out...

It is a winner :wink:
 
(quoted from post at 21:58:13 07/04/19) Should sell just fine.

Hope so - hate to have to eat the startup cost. If that happened and TOOH found out I'd probably have to spend that much again on some bling to calm the domestic waters :roll:

TOH
 
(quoted from post at 21:43:20 07/04/19)
(quoted from post at 21:58:13 07/04/19) Should sell just fine.

Hope so - hate to have to eat the startup cost. If that happened and TOOH found out I'd probably have to spend that much again on some bling to calm the domestic waters :roll:

TOH

Hey if you need some upfront $ I'll commit and pay for 1 @ $50 now.

Kevin
 
(quoted from post at 18:42:39 07/05/19)
(quoted from post at 21:43:20 07/04/19)
(quoted from post at 21:58:13 07/04/19) Should sell just fine.

Hope so - hate to have to eat the startup cost. If that happened and TOOH found out I'd probably have to spend that much again on some bling to calm the domestic waters :roll:

TOH

Hey if you need some upfront $ I'll commit and pay for 1 @ $50 now.

Kevin

Thank you Kevin but I was just being a smart a$$. I am really busy right now and dont need a new project but I am trying out s new CNC shop so this fits in quite nicely. If things go as planned I will have a few of these to test out in 2-3 weeks and you can be the first Guinea pig. You looking to stay with points or are you going EI as well?

TOH
 

I have a relationship with a small CNC shop if you are interested in a quote... He's home based and has it going on :)...
 
(quoted from post at 17:56:10 07/05/19)
(quoted from post at 18:42:39 07/05/19)
(quoted from post at 21:43:20 07/04/19)
(quoted from post at 21:58:13 07/04/19) Should sell just fine.

Hope so - hate to have to eat the startup cost. If that happened and TOOH found out I'd probably have to spend that much again on some bling to calm the domestic waters :roll:

TOH

Hey if you need some upfront $ I'll commit and pay for 1 @ $50 now.

Kevin

Thank you Kevin but I was just being a smart a$$. I am really busy right now and dont need a new project but I am trying out s new CNC shop so this fits in quite nicely. If things go as planned I will have a few of these to test out in 2-3 weeks and you can be the first Guinea pig. You looking to stay with points or are you going EI as well?

TOH

I built an EI set up with a Ford 2.3 reluctor and Pickup going back to an HEI module

y4md1u1ldUR8kJY87zJosUiUOqdMgoEB5l_sb0XYb9XuMuCwlENUXmBdGjPztaMpNAZRsbX9IDviS1Bl-8RGtQ_fkbaAcUjiM_WQdMqQX2ctC0GxB2i4drps0YF-oe-jX045NmGb7gd1kt7cy6QiCwoOIpIt6RJquHnQAiA5kfOe5pD2W-5fxnFOZj9t3IEerWovzh5ZaHMNN54mg0OOUC_0Q
y4mnWRNsYm8njtLHd-3lACyLAHo7-ueaHyDwv54EHfwTRolf6o9cY3JifxT83DE3H7lIPKXgcHMoNtsfqVaTfTKfIpNbrEST2UCIGq-HJy0pbSeJysPIOa1H2RSErAiVzNwMLy3nAZe5MtTzBVq6k0-HRa_A7TJt0LDCeD1i9bT3IOYa-jExjD7qTrNCGDkKU-qyOXnjACZnQ20WRZt1FkhIQ
 
I'm pricing 50 units out as I type.
  • [*:f489fde869]CNC cut acetal top covers - 50 @ 6.00 each = $300[*:f489fde869]Sacrificial Honda distributor caps (Standard Ignition) for coil towers - 50 @ $4.00 each = $200[*:f489fde869]New front mount distributor caps - 50 @ $8.00 - $400[*:f489fde869]Miscellaneous hardware and shipping charges - $50[/list:eek::f489fde869]Looks like $950 or a bit more for materials. Add ~$20 each for labor and you get a unit price of $35-$40.

    TOH


  • I have a guy at work that is into the 3D printing . I do not know what kind of resins they have on the market or how well they hold up to heat .

    I remember years ago someone was going to make a mold for a cap that would block off the top of the distributor and hold the new round coil .

    The thing I liked about the square coil gutted conversion is you did not need to modify the distributor cap so if you ever replaced it you did not need to fabricate a new one , just use a standard part and cork gasket. The standard bail held the gutted coil . More of a plug and play set up .
 
(quoted from post at 10:32:06 07/07/19)

I'm pricing 50 units out as I type.
  • [*:7fa0b0004b]CNC cut acetal top covers - 50 @ 6.00 each = $300[*:7fa0b0004b]Sacrificial Honda distributor caps (Standard Ignition) for coil towers - 50 @ $4.00 each = $200[*:7fa0b0004b]New front mount distributor caps - 50 @ $8.00 - $400[*:7fa0b0004b]Miscellaneous hardware and shipping charges - $50[/list:eek::7fa0b0004b]Looks like $950 or a bit more for materials. Add ~$20 each for labor and you get a unit price of $35-$40.

    TOH


  • I have a guy at work that is into the 3D printing . I do not know what kind of resins they have on the market or how well they hold up to heat .

    I remember years ago someone was going to make a mold for a cap that would block off the top of the distributor and hold the new round coil .

    The thing I liked about the square coil gutted conversion is you did not need to modify the distributor cap so if you ever replaced it you did not need to fabricate a new one , just use a standard part and cork gasket. The standard bail held the gutted coil . More of a plug and play set up .


  • As far as my project goes details like that are very much in flux. You dont need to keep the old coil to accomplish your ends and I have been giving both those ideas considerable thought. It all comes down to price. How much would you be willing to pay for a 100% plug and play conversion cover?

    At this point I haven't settled on the specifics of how this gets done but it won't be a dead copy of what Hobo or Bob did so I am open to any and all suggestions.

    Using an unmodified distributor cap is high on my list but complicates the addition of the coil tower to the cover. On the other hand It also eliminates the time and cost of the cap modification. Using the OEM bail to secure the cover simply requires a spacer which is just a small amount of additional work and material. The cover should also fit over the condensor so it can be used with an unmodified contact breaker ignition as well as EI. Installation of the conversion should be as simple as replacing the OEM cap and coil. All of those possibilities will be evaluated as soon as I settle on material and get a small supply of the basic cover on hand to experiment with.

    TOH
 
(quoted from post at 21:21:46 07/07/19) It would be interesting to see what these people could with the OEM cap with a tower fiber-glassed to it to mold from. Or a a hollowed out coil with a tower added.


http://www.antiquedistributorcaps.com/Custom_Cap_Inquiry.htm


Kevin

I doubt they could beat this for price or performance. This is my "proof of design" cover made from some Delrin (acetal) sheet/rod and a few bits of common OTS hardware. The HT tower screws into the top cover. The tower has an aluminum sleeve and simple spring loaded contact point in it that makes the HT connection to the OEM cap in the same fashion as the OEM coil so there is no need for modifying the cap. The backside of the cover is also relieved to clear the condensor so it can remain in the distributor if you are staying with contact breaker points. All that remains is to add a provision for the primary connection and a means of clamping it down. Right now I am considering three options for the clamping system:
  • [*:72fe98e891]Add a spacer to the cover and use the OEM bail[*:72fe98e891]Replace the screw that holds the primary connection to the points with a stud and bring it up through the top of the cover as a terminal connection point for the primary lead. The external nut on that connection would then do double duty and clamp the cover to the distributor.[*:72fe98e891] Add a couple slotted tabs to the sides and use self threading screws in the holes for the bail to clamp them to the body.[/list:eek::72fe98e891]Right now I am leaning towards #2 because it is easy and does both jobs but I am open to suggestions.

    There are a few other details to work out but nothing major. I made this one by hand but I will be ordering a batch of the top covers from a CNC shop along with matching rubber or rubber impregnated cork gaskets "real soon now". I just need to verify all of the geometry is right before finalizing the drawing.

    Kudos to Bob and Hobo - this is is way easier than gutting a coil.

    TOH

    CoilConversion1.jpg


    CoilConversion2.jpg


    CoilConversion3.jpg
 
(quoted from post at 15:14:25 07/11/19)

All that remains is to add a provision for the primary connection and a means of clamping it down. Right now I am considering three options for the clamping system:
  • [*:a6a4ce19ef]Add a spacer to the cover and use the OEM bail[*:a6a4ce19ef]Replace the screw that holds the primary connection to the points with a stud and bring it up through the top of the cover as a terminal connection point for the primary lead. The external nut on that connection would then do double duty and clamp the cover to the distributor.[*:a6a4ce19ef] Add a couple slotted tabs to the sides and use self threading screws in the holes for the bail to clamp them to the body.[/list:eek::a6a4ce19ef]Right now I am leaning towards #2 because it is easy and does both jobs but I am open to suggestions.


  • I made an executive decision and went with an 8-32 stud and three nuts as a combination primary terminal/cover clamp. Clamps the cover nice and tight and with the addition of a quality gasket should outperform the OEM bail and cork gasket.

    Everything looks good so I am going to put the approved stamp on the drawing and get some quotes for the Delrin pieces. Wonder if someone can supply it in Ford red ;-)

    TOH

    CoilConversion4.jpg


    CoilConversion5.jpg
 

#2) I don't like attaching the cover to the points post, how are you going to set the timing ?... I doubt it going to make much difference but the points plate is locked down and takes the option away for us that can set the timing with a light...

I would keep it so the dist cap can be removed if the dist needs to come off the engine... I would knock the upper vent out of the dist body and run the primary wire out to the coil...


mvphoto39227.jpg


mvphoto39228.jpg
 

I hadn't bothered to read any of this thread till now but just read the whole thing.
You guys are great and those are some very clever mods to upgrade those old coils.
But what I really like best is being able to talk about this stuff here without starting a major chit storm.
It only took about 20 years for That to happen.
But genius will out.
It always does in the end.
 
(quoted from post at 20:52:47 07/11/19)
#2) I don't like attaching the cover to the points post, how are you going to set the timing ?... I doubt it going to make much difference but the points plate is locked down and takes the option away for us that can set the timing with a light...

I would keep it so the dist cap can be removed if the dist needs to come off the engine... I would knock the upper vent out of the dist body and run the primary wire out to the coil...

Timing was/is my biggest concern with #2. You can still set the timing but you need to bend the stud slightly if you move the adjustment way off center. I was going to have a short slot cut rather than the hole I drilled to minimize the need for the bend.

You can still remove the cap and/or the cover - both were hard requirements from the git-go. Another is no drilling or other modifications to the cap or body of the distributor. Setting the timing with a timing light was not on my radar How do you do that with the distributor on the tractor or is that a trade secret ;-)

I considered using the condensor hold down screw rather than the primary post on the distributor. I'll have another look at that.

Keep the comments coming - I'd like to get it right the first time.....

TOH
 

You have to Locate TDC then make are mark a indicator at the front crank pulley... THEN have a timing light that will work with 6/12V that does not pick up interference from those useless aggravating copper core plug wires...

Its just a matter of loosening the hold down screw for the points plate timing adjuster and moving it with a long screwdriver... I have done this with the tractor running...

Conversions like this are giving you the options to get deep into timing, dwell ETC :) All these things to nail perfect operation of the front mount dist. to lessen the agitation its a win win even if you don't go the extra mile are tool up for it the option is there :)
 
(quoted from post at 07:46:11 07/12/19)
You have to Locate TDC then make are mark a indicator at the front crank pulley... THEN have a timing light that will work with 6/12V that does not pick up interference from those useless aggravating copper core plug wires...

Its just a matter of loosening the hold down screw for the points plate timing adjuster and moving it with a long screwdriver... I have done this with the tractor running...

Conversions like this are giving you the options to get deep into timing, dwell ETC :) All these things to nail perfect operation of the front mount dist. to lessen the agitation its a win win even if you don't go the extra mile are tool up for it the option is there :)

OK - your points (no pun intended) are well taken and I will revisit the idea of using some sort of bail as the hold down. Naturally my brain says the OEM design can be improved :roll: Also going to add some tabs on the sides to create a lip and keep the cover and gasket from moving sideways.

TOH
 
(quoted from post at 10:42:33 07/12/19)
(quoted from post at 07:46:11 07/12/19)
You have to Locate TDC then make are mark a indicator at the front crank pulley... THEN have a timing light that will work with 6/12V that does not pick up interference from those useless aggravating copper core plug wires...

Its just a matter of loosening the hold down screw for the points plate timing adjuster and moving it with a long screwdriver... I have done this with the tractor running...

Conversions like this are giving you the options to get deep into timing, dwell ETC :) All these things to nail perfect operation of the front mount dist. to lessen the agitation its a win win even if you don't go the extra mile are tool up for it the option is there :)

OK - your points (no pun intended) are well taken and I will revisit the idea of using some sort of bail as the hold down. Naturally my brain says the OEM design can be improved :roll: Also going to add some tabs on the sides to create a lip and keep the cover and gasket from moving sideways.

TOH
rom 2007 experiments:

4UxpIGD.jpg


:)

9zixZAy.jpg

:)
 
TOH,Also going to add some tabs on the sides to create a lip and keep the cover and gasket from moving sideways.
Good idea,I like that addition.
IDEA
How about two more clips just like the ones that hold the cap on to hold the cover down.on each side drilled and screwed into the distributor housing,with a notch cut in the cover on each side to fit the clips so they snap in to hold the cover down.easy on easy off.With a good gasket it would be pretty much water tight.
Then a wire through a hole drilled in the side of the housing with a rubber grommet,from the points to the round coil,leaving the vent in place for ventilation to help with moisture accumulation.

Anothe idea on the hold down would be a bail like a sediment bowl bail with the thumb screw to hold the cover in place.But I like the clips the best.


Then a wire from the points through a hole drilled in the housing side,with a rubber grommet to the round coil,and rimming can be adjusted.
 
(quoted from post at 15:03:33 07/12/19)
Anothe idea on the hold down would be a bail like a sediment bowl bail with the thumb screw to hold the cover in place.

You are reading my mind - that is [b:8a54c5697a]exactly[/b:8a54c5697a] the improvement I had in mind on my last post. Easy and inexpensive to make - don't know why it took so long to materialize in my old brain. I want to see some real clamping force.

TOH
 
Guys, Great work!

I stumbled on this string from a couple of months ago and couldn't stop reading. Wow!

That string is now saved as a favorite and I'll be keeping tract of it from now on.

Keep us up-to-date on what you've been doing with this great idea. You know - if Henry had 'a thought of it, he'd 'a used it. - Joe -
 
Hi I was wondering where you got that last piece or how you made it . It s the last picture .Thank you very much
Scott
mvphoto103664.jpg


This post was edited by Workman87 on 03/22/2023 at 04:08 pm.
 

We sell tractor parts! We have the parts you need to repair your tractor - the right parts. Our low prices and years of research make us your best choice when you need parts. Shop Online Today.

Back
Top