Generating system confusion

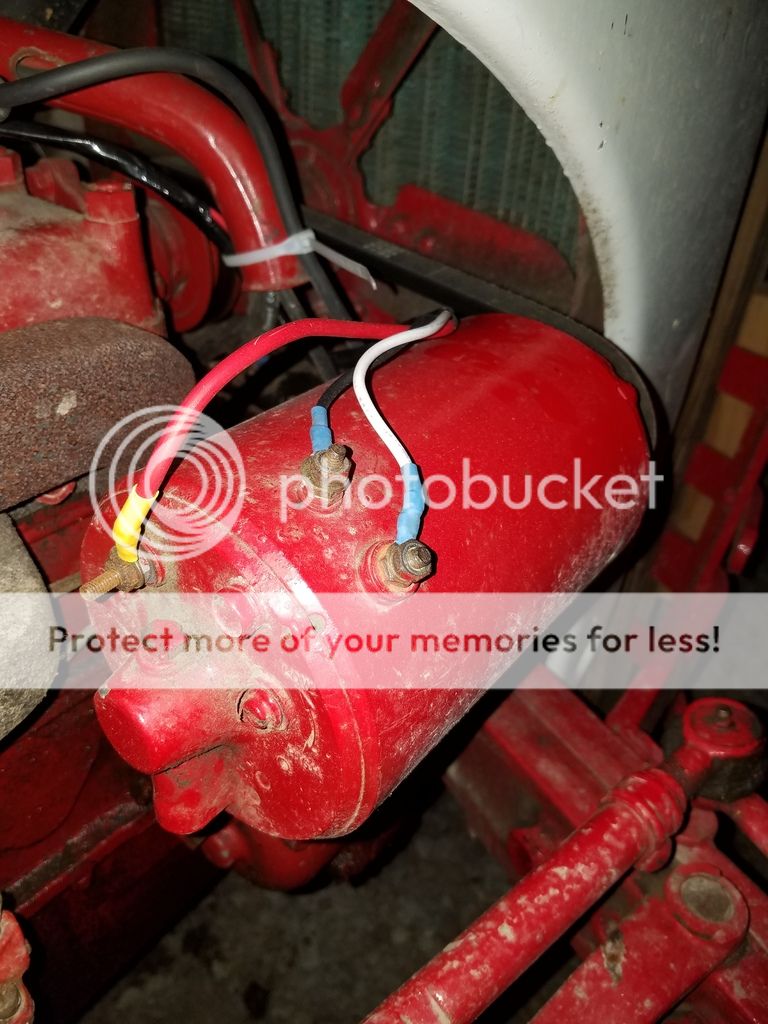
I have a 6v positive ground front mount 47 8N with what I believe is an adjustable 3rd brush generator. I have it wired according to the JMOR pictogram for 8N prior to S/N 263844 using a voltage regulator for an early 8N w/front dissy #8N10505B.

I'm confused now because according to the FO-4 manual I should be using a cut out relay #BONN10505A for my serial number (20740) instead of a VR.

Is the cut out an outdated part or is my system wrong? Photos of my generator are attached.
20181006_205346.jpg
 
someone has likely installed later generator on it. Three gen terminals means VR, not cut out.
 
You have the correct generator and VR for the early 8N. You are reading the part list for the 8N wiring diagram in the F-04 manual, page 119 in my version, for the front-mount units to s/n 8N-263844. They say 'CUTOUT' but look at the picture and their #2 -it is a voltage regulator, not the cutout. Look on pages 48 & 49 at the 8N wiring schematic and diagram. It shows the VR and is listed correctly. You have the correct setup for your early 8N. The round can cutout, p/n 9N-10505-B was used beginning in early 1940 with the 9N-10000-B generator, at and after s/n 9N-12500. The Generator was a 1-wire/3-brush unit and had a 3rd Brush adjustment on the back panel. This setup was used on all 9N/2N production til the end. No 8N model ever used the cutout. The 8N used a new generator, 8N-10000, a 3-Wire/3-Brush unit, A circuit Design, at 11.5 AMPS with the new 8N-10505 Voltage Regulator. In April, 1950, at s/n 8N-263844, the side distributor was released, the generator moved to the LH side and was now a 3-Wire/2-Brush unit at 20 AMPs output. The VR also was changed to the 'B' unit. By the way, 3rd Brush gennys proved to be slight failures. The 3rd brush was meant to be increased when the lights were used so undercharging wasn't obtained. When lights were not in use, it was to be reduced back to the LOW setting. If the setting was left on HI, it would cause overcharging the battery. With the early 8N's, there was a Service Bulletin issued with instructions on how to convert a 3-Brush to a 2-Brush unit. So some units could still have the 3rd Brush adjustment screw on the back , but the internal wiring got changed for only a 2-Brush unit. You would have to look inside to see the config. The I&T F-04 manual has a test procedure to set the genny for correct output. I'd leave it to those settings and never muck with the 3rd Brush screw at all. If your wiring follows these diagrams. then you are correct. Also, if you are not experiencing any charging issues, the AMMETER reads about 3-10 amps when charging, and a slight NEG discharge or a ZERO reading when the lights are ON, you are good.


CfuUUP3h.jpg

rxNF128h.jpg

lz8RwfQh.jpg


Tim *PloughNman* Daley(MI)
 
(quoted from post at 07:39:59 10/08/18) You have the correct generator and VR for the early 8N. You are reading the part list for the 8N wiring diagram in the F-04 manual, page 119 in my version, for the front-mount units to s/n 8N-263844. They say 'CUTOUT' but look at the picture and their #2 -it is a voltage regulator, not the cutout. Look on pages 48 & 49 at the 8N wiring schematic and diagram. It shows the VR and is listed correctly. You have the correct setup for your early 8N. The round can cutout, p/n 9N-10505-B was used beginning in early 1940 with the 9N-10000-B generator, at and after s/n 9N-12500. The Generator was a 1-wire/3-brush unit and had a 3rd Brush adjustment on the back panel. This setup was used on all 9N/2N production til the end. No 8N model ever used the cutout. The 8N used a new generator, 8N-10000, a 3-Wire/3-Brush unit, A circuit Design, at 11.5 AMPS with the new 8N-10505 Voltage Regulator. In April, 1950, at s/n 8N-263844, the side distributor was released, the generator moved to the LH side and was now a 3-Wire/2-Brush unit at 20 AMPs output. The VR also was changed to the 'B' unit. By the way, 3rd Brush gennys proved to be slight failures. The 3rd brush was meant to be increased when the lights were used so undercharging wasn't obtained. When lights were not in use, it was to be reduced back to the LOW setting. If the setting was left on HI, it would cause overcharging the battery. With the early 8N's, there was a Service Bulletin issued with instructions on how to convert a 3-Brush to a 2-Brush unit. So some units could still have the 3rd Brush adjustment screw on the back , but the internal wiring got changed for only a 2-Brush unit. You would have to look inside to see the config. The I&T F-04 manual has a test procedure to set the genny for correct output. I'd leave it to those settings and never muck with the 3rd Brush screw at all. If your wiring follows these diagrams. then you are correct. Also, if you are not experiencing any charging issues, the AMMETER reads about 3-10 amps when charging, and a slight NEG discharge or a ZERO reading when the lights are ON, you are good.


<center><img src="https://i.imgur.com/CfuUUP3h.jpg"></center>

<center><img src="https://i.imgur.com/rxNF128h.jpg"></center>

<center><img src="https://i.imgur.com/lz8RwfQh.jpg"></center>


Tim *PloughNman* Daley(MI)
Great info, thanks! The funny thing is, my tractor doesn't have any lights. There aren't even cutouts, holes, or any sort of provisions for them.
 
Nothing funny about no lights. Lighting kits were always optional dealer supplied accessories, never installed at the Ford Highland Park factory (8N/NAA) or the earlier 9N/2N at the Rouge Plant. Headlights only became OEM with the Hundred Series models. The 8N Ford doglegs should have two punch-outs for headlight mounting. If not, you may have earlier 9N/2N doglegs. One more important detail on the 8N Generator to know. They used a belt tensioning arm, p/n 8N-10145, that bolts to the mounting bracket on an short semi-circular arc slot and the other end on the timing cover. If you don't have generator belt tension, it will slip and loosen itself up and thus you won't have charging. If you don't have one, I have a supply.

Tim *PloughNman* Daley(MI)
 

We sell tractor parts! We have the parts you need to repair your tractor - the right parts. Our low prices and years of research make us your best choice when you need parts. Shop Online Today.

Back
Top