
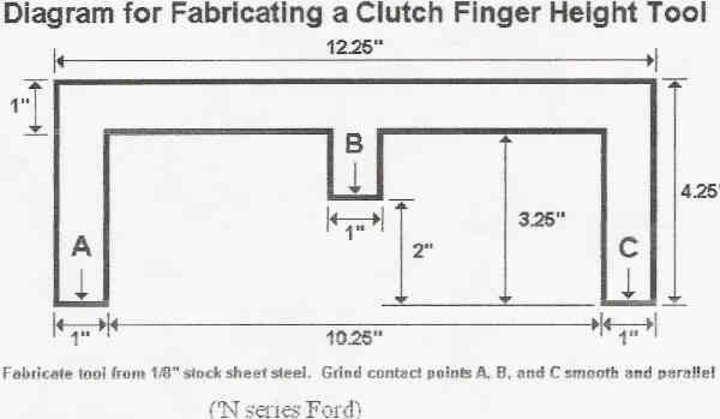
I couldn’t find any info on adjusting the fingers and my F-04 manual didn’t have much on It. I bought it all from here and the measurement with the pressure plate flush to the flywheel is 1 7/8ths. The only way to get 2 inches is to loosen the pressure plate. Not sure if that’s the correct way. Any help is appreciated!
You are using an out of date browser. It may not display this or other websites correctly.
You should upgrade or use an alternative browser.
You should upgrade or use an alternative browser.
- Thread starter mcglockin
- Start date
That’s the only way I found to get them to come out further. Loosening the bolt on top of the finger only dropped it further in.(quoted from post at 17:11:12 03/24/18) NOT sure what all you've got going on but loosening the pressure plate mounting bolts is NOT part of the finger height adjusting procedure.
Hobo,NC
Well-known Member
- Location
- Sanford, NC
Make sure the pressure plate is being pulled completely down by the bolts... Its possible the shoulder of the bolt is bottoming out before the cover completely mates to the flywheel..
How about a pix of the flywheel fingers...
(quoted from post at 19:12:04 03/24/18)
Make sure the pressure plate is being pulled completely down by the bolts... Its possible the shoulder of the bolt is bottoming out before the cover completely mates to the flywheel..
How about a pix of the flywheel fingers...
I will get one tomorrow. I’m just not sure how to actually adjust it. The bolt on top of the finger is all the way right. When I loosen it it the finger just flops down.
Bill M. From Illinois
Member
I don't recall any adjustment when I changed mine out, just torqued down all the bolts in sequence steps.
Dollar Bill
Member
Does your pressure plate have adjustment bolts at the end of the lever? If not, the lever height is only adjustable by changing the thickness of the pressure plate friction surface or the thickness of the clutch plate.


(quoted from post at 09:37:51 03/25/18) wITH EVERYTHING Installed you should feel free travel as per FO-4. If not you have a linkage problem or way out of adjustment.
So Feeling free travel is correct then? Because it’s free travel the whole length of the pedal movement. I replaced the springs, and bearing, as well as all the pedal linkage parts.
Sooo the only way to know if it all works is by putting it totally back together and running it?
Hobo,NC
Well-known Member
- Location
- Sanford, NC
(quoted from post at 08:15:00 03/25/18)(quoted from post at 19:12:04 03/24/18)
Make sure the pressure plate is being pulled completely down by the bolts... Its possible the shoulder of the bolt is bottoming out before the cover completely mates to the flywheel..
How about a pix of the flywheel fingers...
I will get one tomorrow. I’m just not sure how to actually adjust it. The bolt on top of the finger is all the way right. When I loosen it it the finger just flops down.
I hope you can put that bolt back were you found it cuzz I don't know what it does... Slide the tractor back together install a few bell housing bolts... Put the left floor board on adjust clutch does it release... One way to tell engauge the PTO press clutch does the PTO release EZ...
Adjusting the clutch is one of the most miss understood adjustments, very few here know how to do it correctly those that don't just belch out how the book tells you to do it... Out in the real world the book is WRONG...
It leaves out you need remove the adjuster pin and conform free play at the leaver at the adjustment you chose.. Its harder to explain on a tractor with this set up because every thing is mounted solid.

(quoted from post at 11:40:36 03/25/18)(quoted from post at 08:15:00 03/25/18)(quoted from post at 19:12:04 03/24/18)
Make sure the pressure plate is being pulled completely down by the bolts... Its possible the shoulder of the bolt is bottoming out before the cover completely mates to the flywheel..
How about a pix of the flywheel fingers...
I will get one tomorrow. I’m just not sure how to actually adjust it. The bolt on top of the finger is all the way right. When I loosen it it the finger just flops down.
I hope you can put that bolt back were you found it cuzz I don't know what it does... Slide the tractor back together install a few bell housing bolts... Put the left floor board on adjust clutch does it release... One way to tell engauge the PTO press clutch does the PTO release EZ...
Adjusting the clutch is one of the most miss understood adjustments, very few here know how to do it correctly those that don't just belch out how the book tells you to do it... Out in the real world the book is WRONG...
It leaves out you need remove the adjuster pin and conform free play at the leaver at the adjustment you chose.. Its harder to explain on a tractor with this set up because every thing is mounted solid.
Thanks Hobo, I can understand about the free play. But my problem was when Assembled When I pushed the pedal down I never felt it hit the P/P fingers. Even all the way adjusted as right as it could go. The only time I felt it was when I took the foot plate off and pressed through it. All the linkage is new.
Hobo,NC
Well-known Member
- Location
- Sanford, NC
(quoted from post at 02:03:15 03/26/18)
I don't see how the book could be any clearer!
Clutch free travel should be checked at the leaver not the pedal... On any mechanical linkage set up you go to the last connection at the release lever and check for free play that's the clearance that counts... Free play at the pedal is a starting point it does not mean the clutch free play is correct! You could have by the book correct pedal free play and NONE at the release leave you will destroy the release bearing...
Free play is the clearance between the release bearing and clutch fingers a good mechanic will adjust the clutch and leave some free play at the pedal then go to the release lever and confirm clearance (free-play) at the release leaver that is connected directly to the release bearing.... Its going to be in the neighborhood of 1/8" on yer ford tractor...
Dollar Bill
Member
When depressing the clutch pedal, you should feel 3/4-1" of no resistance then increased resistance when the release bearing contacts the pressure plate levers. If you cannot feel an increase in resistance after 3/4-1" of free travel, there is a problem.Because it’s free travel the whole length of the pedal movement.
Can you photograph the installed release bearing?
Just for grins - Place a straight edge across the face of the bell housing and measure the distance to the release bearing. Then measure the distance from the engine block to the installed height of the pressure plate levers and compare those two numbers.
Or, pull the steering box and view the release bearing to pressure plate arrangement as shown below.

Clutch Pedal Depressed
Dollar Bill
Member
[i:9975f7d839]'Place a straight edge across the face of the [u:9975f7d839]bell housing[/u:9975f7d839] and measure the distance to the release bearing. Then measure the distance from the [u:9975f7d839]engine block[/u:9975f7d839] to the installed height of the pressure plate levers and compare those two numbers. '[/i:9975f7d839]
I read your previous post regarding P/P lever height. Since you report that you have free play for the entire distance of pedal travel, I was curious as to the [u:9975f7d839]installed[/u:9975f7d839] distance between the P/P levers and release bearing.
I read your previous post regarding P/P lever height. Since you report that you have free play for the entire distance of pedal travel, I was curious as to the [u:9975f7d839]installed[/u:9975f7d839] distance between the P/P levers and release bearing.
I got it back together and still nothing. Adjusted it as far as I could go and took the floor board off and it barely contacted it. Didn’t contact it enough to free the pto. I’m going to take the steering box off this weekend and look at it. I’m learning patience with this project.


Hobo,NC
Well-known Member
- Location
- Sanford, NC
Are you absolutely positive the release fork is hatched to the cross shaft solid... I would set out to prove the fork is not moving on the cross shaft....
(quoted from post at 11:59:08 03/30/18)
Are you absolutely positive the release fork is hatched to the cross shaft solid... I would set out to prove the fork is not moving on the cross shaft....
I will check it, it looked like it was moving with it. But maybe it’s cracked or that pin is broken.
Dollar Bill
Member
Does the re!ease bearing move proportionally with pressing the clutch pedal?
There appears to be too much clearance between release bearing and pressure plate levers when clutch is released.
Have you compared new parts to old ones?
There appears to be too much clearance between release bearing and pressure plate levers when clutch is released.
Have you compared new parts to old ones?
Hobo,NC
Well-known Member
- Location
- Sanford, NC
Never had the pin in the fork to cross shaft shear but have read its happen a few times in the past...
Clean the fork were it fits around the cross shaft then mark it... You are going to have to wedge a couple screwdrivers are something between the fork fingers and release bearing to take up the clearance between the bearing and clutch cover fingers... Operate it and check your mark...
Happy Easter everyone! I got a little time this afternoon to work on the ol’ 8n. I used the technique Hobo talked about in determining the fork status. The fork is not moving on the shaft at all.
When I wedged some wood between the fork and the throw out bearing, and diesengaged the clutch I was able to spin the PTO freely while it was engaged. So this still leaves me stumped.
I heated and slightly bent the cleave on the linkage a little farther downward. With the linkage adjusted to the max I am now able to disenegage the clutch slightly but with a lot of dragging.
I would really like to fix the problem that is causing this. I’m wondering I purchased a defective part somewhere along the way. The part of the input shaft that the T/O bearing slides on is about an 1/8inch away from the clutch. So I believe I have the right P/P plate and all.
The thickness of the old T/O bearing to the new is the same. I am about to build up the front of the fork to make up for the difference but I’d really like to fix the issue.
Thanks again everyone for all the input thus far!! I wouldn’t have made it this far without it!
Thinking on this further, I never checked my flywheel thickness. I guess it’s a possibility that with the new clutch and the older flywheel (of unknown thickness) that could be causing my fingers to go in slightly further.
The bolts on the pressure plate weren’t too hard to get started, but maybe I could put a washer behind the pressure plate bolts or some sort of shim....
Has anyone ever heard of anyone doing this?
The bolts on the pressure plate weren’t too hard to get started, but maybe I could put a washer behind the pressure plate bolts or some sort of shim....
Has anyone ever heard of anyone doing this?
Well I made up for the 1/8inch by shimming the pressure plate. I have a bunch of adjustment now and it contacts it perfectly. I took it all apart again today and measured all the parts to make sure Hey we’re the same size.
The fingers were 1 7/8ths from the flywheel so I shimmer it to get it 2 inches. It’s been working so far.
The fingers were 1 7/8ths from the flywheel so I shimmer it to get it 2 inches. It’s been working so far.
Hobo,NC
Well-known Member
- Location
- Sanford, NC
No way I would shim the pressure plate but its your tractor hope it works out for ya,,, I would have tried another clutch set and maybe made a spacer to move the release bearing out 1/8"....
I got the whole assembly from here. I took it all out yesterday and measured and the old clutch is the same thickness as the new and the pressure plate was the same as well. I was talking to a guy at the local shop and he suggested the same thing with the wrong size clutch. But everything matched the old. You’ve got me second guessing my pressure plate shim now haha.
I had the same problem when I replaced the clutch on mine. Split it two more times to see what the problem was. Nuttin' Honey. Pure luck when I found this:
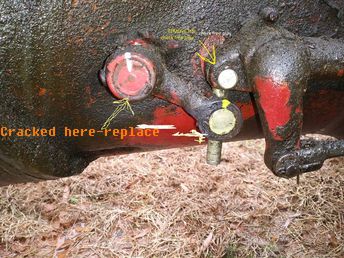
Replaced that part and all was good. Was told it was a quite common occurrence caused primarily by a lot of bush hogging.
Noah W
Replaced that part and all was good. Was told it was a quite common occurrence caused primarily by a lot of bush hogging.
Noah W
(quoted from post at 12:38:40 04/03/18) I had the same problem when I replaced the clutch on mine. Split it two more times to see what the problem was. Nuttin' Honey. Pure luck when I found this:
Replaced that part and all was good. Was told it was a quite common occurrence caused primarily by a lot of bush hogging.
Noah W
I replaced that in the very beginning. I wish it was that!
Hobo,NC
Well-known Member
- Location
- Sanford, NC
Its rare to find a spec on clutch finger height you N has one maybe you should have stopped there and found out why it was not in spec... About the only other thing I can think of is the cross shaft and bushings are worn... Don't matter tho at this point I spec you will run it and life will be good...
Why I would not shim it is I charge well for my time if it had a problem and the next guy ask who'da ell shimmed the clutch cover I don't want my name to become part of that conversation...
Its just not a acceptable repair to the issue I bet I would never get away with it... I have replaced hundreds of clutch sets I have had 3/4 that ate my lunch out of those 1 never was right even tho I about wore it out trying to find the issue... Maybe I should have shimmed it :twisted: between the crank and flywheel... :idea:
(quoted from post at 18:33:41 04/03/18)
Its rare to find a spec on clutch finger height you N has one maybe you should have stopped there and found out why it was not in spec... About the only other thing I can think of is the cross shaft and bushings are worn... Don't matter tho at this point I spec you will run it and life will be good...
Why I would not shim it is I charge well for my time if it had a problem and the next guy ask who'da ell shimmed the clutch cover I don't want my name to become part of that conversation...
Its just not a acceptable repair to the issue I bet I would never get away with it... I have replaced hundreds of clutch sets I have had 3/4 that ate my lunch out of those 1 never was right even tho I about wore it out trying to find the issue... Maybe I should have shimmed it :twisted: between the crank and flywheel... :idea:
I totally understand! I would love to find the exact reason why it’s not working. And if I had someone work on mine and got it back and it was shimmed I would probably be ------. Due to the time crunch I’m going to try it. Once I get spring under control around here I may take it apart again and look more into it.
I’ve gotten pretty good at splitting it now!!
Similar threads
- Replies
- 12
- Views
- 207
- Replies
- 8
- Views
- 357
We sell tractor parts! We have the parts you need to repair your tractor - the right parts. Our low prices and years of research make us your best choice when you need parts. Shop Online Today.
Copyright © 1997-2024 Yesterday's Tractor Co.
All Rights Reserved. Reproduction of any part of this website, including design and content, without written permission is strictly prohibited. Trade Marks and Trade Names contained and used in this Website are those of others, and are used in this Website in a descriptive sense to refer to the products of others. Use of this Web site constitutes acceptance of our User Agreement and Privacy Policy TRADEMARK DISCLAIMER: Tradenames and Trademarks referred to within Yesterday's Tractor Co. products and within the Yesterday's Tractor Co. websites are the property of their respective trademark holders. None of these trademark holders are affiliated with Yesterday's Tractor Co., our products, or our website nor are we sponsored by them. John Deere and its logos are the registered trademarks of the John Deere Corporation. Agco, Agco Allis, White, Massey Ferguson and their logos are the registered trademarks of AGCO Corporation. Case, Case-IH, Farmall, International Harvester, New Holland and their logos are registered trademarks of CNH Global N.V.
Yesterday's Tractors - Antique Tractor Headquarters
Website Accessibility Policy