51 B Clutch

[email protected]

Well-known Member
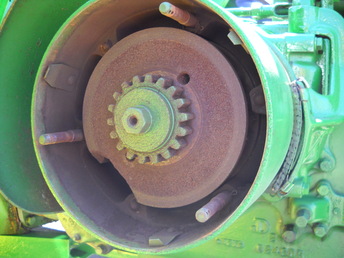
I have the service manual for my project tractor, BUT... Its not super clear on diagram and direction from what I see to what I would like to know. The clutch driver appears to have only a splined shaft with a locking bolt on the end, is there anything else that needs to be removed other than the obvious? There is no other dogs or pins anywhere that I am not seeing is there. I am trying to get a good idea on the entire project before I go ripping into something. I have the friction disk and that is the main reason that I want to get into it. 57 years and never a clutch, its time.
 
No, nothing surprising. Just remove the three castellated nuts, pressure plates and keep removing discs until you get back to the driver. Sometimes the drive discs are difficult to get off the T bolts, but they will eventually come off with enough prying and penetrating oil.

It's now time to pull the driver.... Remove the bolt on the end of the crank, then pull the driver. The driver will need a puller made from a piece of flat metal and two bolts to get it pulled off the crank. Tension it up good and tight then give the puller a good solid wack with a fat dead blow hammer. It is a tapered spline and may be a little difficult to pull off.

As for it being the original clutch... It's without a doubt not the original disks. They would have fallen apart years ago. That is unless it's been sitting in a barn unused for the last 45 years, and in that case it would have all bonded together in rust.
 
I took off the inspection plate already and the castle nuts were actually easy to remove. The outer pressure plate came off pretty easy. I looked at the friction disk and there is no doubt in my mind that they are original, this tractor has been in a barn for nearly 30 years without operation. The disk that are in there look more like asbestos compared to the replacements. The originals remind me of a cheesecloth in the way that they have deteriorated over the years. I went all the way in to the driver and stopped pulling parts off so I could reassemble what I had and park it for the day. The service manual shows their metal puller, but didn't say anything about other items needing removed. Looks pretty straight forward, just wanted a second opinion and thoughts if I missed something. Thank you!
 
I found my vibration while I was in here too. May not be much fun getting the old one off to get the new one on.
r5083.jpg
 
You are to use those 1/2" through holes along with 1/2" bolts 4" or so long to push that driver off of the crank after removing the end cap screw and washer. It's a built-in puller. Might want to clean the threads first.
 
I'd go ahead and pull the pulley off the tractor too. This way you can clean and grease the toggles and repack the clutch roller bearing. Remove the 3 operating bolts and clean those up good too along with the hole they go through.

To remove the pulley , once you have the clutch all apart and the driver off the crank unbolt the clutch fork shaft/bearing assy. from the front side of the reduction cover. Pull this out and then the pulley will slide off the crank.
 
yeah if you look in the OM, it shows the home made plate puller method because the holes are blind, but when you read the I&T manual, it lets on that you can push it off like FIT says. The I&T is a bit misleading. That one looks like someone tried to pull it with a 2 jaw gear puller and broke that piece out. woodvue
 
at the risk of making fit and woodveu mad here too, your supose to remove the bolt and washer and then put the bolt back in and do any pulling with a puller against this bolt and not the end of the crank. see you jd service manual. to remove mine i had a puller with a hole in the middle with a bolt and jam nut on it and both ends had slots in a bar that the two bolts go through to screw into the drive. it looked like a tall skinny letter "H", where the bolt with the jam nut goes through the center bar of the "H" and the two bolts go through the legs of the "H". after applying a bunch of torque and it not coming off i just barely heated the drive with my torch, like 3 or 4 seconds and it just jumped right off.
 
(quoted from post at 23:13:48 04/12/09) I found my vibration while I was in here too. May not be much fun getting the old one off to get the new one on.
r5083.jpg

Dave, mine looked just like yours after I followed the manual that said to put the bolts back in the tapped holes and push it off. After twisting off a 1/2" Grade 8 bolt, I tried the 2 jaw puller (that's when it became the version that you have.

Then, did as others have said, hit it with a rosebud, put the 2 jaw back on it and whacked it with a hammer. Popped right off.

Also, Johns48 was right on the money. Take the bolt off at the end of the crank, remove the washer, then put it back in the hole so you don't bugger up the threads on the crank.
 
I made one like the service manual shows. I also have an extra bolt to fit into the threads so I don't take a chance of messing up my original with marks. Should be an easy job from the looks of the outside.
 

We sell tractor parts! We have the parts you need to repair your tractor - the right parts. Our low prices and years of research make us your best choice when you need parts. Shop Online Today.

Back
Top