TW 35 oil pressure switch/sensor wiring

Tony Wells

New User
I have a TW-35 Ford, built in Belgium, tractor in the shop. It is equipped with the electronic dash. Somehow, over the years, some electrical issues have cropped up and someone switched to a Murphy gauge setup, but now, I get all the warning lights and audible alarms when running. Additionally, the fuel cutoff solenoid must be jumped to a 12 V to even run. The harness and four main interconnecting plugs are all clean and still have factory dielectric gel in them so not really suspecting them (yet). The machine will start and operate normally but for all the warnings.

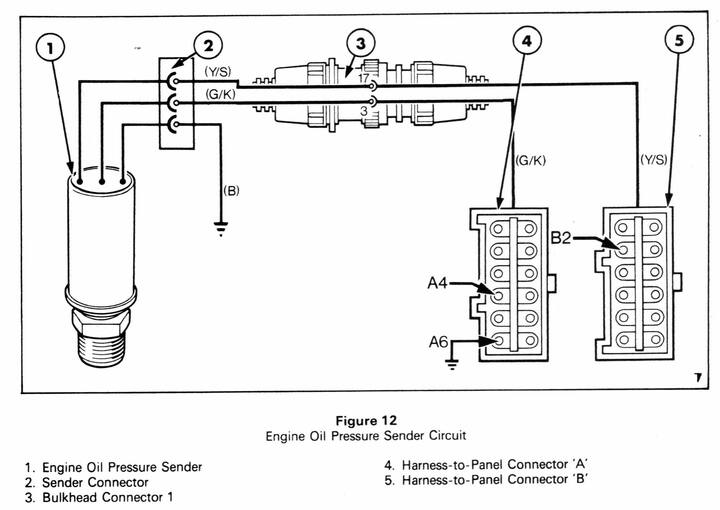
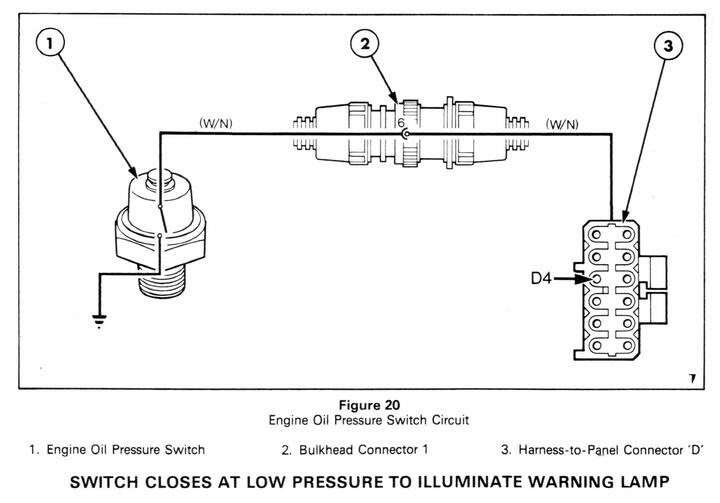
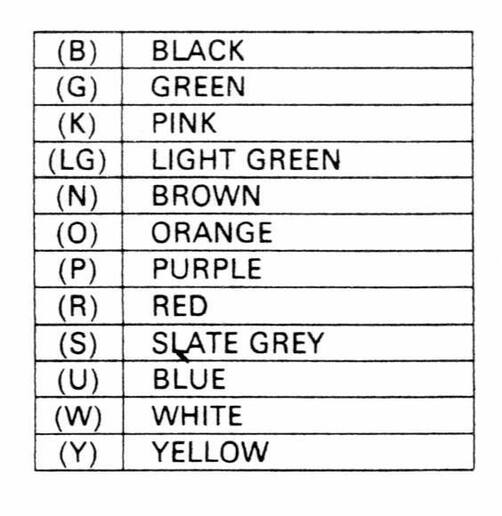
There is a lot of wiring that has crispy insulation. Ford/New Holland must have chosen incorrect insulation material. It has not aged well, even though this is a 1997 model. I really would like a full schematic, but that's a long shot I imagine. At this point, my focus is on the oil pressure switch/sending unit. The manual from the dealer is only a Clymer (Haynes), and does not have much detail regarding wiring specifics. Some of the crispy insulation has resulted in wires breaking (plus some questionable repairs). It has been painted, so I had to get back in the loom a ways to get the colors of the wires to the sending unit. The book I have shows separate switches for the light and the actual gauge. This machine however, doesn't seem to have the forward mounted switch. The main sending unit is a 3 wire, but the bundle coming towards it has 4 wires. The patchwork repairs have left the colors at the sending unit a bit mysterious. About all I can be sure of is that one is red, but the harness leading to it has no red wires. I suspect there may have been a translation at a connector, which has been done away with in favor of twisted wires and tape. With 2 wires fatigued and broken, I'm a bit lost to reconnect it, and see if it is even good. It has no short to ground, but I think one wire should be grounded when not running, thus turning on the warning light. The other wire I believe is the actual gauge wire, but I'm not sure.

Can anyone shed some light on this? This tractor has no SN plate, at least where it is supposed to be, so I cannot provide that, but the engine part number and serial I do have.

Engine PN: FNH9673623 DS
Eng SN: 6522308
Build date 10-28-97

A schematic would be ideal, but an explanation of the 4 wires on a 3 wire sending unit would go a long way.

Many thanks in advance!


Tony Wells (First post)
 
The attached image for the oil pressure sensor should help. As for the 4th wire in that bundle, I think it might go to the oil pressure switch. To confirm, if you touch that wire to ground, it should light up the oil pressure light on the dash.

Getting the complete wiring diagram is not a long shot, it just requires money. The factory service manual, available from New Holland, would have that info. I have it on pdf. It's about 150MB in size.

By the way, your tractor cannot be a 1997 model. TW35s with the electronic dash were produced from 1985ish to 1989.


cvphoto72222.jpg
 
Thank you Bern. That should help. The wires exiting the sender have been painted, so I'll have to clean them up to match the harness. I don't see the separate switch on this engine. BTW, the date I gave was on the engine tag. The tractor proper doesn't seem to have a tag that I can find. Per the less than complete manual I have (Clymer) it should be on the frame, right hand side, just behind the radiator side cover. Nothing there, or evidence it was ever there. I wish they would just stamp it in the frame.

Thank you again, and I'll let you know if I get it sorted out. I'm thinking that there is a problem with that sender, and that's why someone has put the Murphy system in. I need to take that out and restore it to factory condition, using the electronic dash. I may leave the plain oil gauge, as it has no bearing on the electrical system.
 
The oil pressure switch should be on the LH side of the block behind the oil cooler assy.

The tractor serial number and date code are stamped on the top horizontal face of the rear axle housing, just behind the 3-point lift cover. Post back with the numbers and someone here can interpret them for you.

The Murphy was put in because at some point in the past someone used it for unattended PTO work and wanted some protection for it. There was not an option from the factory for a shutdown system, since it used a mechanical fuel shutoff cable.

By chance do you live in the Pacific Northwest? If so, that tractor you have may be the one I put a Murphy on.
 
I tried to post, but apparently the auto-censor doesn't like what I wrote, so I deleted all text and had simply pictures uploaded. It still rejected my post. I'll try a single picture.

That was rejected as well. Here's a post with no pics.
 
Here is the original text, less any pictures. I know that some fora disallow new users posting pictures, so perhaps that's the reason.

Original text:

No Bern, this is northeast Texas. I don't know the history of the machine, but I'm pretty sure it is from this region. I was able to locate the serial number stamped into the machine. It is:
MC618M
7L17B
A91915

PIC WAS HERE

I think I located the oil pressure switch as well. The building I am working in is not well lit, so some of this is hard to see. It's caked in dirt too. My wire colors may be off also, due to poor lighting as well as age. I'm working mostly with a flashlight at this point in the close areas.


PIC WAS HERE

In that pic, there is a tee with what I assume to be water temp sensors, but don't know why there are two, or for sure that is what is factory. Loose wire on the right side sensor/switch. A better picture of that:

PIC WAS HERE

I asked about it's previous life, and it was used to run an irrigation pump unattended, so you are probably correct.

The reason for this work is not only to remove the Murphy system, but because there are problems with the electronic dash, or some sensor is throwing it in alarm mode. After starting the machine, all the warning lights come on as well as the audio warning beeper. I get normal readings on voltage, RPM, etc. I am finding lots of splices, lots of bare spots on wires where the insulation has fallen or been burned off.

On the 4 wires dropping into the vicinity of the oil sending unit, I have what appears to be:

G/W (stripe could be faded pink I suppose but looks white)
Y (no stripe)
B
W/N

In the above pic of the water temp sensor, the wire goes into wrapping and is a smaller gauge than one of the four listed above (W/N). It's also painted, so I cannot tell what color it is. The connector there is a poor fit and does not look correct. It is also a very loose sliding fit over the connector on the sensor/switch.

I note also that there is no longer a connector at the oil sender, so identifying the wires from it is difficult. They are painted, and twist and taped to the harness leads. Under the tape, it looks like one wire is red, not listed on the schematic you posted. The yellow wire is solid color, no stripe. I guess I will trace back through the harness and connectors and see where they end up. Perhaps that will help. For all I know the W/N should feed forward to the water temp switch from there rather than where it goes now, apparently no connection. It's obvious to me that someone has worked on this machine quite a bit.

I'll be back on it Monday. Thank you for your help so far.[/i]
 
Not always, but in most cases new users have to have 5 or more posts on record before the site lets them post pictures, due to site spam filters. Another option is to go down to the Site Comments Forum and ask YT Support for permission to post prior to that. You can try going down to the Test Forum and making several posts there, trying to attach your pictures to each post. That may work after you make several. Then make your post here again. It may not work immediately after you get past the 5 posts, if not, you might try logging out and back in at that point. There is a size limit as well, I think it is a total of 7.5mb per post (be it one picture or several). Some pictures (often taken with phones), are too large and have to be reduced. Keep trying it will work soon.
 
7L17B is the date code, November 17, 1987 build date to be exact.

Be advised that the electronic instrument clusters in those tractors are known to act up internally, and that the usual
repair is to send them to a place like Ag Express (link below). They'll get it all fixed up for you. They have done multiple
units for me with great results.

With regards to the confusion on the wire colors, since they don't seem to make sense to you, possibly because of color
fade, the best way to confirm what wire you have in your hand is with continuity testing at the various connectors. For
example, if you're trying to locate the oil pressure switch wire, check for continuity between pin #6 of the #1 bulkhead
connector with the wire you think it is.

As for the pics, keep posting until the site lets you upload them.
Ag Express
 
I'd find a different dealer. A good dealer will likely have the factory service manual on file. The parts guys at my dealer have
on a few occasions printed sections that I've needed. Last time they printed about 200 pages out of the electrical section TW
manual for me at no charge, but I was spending a bit on parts. Even if it costs you $20 for paper its worth getting the part of
the manual you need. I'm guessing a Clymer /Haynes is probably just about worthless.
 

Thanks for the reply, Jim. It's true that many, if not most fora have guidelines such as that. It is to prevent or attempt to prevent surf-by spammers. I ran a machinist' forum for a few years and know why the rules are there, and I respect them.

I'll try a few test posts and see if I can artificially get the post count up a little. That's likely the issue. The message I received did not mention that, but generally the forum Admin doesn't want to tip his hand on the specifics of spam, or prohibited language, etc. All for good reason. I don't wish to get off on the wrong foot here by skirting the rules. I've read quite a bit of helpful information on this board and finally had a need to ask a question so joined up.
I work on a lot of machinery. Most of it is not Ag tractor related, but some is. And most of it is either too new to be called an antique by any stretch. I work on timber handling and recycling equipment, plus in general heavy equipment. That said, technically I am a retired machinist and do this for an old friend, so I'm slow and make no money at it.

In worst case, I can upload my photos to a hosting site and provide links, but the downside to that, the way I ran my forum was that eventually those links are invalid and won't provide anyone in the future access to possibly helpful information. I discouraged the practice on my forum for that reason, even to the pint of buying additional server space to host them attached to the forum rather than be at the mercy of photobucket, for example, or a disgruntled ex-member taking down his pictures, thus damaging the posts that they had made.
 

Bern, that's the plan at this point. I can trace the wires from the loose ends back and see where they land. There is a single Canon plug, as I'm sure you know, where they break out to the main four Molex style connectors. I'm familiar and comfortable doing that, I was just hoping to find that the harness had not been altered or damaged without doing that. I work alone, and with a few physical problems, so I don't relish the idea of climbing in and out of the cab all day. But them I don't work a full day on anything. Just sort of part time as I feel like it.

What troubles me at this point is identifying the exit wires from the oil sender. With the connector lopped off, all I have is three dangling wires. I may just replace it out of caution. At least I'd know what I have then. The four loose wires I can locate their landing point and the book I have does (surprisingly) give fair information on the pinouts and how to check connectivity and some functions of those sensors. I will be able to verify from the Molex connectors various parameters as specified, whether it is powered (either 12 or 5 VDC) or ground, and with the engine running, whether the resistance changes as it should or switches state as it should.

I'm hoping the cluster is not the problem, but I have to restore all the found issues outside that before I can condemn it, and send it out. If it gets to that, I have no problem doing it.
 
FWIW, I've never been around a Ford tractor of that model and vintage that HASN'T had an internal problem with the instrument
cluster. For a few hundred dollars, Ag Express can get you all fixed up. They've repaired plenty of them, you can be sure of
that.
 

Chris, there are no local Ag Ford/New Holland dealers here these days, but the owner of this machine is a personal friend to one some distance away. That dealer is an old fashioned, multi-generational dealer, so there is a lot of knowledge available there, they just aren't very handy to me. He brought in a new exhaust manifold and bits to replace it recently, but the tractor owner drove to the dealer and picked them up, along with this near useless manual. There are 4 dealers within 70 miles of me, actually one in town but they don't deal with the Ag line. I do deal with them on other equipment, so I may try them to see if they can access Ag product information. I've run into similar situations with other manufacturers (Vermeer for one) who don't seem to want their dealers to clash territories. Worth a shot though. If I have to, I'll buy a manual for this tractor. I believe the owner intends to keep it a while. Overall, it's in remarkable shape for it's age (now that I know it, thank you Bern).
The Clymer book is pretty detailed on some things, but definitely not on others. The instructions are very specific on testing the critical sensors, for example, and on some of the mechanical areas are covered well. But when I was handed the book, my first thought was "It's pretty thin" for a service manual. I'm more accustomed to having 3" ring binders (or several) for the equipment I deal with. So I knew going in that the book was going to be of limited help. I was really counting on a schematic though. At this point, that's all I need. Didn't need the book to replace the exhaust manifold for instance. But the electrical system being largely absent in the book is a hindrance to my current efforts.
 
The thing you labeled "oil switch?" is actually a coolant temp sensor. And, the two temp senders installed into the tee
fitting are totally worthless. That setup would be just fine for oil pressure, but temp sensors need to be in moving water to
be accurate. You might as well take them both out and throw them away, they are that useless right now.

Look for the oil pressure switch behind the oil cooler. If there's no switch, there should at least be a plug in the block for
one.
 

That tee setup looked fishy to me from the beginning. It will go and a plug will take it's place. And I agree, the location of those sensors is less than ideal. The owner's only direction was that he wanted it returned as closely to stock as practical. The wires on those two sensors I'll track back and see where they are tied in, if at all.

Would you happen to know if this manual contains a proper schematic? At this point, I don't really need anything more.

https://www.yesterdaystractors.com/FO45_6518.htm
 
Those two sensors need to be in that t-stat housing - that's factory. One is a switch for a warning light, and the other is a
sender for the gauge. Take that switch out of the tee and put it in the hole that you take the pipe fitting out of.

As for the IT manual, I doubt it has what you're looking for. Although I can't say for sure.
 

Bern, the temp sensor has been restored. The tee was added to make a spot for the Murphy temp probe, so all of that was pulled and the original put where it belongs.

And I did find what I believe to be the oil pressure switch, with a connector and a couple of inches of wire still attached. Sloppy work. See pics. I got pulled off this one to work on a Hogzilla tub grinder and small wheeled loader, so time was limited today, but back on it tomorrow trying to properly ID the wires to the oil sensor and pressure switch. If I understand correctly, this is the pressure switch, which only controls the warning light, and the three wire sender is the actual pressure reading unit.

At this point, the Murphy system is no longer connected to anything, so putting the original back is the thrust of the project. Hopefully, the smart dash isn't bad, but I am prepared to have it repaired or replaced.

I appreciate all the assistance!

mvphoto69044.jpg


mvphoto69045.jpg
 
I do wonder, however, how to positively ID the three wires on the oil pressure sender. I'm fairly sure one should be 12 VDC, but the other two I'm not sure what the resistance should be with engine off or engine running. Is this a hi-lo switching sender? There is one of the three wires that is spliced into a red lead, so may be the supply voltage, but it's not factory so I don't trust that. The other two appear simply black, which is fine when there is a factory connector on the sender..., but it's been clipped. If I can't determine the correct wiring, I'll be forced to replace it, but without the mating connector that may not really gain be anything since the dangling wires on the harness side have no connector. That may depend on how successful my tracing turns out.

I have a feeling I'm going to be stuck buying a full service manual just to get the schematic.

btw, that green/pink stripe wire still looks green/white to my tired old eyes. Maybe I'm going colorblind. Even way up in the jacket where it's protected it looks white. In the dash at the connectors it still looks white. They sure chose a weak pink dye for that.
 
Well, need some guidance. Two things left unresolved at this point.

The engine oil pressure sender/sensor has had the 3 wire connector clipped, so I have no way to ID the leads. I cannot even find that part online. Anyone have a PN? The above drawing shows the three wires, and two are active, one is ground. Is that ground "local" or is it through the harness? There is a black wire that is one of the four that were left hanging. It has continuity to the chassis. It doesn't make sense to me to require an external ground when the switch is screwed directly into the block. The oil pressure switch uses the switch body, screwed into the block, to get ground. I know some of this may be 5 volt, and I can see a separate "ground" coming from the dash panel, but if that is so, then it is a common ground with everything else. Straight to the chassis. I need to ID the other wires. I'm thinking that one is a low pressure switch and the other a high pressure switch. Or, since this is a smart dash, there could be a variable resistor attached between the two non-grounded leads and would each would carry a different potential (or a difference in resistance to ground), depending on actual oil pressure. If that's true, I should be able to measure the resistance to ground with the engine running and find a low or high reading.Then just switch pairs if the gauge seem to read "backwards".

The other remaining issue involves the terminations at the ignition switch. There is a hot-in-run terminal that appears to go to the Murphy system. I cannot locate any loose push-on connectors that potentionally should go to this terminal, so it may have been clipped out. I need to find and reconnect it. So, looking for a diagram or schematic of the wiring to the switch.

Otherwise, I'm about ready to start the machine and see if I have restored the dash functionality. Everything else I've found, I've fixed. Lots of bare spots on wiring, so quite a few solder and shrink splices, but they are all solid, and I've loomed a bit of it and re-positioned it in less hot places, away from the exhaust, for instance.

Any suggestions?
 
Edited/addendum:

I need to ID the other wires. I'm thinking that one is a low pressure switch and the other a high pressure switch. Or, since this is a smart dash, there could be a variable resistor attached between the two non-grounded leads and would each would carry a different potential (or a difference in resistance to ground), depending on actual oil pressure. If that's true, I should be able to measure the resistance to ground with the engine running and find a low or high reading.Then just switch pairs if the gauge seem to read "backwards".[i:9818784719] [b:9818784719]Of course, I also need to know which of the sender leads should be grounded.[/b:9818784719][/i:9818784719]
 
The sensor is actually a variable resistor that changes the 5 volt input from the dash and changes the return voltage proportionally in increments corresponding to changes of 10 PSI to illuminate each of the 8 sections of LCD on the display. The wiring is a floating ground, a 5 volt feed, and the return signal. I found the pressure/voltage profile and a roughly equivalent sensor that I can use. The new sensor has wiring identification.

The hot-on-run terminal has been routed to the Murphy system and appears to control the fuel control valve, so a simple new lead will have to be run from it to the valve. That should wrap up the wiring and let me run the machine normally and find out about the dash unit.
 

We sell tractor parts! We have the parts you need to repair your tractor - the right parts. Our low prices and years of research make us your best choice when you need parts. Shop Online Today.

Back
Top