A better fuel shut off valve?

flashnick

New User
I?m looking for a recommendation on a better source or a better part for a fuel shut off valve for a 1956 Ford 640.

The valves purchased here from Yesterday?s Tractors just won?t last more than a few months before they begin leaking. They leak when test are shut, they leak when they are open, they?re just plain junk.

I?ve been through 3 or 4 of them in the past year, and I just can?t keep dedicating half a day every eight weeks to swapping them out.

Appreciate any advice or experience you can offer.
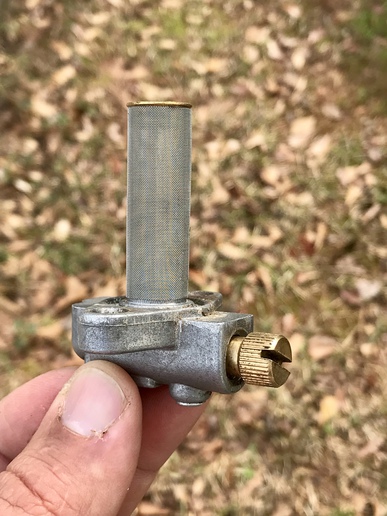
cvphoto11095.jpg


cvphoto11096.jpg
 
I have a solution for you if your tank has a plugged 3/8" NPT hole in the right rear corner of the tank on the bottom. My replacement tank did.
 
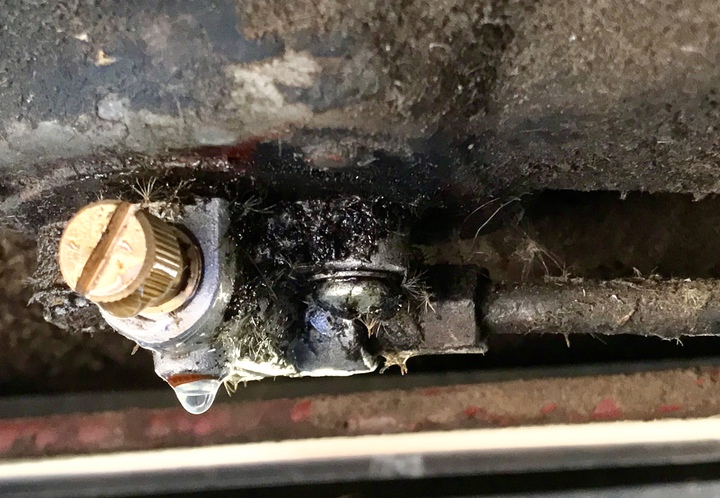
The leak is definitely coming from the threaded brass shut off screw
at the 6 o?clock position. A small amount could be coming from
between the tank and valve body but it?s not significant. More of a
weeping.
 
No such luck. This is an original tank, and I was hoping to keep it that way if possible. A friend of mine suggested welding over the stock location and tapping for 3/8? but I hate to ruin an original tank in good condition.
 
I was just wondering what kind of shape the sealing surface on the tank is in.

I worked in the motorcycle industry for 30 years and we had problems keeping old fuel tanks that use a flange style petcock similar to yours from leaking. We found that the pressure from the screws over the years deformed the sealing surface on the tank and it was no longer flat as it should be. You could take a large flat file and make a few passes on the sealing surface and see that where the screw holes are was higher than the rest of the surface. We would screw a bolt in the hole and give it a couple of gentle taps that would push them back down enough to allow the surface to seal.

-Scott
 
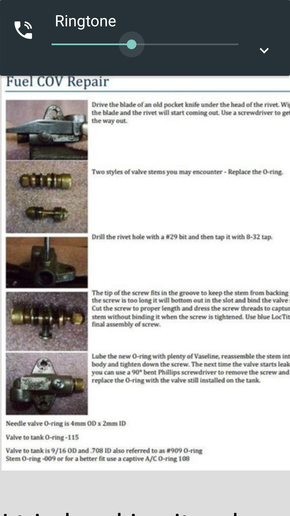
The stem from those valves can be removed and the sealing O-ring replaced with a quality gasoline-rated O-ring. This usually takes care of the leak problem. Pry out the stem's stop rivet, get it started with an old knife blade. This issue comes up repeatedly on this forum, you might want to search the archives for additional information and instructions.
 

Fuel leaks are almost impossible to nail down exactly where they are coming from even if you are positive it can fool you... About the only way I know is to keep it blown off with compressed air till you narrow it down...

I have had them leak from the stem, the o-ring to tank the fuel line fitting and the tank... The bung the valve bolts to is solderer to the tank I had one leak there. I have drained the fuel screwed the stem out and put loctite on the threads screw it in and back out and leave it open till the loctite dries then add a shut off to the line. The last aftermarket valve I repaired the issue was it came with the wrong o-ring valve to tank . The guy was going thru the same deal as you and had gave up...

Gas runs uphill down hill and sideways to complicate maters its clear...
 
AMEN to the "fuel leakes are almost impossible to nail down. The last one did not have the hole drilled in the middle of the seat where the out gas line screws into..
 
I've always had better luck with the valves bought from CNH in CNH boxes. Not perfect luck but considerably better. VERY bad luck with aftermarket valves.

That said, I have not bought a valve in five years or more and have no idea what might have changed since I have.

Yes, they are more expensive.

Dean
 
Always replace the O ring between the valve and tank with the correct O ring.

Do not use an incorrect O ring and do not overtighten the bolts.

Dean
 
The valve can be replaced without removing the sheet metal or tank.

I've done it so many times that I can do it in less than an hour, including R & Ring the gasoline.

You will need the proper tools and it helps if your hands are not too large.

Dean
 
(quoted from post at 10:28:02 01/29/19) The valve can be replaced without removing the sheet metal or tank.

I've done it so many times that I can do it in less than an hour, including R & Ring the gasoline.

You will need the proper tools and it helps if your hands are not too large.

Dean

I take all the bolts out at the dash and loosen the dog leg bolts swing the the hood up wedge it with blocks to get at the valve.. The last one had to take the dog leg bolts out and block the hood up... Its still no fun...
 
Bingo, Scott.

Overtightening the mounting screws can result in the same problem, especially if an incorrect O ring is used.

Dean
 

If it had the correct o-ring I doubt Over tightening would ever become an issue... If it had an o-ring that was to big then yes...

With the correct o-ring all clean you have lest than .040 of crush on the o-ring about the only thing you would damage is the screws...
 
(quoted from post at 15:48:37 01/28/19) I was just wondering what kind of shape the sealing surface on the tank is in.

I worked in the motorcycle industry for 30 years and we had problems keeping old fuel tanks that use a flange style petcock similar to yours from leaking. We found that the pressure from the screws over the years deformed the sealing surface on the tank and it was no longer flat as it should be. You could take a large flat file and make a few passes on the sealing surface and see that where the screw holes are was higher than the rest of the surface. We would screw a bolt in the hole and give it a couple of gentle taps that would push them back down enough to allow the surface to seal.

-Scott

Scott -

Thanks for giving me that idea. I'm 99% confident the tank is true as it didn't leak a drop for the first two months or so. I will definitely check the bottom of the tank for trueness as you suggest as I'm sure even 1/32 or 1/64 could be enough to cause a small leak, and could be corrected with the same flat file you mentioned. Will make sure to check in on that the next time I pull the valve to replace.
 

Andy -

Much appreciated. I do try to search before asking, but was using my phone out in the field and couldn't find the search box on the mobile version of the forum. I've since been able to track down a posting or two and will do my best to follow along.

- Brett
 
Appreciate all of the advice. At some point in the life of this tractor the hex head screws were replaced with Phillips head so removing the tank is the only way to get at them. I may swap them back to hex heads this time around to make it easier to access in the future.

I've put in an order from my local supply house for packs of 70A Buna N 115 and 009 o-rings to repair the valves I have sitting around. I'll do my best to photograph and/or make a video of the process to upload for future reference. To try and help out the next guy.
 
(quoted from post at 05:25:42 01/29/19) Always replace the O ring between the valve and tank with the correct O ring.

Do not use an incorrect O ring and do not overtighten the bolts.

Dean

So, Mr. Dean, with your experience and expertise, just exactly what is the correct O-ring size between the valve and the tank? Also while we're at it, what is the correct size on the valve stem? I have two SAE O-ring kits and one metric kit, and I still haven't found the correct O-ring yet that shuts it off (as tested by blowing thru the fuel line outlet hole).
 
The shut-off o-ring is 009.
The valve to tank is 115.
The brass pan head screw I used is 10/32 NF X 5/16", an 8/32 NF X 5/16" will work if you do a clean job of getting the rivet out, the 5/16" length is the critical dimension.

The bolts holding the valve to the tank are #12 machine screws, not commonly available even in a good hardware.

The o-ring does not 'shut off' the gas, the brass threaded needle seats against the pot metal housing and stops the fuel to the carb. The o-ring seals the threaded needle from the world whether he valve be open or closed.

McMaster-Carr has all this at quite reasonable prices, altho o-rings are sold in packs of 100, so you are set for life.
 

Thanks Pomester. I did try something that BigPapa53 mentioned above--I took a flat file and dressed across the hole on the tank. It was quickly apparent that is was NOT flat. I took down the high spots that may have well been my problem, and removed some small gouges in the process. I wish I had 'before' pics, but I did post an 'after' pic. I think it will be an improvement.

I didn't realize the O-rings could be that critical. I looked at your link above, and a third O-ring size is mentioned there. So, here's a summary:

#009 valve stem o-ring:
ID=.208, OD=.348, Thick=.07 | ID=5.25mm, OD=8.84mm, Thick=1.78mm

#115 valve-to-tank o-ring:
ID=.674, OD=.880, Thick=.103 | ID=17.12mm, OD=22.36, Thick=2.620mm

#909 valve-to-tank? o-ring:
ID=.706, OD=.900, Thick=.097 | ID=17.93mm, OD=22.86mm, Thick=2.46mm

Not sure when the #909 is used vs. the #115.
Has anyone put a micrometer on the genuine CNH O-rings to see what they measure?...This would be assuming that the genuine CNH valve is the same as the aftermarket. Or, perhaps the dimensions are listed somewhere.
mvphoto67360.jpg
 

We sell tractor parts! We have the parts you need to repair your tractor - the right parts. Our low prices and years of research make us your best choice when you need parts. Shop Online Today.

Back
Top