
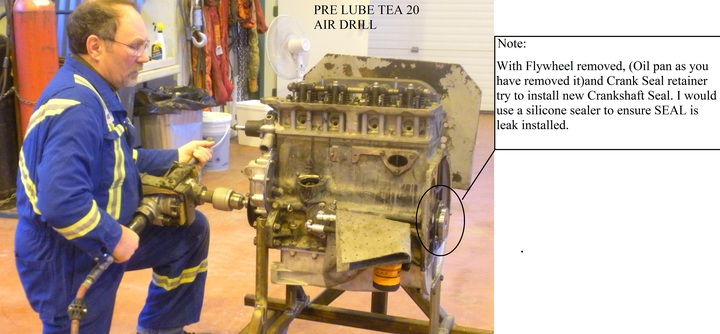
Hi guys, I have a 1952 TEA 2085. I have split the tractor and am looking to replace the rear crankshaft seal. Does anyone have a step by step procedure for completing this job. I have some instruction that didn"t instruct me to remove the oil & oil pan. So I haven"t drained the oil from the engine and have that part of the tractor resting on the oil pan supported on wood & blocks pan to hold it up when I split it. I think that this was a mistake. I can"t see how to remove the sealing block that holds the seal in from the bottom without removing the oil pan. Is this correct? My instructions say to loosen the rear main bearing housing to replace the seal from below the tractor . Since I am a newby to this, I don"t full understand what this means so am in a bit of a dilemma. Can someone help me correct any mistake that I made as well as give me a procedure on how to replace this seal with pictures if possible? If the procedure is too long, could you email it to me? I also have a new clutch, pilot bearing, throw out bearing & transmission input seal to replace while I have the tractor split. Any help in completing these jobs as well would be much appreciated. Thanks in advance! Ron
You are using an out of date browser. It may not display this or other websites correctly.
You should upgrade or use an alternative browser.
You should upgrade or use an alternative browser.
- Thread starter RonON
- Start date
scott mcintosh
Member
Split tractor remove clutch and flywheel rear main is right there.I see no need to remove oil pan as they are a 2 piece seal replaced from back of engine that is the way other Fergusons are.Ask for John Deere D I bet he has pics.Scott
John Deere D
Well-known Member
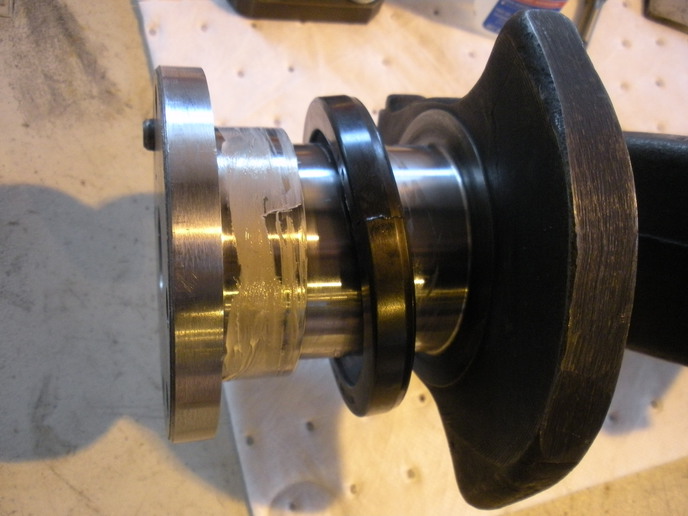
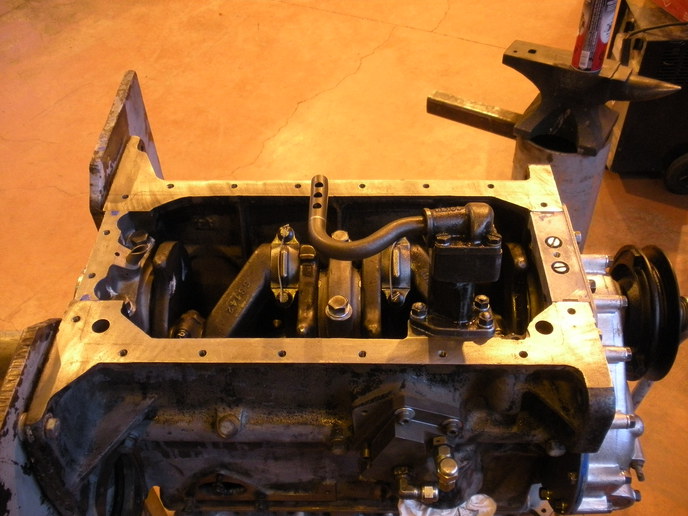
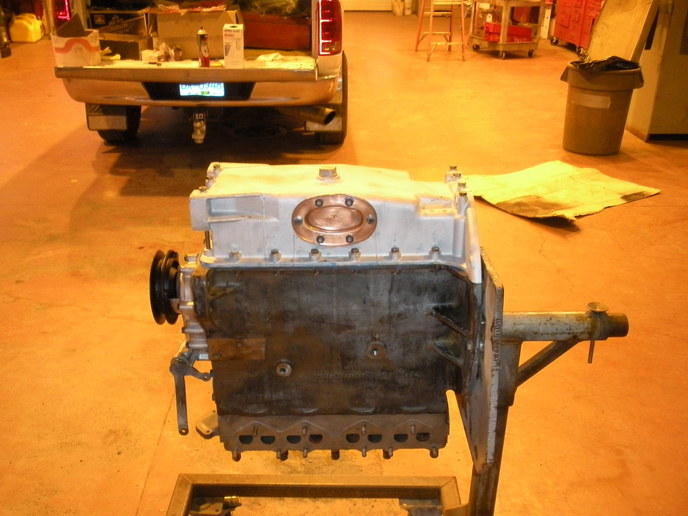
Pics that may assist you......
Bob...

Bob...
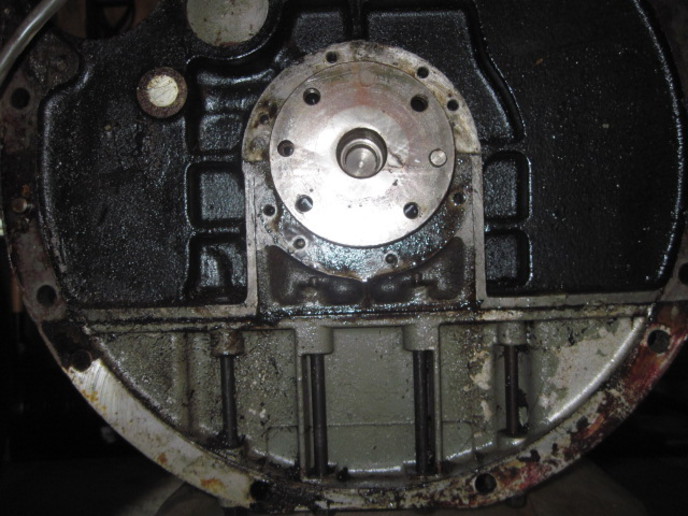
Thanks for the pics John Deere D but I do not have the engine out completely as your pics show but rather have the tractor split. The tractor still has oil in the engine sump. Do I need to drain the oil before going any further? If I take the 2 center bolts out in the picture that I have attached, can I then lower the crank seal block and then remove & replace the seal. If I do this will oil come out of the sump? Is the oil pan in the way to do this and therefore needs to be removed? I see that you use a sealant to seal the seal to the block. Is this possible if I do not remove everything as you have and do it the wy that I am describing? Thanks Ron
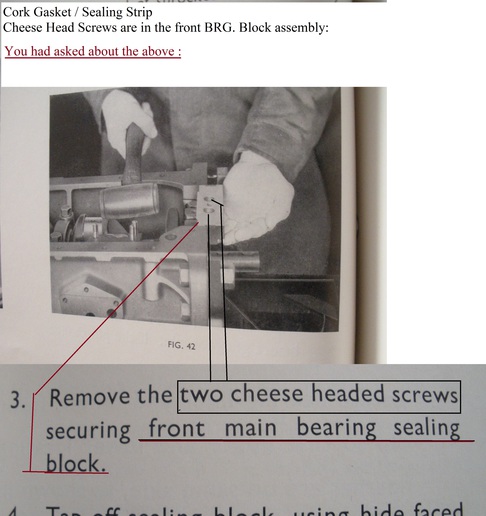
Scott, The seal is a one piece split seal so has to be put in as a single piece. I have done what you have suggested but there is no way to remove the old seal and install the new seal as it sits. My instuctions say to remove "cheese head" security screws that holds the sealing block into position (I can't see cheese head security screws, I don't even know what cheese head security screws are or where they are so I am already lost) and then unscrew the 2 bolts holding the rear main bearing housing in position and prise it loose. I am assuming that the bolts holding the rear bearing housing are the inner 2 long bolts holding the bearing block in position in the pics that I posted in response to John Deere D. My problem is that it appears that the bearing housing is up against the upper lip of the oil pan and cannot be prised loose without removing the oil pan. I am not sure about this but that is what it appears like to me so I am unsure about how to proceed. My instructions then say to loosen the bearing housing enough to removethe oldseal and thread the new seal around the rear bearing on the crank making sure that the oil seal is flush with the rear of the cylinder block. Then put the bearing housing in position with the bolts ready to tighten ensuring that the felt seals in the side grooves are still seated properly. So my problem(s) are i) I am not sure what the sealing block is ii) what the rear main bearing housing is and iii) how to get them out so I can replace the seal. Since I don't have the engine dismantled as John Deere D shows in his response, I am unsure on how to move forward in replacing this seal. Any other ideas? Ron
John Deere D
Well-known Member
Good morning RONon
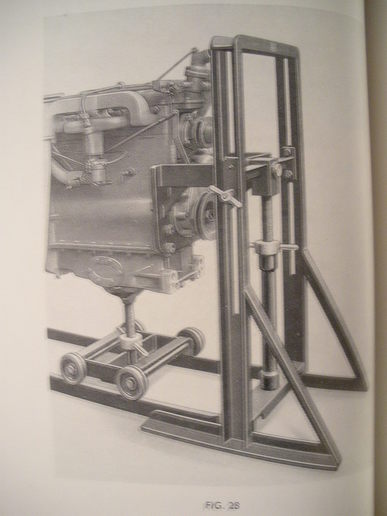
I have never,and shall never replace a REAR CRANKSHAFT OIL SEAL on a TEA-20 with the Standard English Engine unless the Engine is in the inverted position disconnected from the tractor:
With all due respect, the REAR OIL SEAL is the worst Challenge you could have ever set out to do, let alone with the engine still attached to the forward components of Tractor.
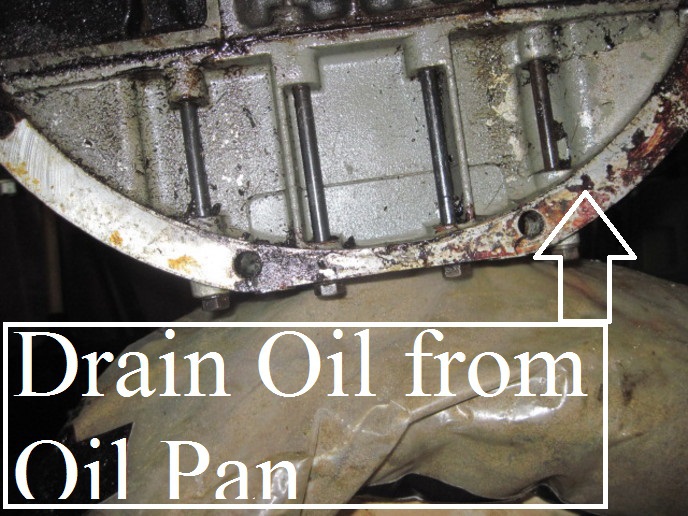
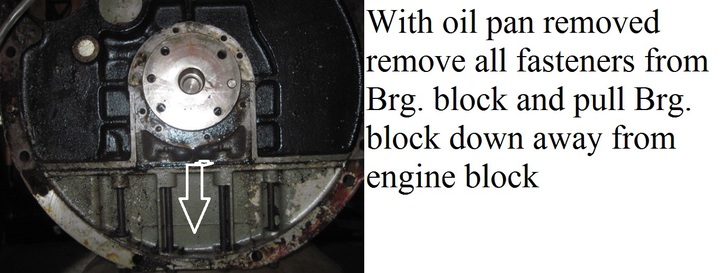
The Engine OIL should be drained, Oil Pan / Sump removed. Then at that time, the REAR BEARING BLOCK pulled away from the Engine block.
Working upside down trying to replace the rear Crank oil seal, I give you less that a 40% chance of a successful seal change out:
I shall be watching to see the comments from others who have successfully changed the rear Oil seal in the manner that you are striving to do:
All the best:
Bob.. Owner Operator TEA-20 and Several TEA-20 parts Tractors.

I have never,and shall never replace a REAR CRANKSHAFT OIL SEAL on a TEA-20 with the Standard English Engine unless the Engine is in the inverted position disconnected from the tractor:
With all due respect, the REAR OIL SEAL is the worst Challenge you could have ever set out to do, let alone with the engine still attached to the forward components of Tractor.
The Engine OIL should be drained, Oil Pan / Sump removed. Then at that time, the REAR BEARING BLOCK pulled away from the Engine block.
Working upside down trying to replace the rear Crank oil seal, I give you less that a 40% chance of a successful seal change out:
I shall be watching to see the comments from others who have successfully changed the rear Oil seal in the manner that you are striving to do:
All the best:
Bob.. Owner Operator TEA-20 and Several TEA-20 parts Tractors.
Thanks Bob. I am hoping to complete this with a greater than 40% success rate. Your suggestion is exactly as I thought, drain oil, remove pan and lower the block to gain access to the seal. I will try and if it works great, if not I will have to do what you suggest. What type of sealant did you use for the seal? Thanks again, Ron
So I have decided, based on Bob's pics etc. that I have to remove the oil pan. So, since the engine is currently resting on the oil pan, I have to lift the engine, drain the oil & remove the oil pan to get at the seal etc. Will the radius arms hold up the wait of the engine while I remove the oil pan? If not, I thionk that I can hoist it up with my engine hoist attached to bolts that go through the holes that would join the two parts of the tractor. It would be much easier to lift the engine and rest the radius arms on jack stands while I remove the oil pan. do yo think that this will work? If this will not work, will grade 5 bolts hold up the weight or do I need to go to grade 8? Ron
Ron, I'll preface this by saying I don't have direct experience with the model of tractor you are working on, but I have worked on several Fergusons/Fords of a similar configuration -
I would not trust the radius arms to hold the engine in position - too many points where things might shift - take a piece of chain and your engine hoist and two bolts thru the engine to transmission bolt holes and relieve the weight from the oil pan - however you do it, work safely - I try to always have a second support in place, particularly if I am working underneath an assembly -
I've looked over the pictures and it's unclear to me how the one piece seal is placed in position - I've done two piece seals in that location (other engine models) and those were difficult to place satisfactorily -
be very careful, don't get frustrated, work thru each step methodically -
best of luck to you
David
scott mcintosh
Member
By look of John Deere D's pics you will have invert engine and remove all main caps and lift crank a tad so you have room to work.I don't know if there is enough room without removing timing cover.Follow his pics and it should go.I have worked with two piece felt seals.All one piece seals on motors I have worked with seal area is same size as where flywheel bolts to crank.Take it slow and you will figure it out.Scott
OK so I am going to lift the engine with my engine hoist and drain the oil and remove the oil pan. Is there anything that I should know before doing this to avoid another mistake? Is it straight forward, remove the bolts holding the oil pan onto the bottom of the block and just removing the oil pan? What about the oil pump? Is there anything that I should watch to avoid damage to it when removing the pan? Will it be possible to put a jack under the block with a piece of wood under the block to allow me to hold up the engine rather thn have the engine hoist there in the way? Is it better to leave the engine hoist there since I will need it to replace the oil pan after I get the oil seal in? Just bouncing my thoughts off of you guys to get some knowledgable feedback. Thanks for any advice! Ron
John Deere D
Well-known Member
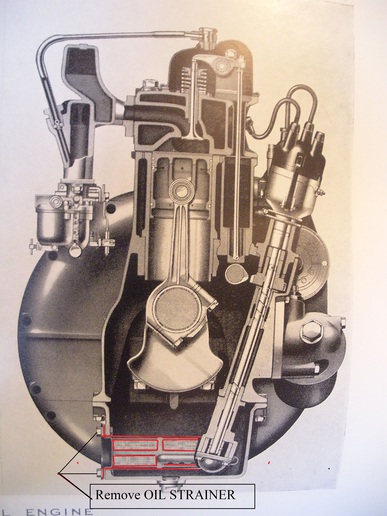
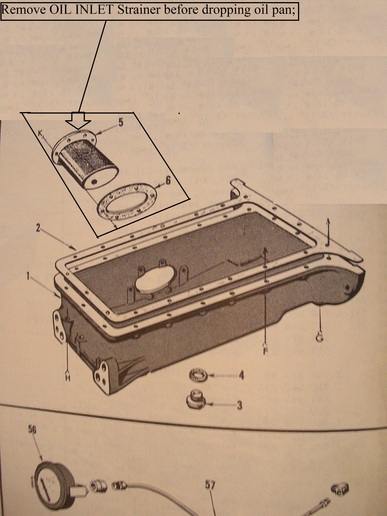
Remove OIL STRAINER as per pictures BEFORE you drop he OIL PAN.........
Bob....
Bob....
Bob, after looking at the pictures of the oil pan, I wondered how the oil strainer was attached to the pump. Is it secured in some way to the oil pump or does it simply fit over the pump input? From the pictures it appears that if I remove the oval cover on the oil pan that the oil strainer can either be pulled out through the hole in the pan if it not attached to the pump or left in place and can be removed after the oil pan is removed but it is hard to tell from the pictures which is the correct way to remove the oil strainer so that it not damaged during the oil pan removal. Is there any description of removing the oil pan that decribes this? If possible could you scan the page(s) describing the oil pan removal, including any reference to the oil strainer, from the service manual and send them along to me. Much appreciated, Ron.
Charles in Aus.
Well-known Member
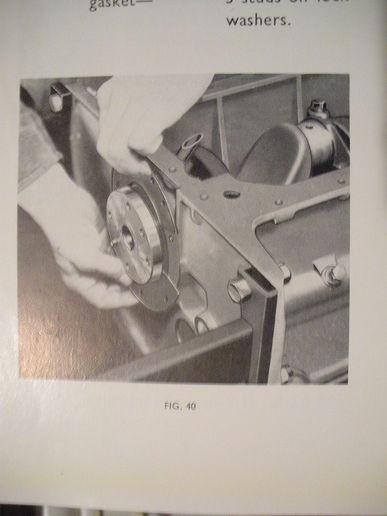
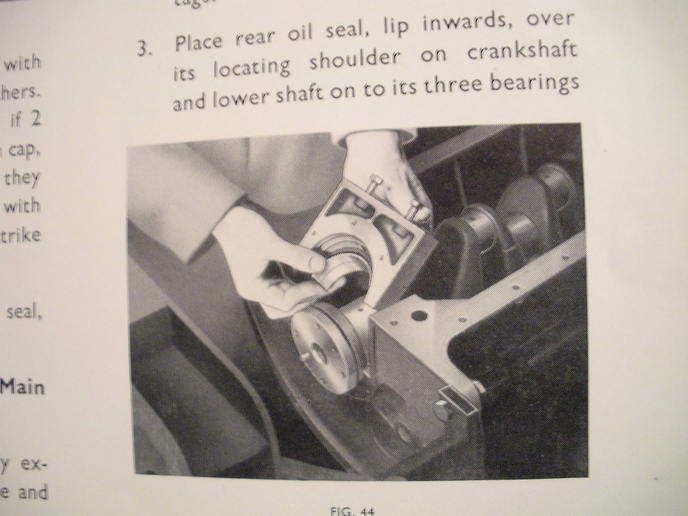
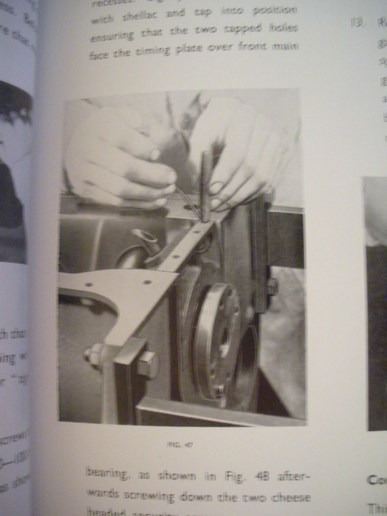
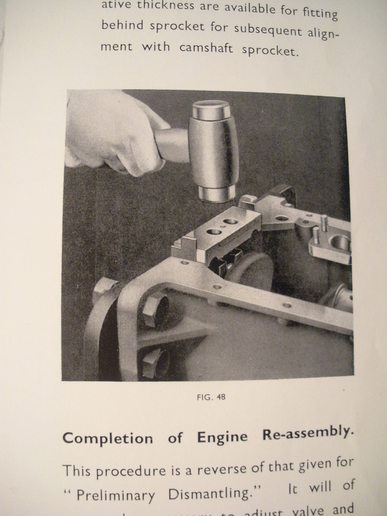
This is an FE35 tractor but the operation is the same ,


John Deere D
Well-known Member
Section C Page 24 States:
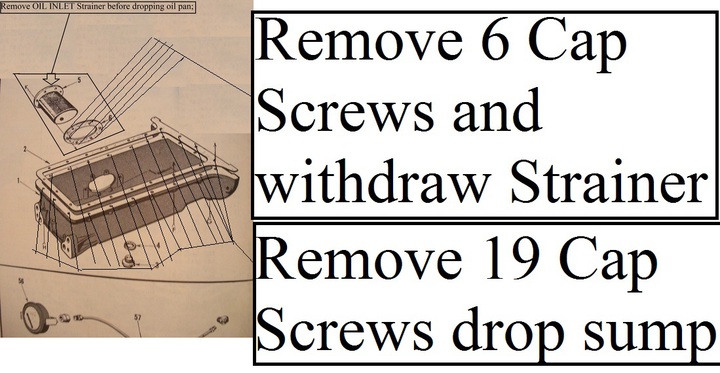
............and remove oil strainer with gasket-SIX SET SCREWS:
In Canada,CAP SCREWS are the same as referenced in the above......and remove oil strainer with gasket-SIX SET SCREWS:
Section C Page 24 States:
Remove SUMP (oil Pan) with Gasket-SEVEN LONG and TEWLVE short SET screws:
In Canada, CAP SCREWS are the same as referenced in the above......Set Screws.....
Bob...
John Deere D
Well-known Member
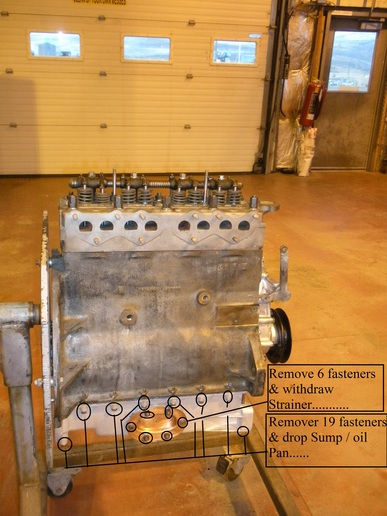
Drain Oil...
Remove OIL STRAINER before dropping Sump /Oil Pan .....
Then drop Sump / Oil Pan...
Bob..
Remove OIL STRAINER before dropping Sump /Oil Pan .....
Then drop Sump / Oil Pan...
Bob..
John Deere D
Well-known Member
Bob...
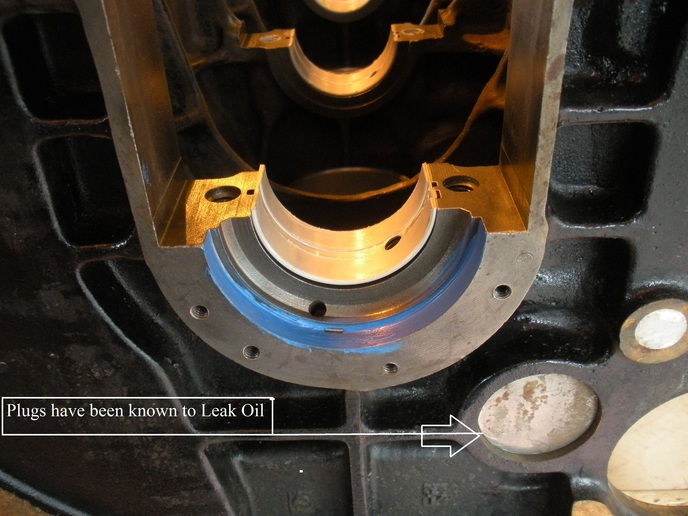
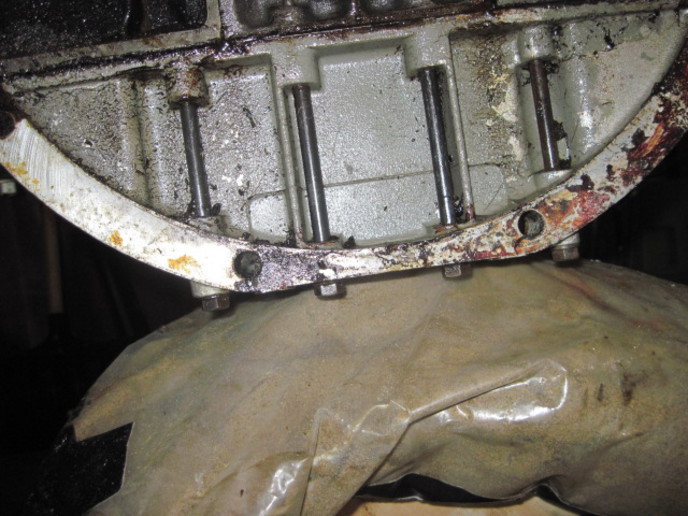
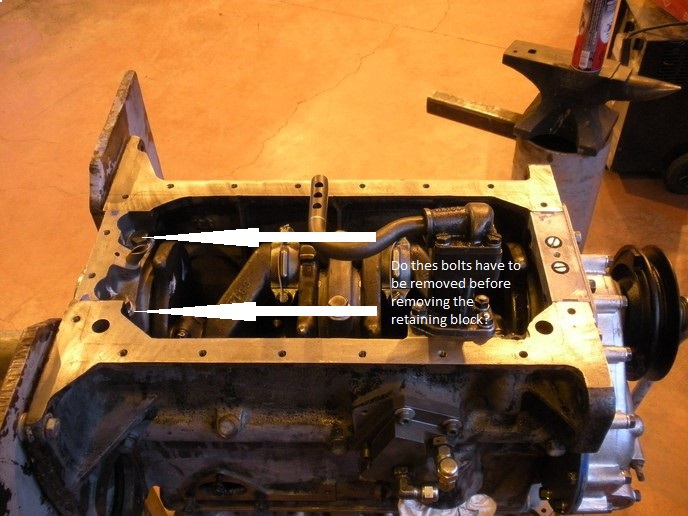
I have removed the oil pan with no mishaps. So far so good! Now to remove the rear seal retaining block (I think Bob referred to it as the bearing retaining block since it holds both the bearing and the seal). I noticed in a couple of pictures that Bob posted, that the block appears to be held in place by 2 additional bolts towards the interior of the engine. I have added the one picture that I saw the bolt heads behind the retaining block. Do these bolts hold the lower part of the retaining block to the upper half of the bearing block and do they have to be removed prior to removing the lower part of the block? It would appear from the picture that it does but I want to make sure that I do not make any mistakes here. I am currently removing the oil pan gasket from the engine block to allow the bearing block to easily be removed when I get to that part. Thanks Ron
John Deere D
Well-known Member
Quote:
Do these bolts hold the lower part of the retaining block to the upper half of the bearing block and do they have to be removed prior to removing the lower part of the block?
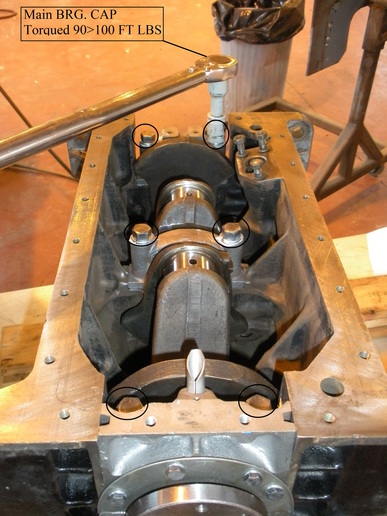
Yes....Remove these two BOLTS:
Well done RonON ...........")

Do these bolts hold the lower part of the retaining block to the upper half of the bearing block and do they have to be removed prior to removing the lower part of the block?
Yes....Remove these two BOLTS:
Well done RonON ...........
"Do these bolts hold the lower part of the retaining block to the upper half of the bearing block and do they have to be removed prior to removing the lower part of the block?"
Yes, those bolts hold the main bearing cap in place - and they will need to be torqued to specifications when you replace them
"...allow the bearing block to easily be removed ..."
ya - probably not - you'll remove those two bolts and likely find the main bearing cap still firmly fixed - the seals on either side of the cap are compressed into place there will be no slop - - you'll need to be careful - after removing the bolts I'd take a plastic hammer and gently tap the cap first one way then the other (toward the inside of the engine, then the outside) and see if you can get a bit of movement - you have to be careful not to damage the bearing and not burr the cap or block when removing, so very small movements back and forth as you try to work it down and out - take your time and don't succumb to the temptation to stick a screwdriver anywhere -
Bob, I keep reading about some cork seals in these bolts. Are they in the holes of the retaining block? Can you explain where they are exactly, how not to damage them when taking out the bolts and any other advice when removing the block. If damaged can they be "homemade"? I noticed when you were installing the seal and block in your pictures, that you used some blue liquid gasket material on the retaining block. What exactly is the material that you used? Is it high temperature liquid gasket material? From your pictures, I think it is only put onto the outermost surface where the seal touches the retaining block. This might be a bit difficult to do with the crankshaft in place but I could put it on the lower part of the retaining block that I will have removed. In your opinion, will putting it on the lower half of the block only help seal it better? What about putting the material on the top half of the seal just prior to installing it and threading the top part of the seal into the upper part of the retaining block and applying the liquid gasket directly to the bottom half as you did? I assume that you install the seal while the gasket material is still wet/tacky so that it holds the seal in place and also seals it a bit better when dry. How much time between applying the material and having the seal installed i.e. working time before dry? Did you also use it in the split in the seal at the top to seal that split? Did you use it to help pack & seal the felt strips installed in the side slots of the retaining block? Again Thanks. With your help I think that my chnaces are getting greater than 40%. Ron
John Deere D
Well-known Member
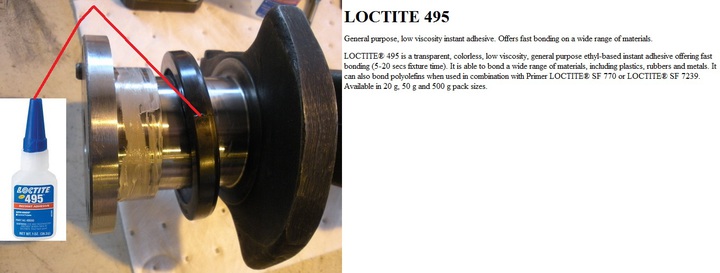
LOCTITE 495
General purpose, low viscosity instant adhesive. Offers fast bonding on a wide range of materials.
LOCTITE? 495 is a transparent, colorless, low viscosity, general purpose ethyl-based instant adhesive offering fast bonding (5-20 secs fixture time). It is able to bond a wide range of materials, including plastics, rubbers and metals. It can also bond polyolefins when used in combination with Primer LOCTITE? SF 770 or LOCTITE? SF 7239. Available in 20 g, 50 g and 500 g pack sizes.
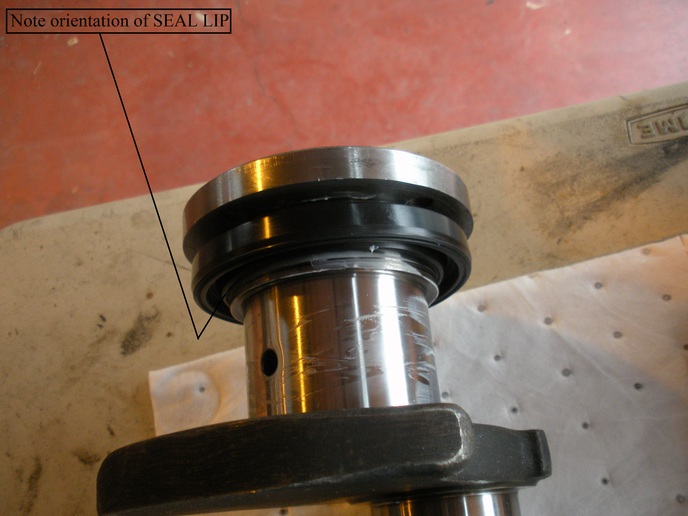
Possibly Other Mechanics have another preference as to the split line of the SEAL. I glue the split together.
Bob..
General purpose, low viscosity instant adhesive. Offers fast bonding on a wide range of materials.
LOCTITE? 495 is a transparent, colorless, low viscosity, general purpose ethyl-based instant adhesive offering fast bonding (5-20 secs fixture time). It is able to bond a wide range of materials, including plastics, rubbers and metals. It can also bond polyolefins when used in combination with Primer LOCTITE? SF 770 or LOCTITE? SF 7239. Available in 20 g, 50 g and 500 g pack sizes.
Possibly Other Mechanics have another preference as to the split line of the SEAL. I glue the split together.
Bob..
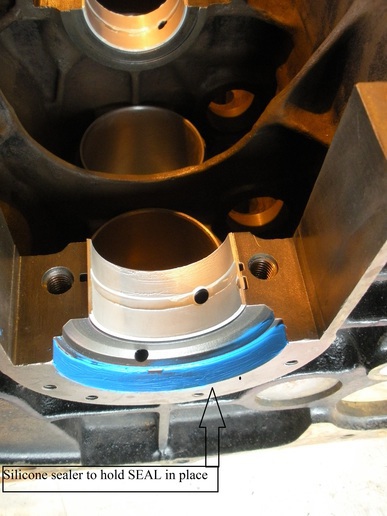
Bob, this doesn't give much time to work and might be difficult to use with the crank in place. However, what I was referring to was the blue "silicon" sealer that you point out in a picture that you posted earlier and that I have added to this reply. What is it and what is the purpose of adding it? Also do you know anything about the cork seals that are suppose to be at the end of the sealing block that I cannot see? Where are they and doi need to replace them if I remove the block? Ron

Thanks for the tips! I will go carefully and hopefully won't do any damage here. Can I tap the block with a piece of wood to push it downward? When installing the felt seals, are they just packed in tightly or is there a procedure specific to installing them. In one of Bob's posts it shows a picture where the seals are sticking out after the block is installed and I assume are just pushed into place firmly to seal the outer part of the block. Ron
John Deere D
Well-known Member
Quote:
However, what I was referring to was the blue "silicon" sealer that you point out in a picture that you posted earlier and that I have added to this reply. What is it and what is the purpose of adding it? Also do you know anything about the cork seals that are suppose to be at the end of the sealing block that I cannot see? Where are they and do I need to replace them if I remove the block? Ron
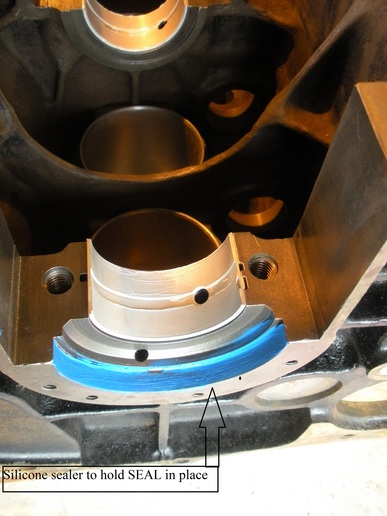
The Blue SILICONE Sealer,can be any colour of AUTO MOTIVE OIL Resistant Silicone Sealer.
There is NO MENTION in any of my ORIGINAL HARRY FERGUSON SRVICE MANUALS,of adding a sealer to the REAR CRANKSHAFT OIL SEAL BORE.I'm not about to,to take a chance on a possible OIL LEAK "between the outer diameter of the SEAL and the BORE in the Engine Block:
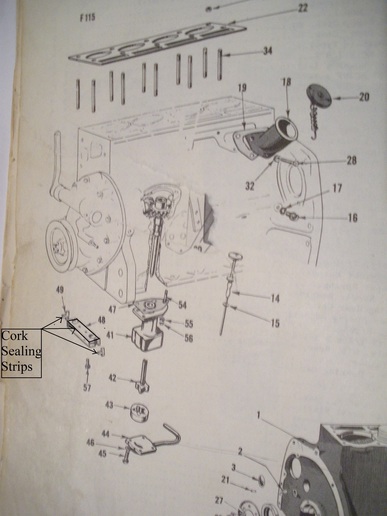
The Cork SEALS, to the best of my knowledge, was located on the FRONT BRG. BLOCK......NOT the REAR BRG. block that your are removing:
Bob...
However, what I was referring to was the blue "silicon" sealer that you point out in a picture that you posted earlier and that I have added to this reply. What is it and what is the purpose of adding it? Also do you know anything about the cork seals that are suppose to be at the end of the sealing block that I cannot see? Where are they and do I need to replace them if I remove the block? Ron
The Blue SILICONE Sealer,can be any colour of AUTO MOTIVE OIL Resistant Silicone Sealer.
There is NO MENTION in any of my ORIGINAL HARRY FERGUSON SRVICE MANUALS,of adding a sealer to the REAR CRANKSHAFT OIL SEAL BORE.I'm not about to,to take a chance on a possible OIL LEAK "between the outer diameter of the SEAL and the BORE in the Engine Block:
The Cork SEALS, to the best of my knowledge, was located on the FRONT BRG. BLOCK......NOT the REAR BRG. block that your are removing:
Bob...
Bob, So where are you adding the "blue" silicon sealer? From your pictures I thought that you had added it to the section of the retaining block where the seal met the block. Am I missing something? Thanks for the heads up regarding the Tee cork plugs. I was at my local MF dealer to pick up some of the parts today and saw in his schematic that the cork plugs were for the front along with the cheese head bolts. I just want to know what the head of a cheese head bolt looks like. I'll keep on plugging away at this with your help. Ron
John Deere D
Well-known Member
Yes...I added the Silicone Sealer to the BORE in the BLOCK, and the BORE of the BRG CAP..Specifically were the CRANKSHAFT SEAL fits in.
So far so good! Removed the main bearing cap, was able to get the seal into the top part of the cap and then put the bottom cap back on. I did not use any sealer or adhesive anywhere. The top part of the seal where the seal is split came together very well and there was no gap. The seal was about 1/8" proud of the outer part of the engine block and bearing cap. I could not get it to go in towards the inside of the block any further. Any comments? I am assuming that the retainer plate holds the seal in this position so that it pushes the seal inwards and seals the crank from engine leaks. Tomorrow I pack the felt strips in the side of the bearing cap. I know that the manual says to use shellac but I went in to talk to my engine machinist and he says that you can pack it dry and oil will soak into it or you can 1st soak it in oil and then pack it into the slots to seal the cap at the sides. He said just make sure that you pack it well. I will soak mine in oil and then pack it into the slots. Then the oil pan, flywheel and new clutch. I have replaced the pilot bearing in the flywheel and will also replace the thrust (throw-out) bearing before puting it all back together. Any tips, comments etc. welcome to prevent further mistakes. Ron
Similar threads
- Replies
- 11
- Views
- 722
- Replies
- 17
- Views
- 554
- Replies
- 13
- Views
- 269
We sell tractor parts! We have the parts you need to repair your tractor - the right parts. Our low prices and years of research make us your best choice when you need parts. Shop Online Today.
Copyright © 1997-2024 Yesterday's Tractor Co.
All Rights Reserved. Reproduction of any part of this website, including design and content, without written permission is strictly prohibited. Trade Marks and Trade Names contained and used in this Website are those of others, and are used in this Website in a descriptive sense to refer to the products of others. Use of this Web site constitutes acceptance of our User Agreement and Privacy Policy TRADEMARK DISCLAIMER: Tradenames and Trademarks referred to within Yesterday's Tractor Co. products and within the Yesterday's Tractor Co. websites are the property of their respective trademark holders. None of these trademark holders are affiliated with Yesterday's Tractor Co., our products, or our website nor are we sponsored by them. John Deere and its logos are the registered trademarks of the John Deere Corporation. Agco, Agco Allis, White, Massey Ferguson and their logos are the registered trademarks of AGCO Corporation. Case, Case-IH, Farmall, International Harvester, New Holland and their logos are registered trademarks of CNH Global N.V.
Yesterday's Tractors - Antique Tractor Headquarters
Website Accessibility Policy