Farmall M Hydraulics- pics please?

n9viw

Member
I have a "49 Farmall M with a 3-point hitch on it, which runs off the factory Lift-All hydraulics. The hitch is partly aftermarket, partly homebrewed linkages, so using it has been a learning process.

Since I bought it, I"ve had to lift both control rods (main lift and Remote Control lift) to raise the 3-point. Only after I received the manual from my father via YT (thanks, Dad!) did I read that this should not be so!

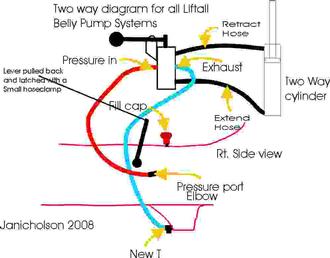
I inspected it today, and it turns out that the PO routed the main hydraulic line from the right side of the tractor to an inlet on the left side of the Remote Control valve body, then routed the pressure line from the upper rear port on the Remote Control valve body to the pistons on the 3-point hitch. He then routed the return from the pistons to the lower rear port on the Remote valve body.

As such, I have to engage the main hydraulics, then ALSO engage the remote hydraulics, to raise the 3-point. Can anyone think of a reason why he would do it this way, rather than just running the pistons off the main hydraulics? There are no other lines on the tractor, and both ports on the left side of the tractor are capped, so it"s not like he was using it for some other implement. I"d appreciate it if someone could post a picture of how their stock hydraulics are run, particularly focusing around the main and remote hydro units.

Another issue I noted while inspecting the tractor is the filler cap/vent valve for the hydraulic system. The filler cap came off fine, but the dipstick looked odd, so I removed it. It turned out to be a 3" section of threaded rod with a nut and washer welded to it to form a stop; this sat on top of the filler neck, under the filler cap. The threaded rod was then welded to a long flat section, about 1/4" wide by 3/32" thick, by about 15" long, presumably the original dipstick. The end of this flat stick was in turn welded to a 1/4"x3" round chunk of ANOTHER dipstick, which is stamped with a couple horizontal lines and an arrow. Could someone post a pic of what"s actually supposed to be in there?

As a side note, the book says there"s supposed to be a "vent valve" on top of the filler cap, and that this is somehow used for the proper operation of the remote hydraulics system. But my cap only has a small (1/16") hole, no valve. What SHOULD be there?

Lastly, the book states that the "Hydraulic Lift-All will lift or drop either the right or left sections of an implement independently of the other, as in the case of cultivators, two-way plows, etc." How would one go about raising the right or left independent of the opposite side? I know about the delay circuit on the left side of the tractor, but that raises AFTER the main circuit, both raising and lowering, and is not exactly independent.

Any help is most appreciated!

Regards,
Nick
 
Well the pump on the Liftall does not work at all unless the rod is pulled. The hitch is set up as lift and down force (double acting) and is correct as is. The rod on the Liftall can be wired back, leaving it on all the time. It hurts nothing to do so. The cap can be sealed with no opening at all (the two way cylinder gives back very close to what it puts out, so no vent is needed (I recommend this as it keeps moisture and dirt out) the dipstick is extended because the setup for the return line T raised the dipstick location. It seems a bit cobbled, but might not come out if it was a solid 1/8" rod that was stock. The stock stick is on a washer just as yours is. The diagram shows the return in the bottom of the Liftall drain. This is a bit less messy, and works well. JimN
v4878.jpg
 
Jim,

Thanks for the diagram, that helps. I do like your setup - that would, indeed, give a true double action circuit, which would help if I had (as I would like to in the future) a front end loader. My system is good enough as power up and gravity down, for now.

Your explanation about the cobbled-together dipstick makes sense, as a solid rod would indeed be hard to remove. It doesn't seem to read properly, though, as there's no mark on the stick (or anywhere near it) that corresponds with the current level of fluid, which doesn't seem too low. Also, there is no return line tee below the filler cap; the return line enters a port on the left side of the Remote Control valve box.

I think, for the time being, I am going to remove the pressure line between the main and remote valves, and connect the pressure line to the pistons to the main circuit. If I set the return up to the bottom of the pan, as your diagram shows, I'd worry about snagging it on brush. The return line seems to work well where it is for right now, so I can leave that.

Nick
 
To raise left or right side on a single acting hydraulic circuit, you need a IH Select-O-lift. It bolts to the steering post on a cast arm. The operating lever is guided into one of three slots. Left, right, or both at once (center slot).

They come up on eBay once in a while. The M or H parts book will have it in the attachment section.

I have one on a H. I'll see if I can post a picture in a day or two.
 
If you try to circumvent the double acting valve by using the lift all valve, you will only have all the way up or all the way down and no in between. That is the reason for the line to the remote valve then to the cylinders.
 
CaterpillarGuy:
So, are you saying that the factory Remote Control valve is double-action? I don't know that I would have figured that out, as I've been pushing both rods forward to lower the 3-point hitch, which would have cut power to the Remote valve before it had a chance to engage its down circuit. I'll have to try leaving the main valve engaged and push forward on the Remote valve to see if it does, indeed, power down.

I have, however, tried raising the deck with the main lever hooked on that little peg in the 'up' position and just pulling back on the remote lever, but it doesn't work, the deck _falls_ an increment every time I pull the remote lever out. I need to have the main AND remote levers pulled ALL the way out to raise the deck, which is a pain while I'm moving because I have to use both hands on the levers and steer with my knees. Is there some sort of adjustment for them, or do I have bad or worn valves?

Wardner:
Thanks for the info about the Select-o-Lift. I don't think I'd need one, I was just curious how it could be done. The book didn't mention needing a separate valve, so I wondered.

More questions for you all:
If one were to want to use the Remote valve for something, but the Remote is dependent on the main for pressure, how would one use the Remote for an implement without also engaging the implement hooked to the main? I'm thinking, a 3-point hitch on the main and a front-end loader on the remote. If I have to engage the main to power the remote, the 3-point would have to be raised to then use the loader.

Speaking of double-action valves, is there such a thing as an aftermarket position control system? I'd love to have that for mowing, to be able to keep the deck out of the dirt without using a limiting strap or piston clamps. The remote does keep the deck partway up (presuming that's what does it), but it loses pressure while I'm mowing, so I occasionally have to raise it again or the mower starts biting the ground. It'd be one less thing to have to worry about.

One last set of questions (for now):
How many here have an auxiliary valving system for their Ms, such as the lever shown in Jim's diagram? Where do you mount the levers, and what sorts of things do you use them for?

Thanks for all your helps!

Nick
 
The issue may be that the Previous owner didn't know enough about how the system works.
If you have a single hose to the hitch lift cylinder, the supply hose is the return hose. The system is designed to pressurize the single hose to extend, and let fluid back into the Liftall through the same hose to lower.
Putting what may be a two way valve in the pressure line, won't work well.
In all cases, the system needs a return to the Liftall.
If you have a one hose rear cylinder:
Take the extra valve off, and put it in a clean plastic bag for use later. Hook the cylinder up to the right side pressure elbow and all is fine.
If you have a two hose (double acting) cylinder
and a two way extra valve hooked up:
There should be 4 ports on the valve. two of them in the center area, and one at each end.
One of the center ports should be connected to pressure in (probably is now). The other center port (may be plugged of) should be connected to the Liftall bottom drain with a T as My drawing shows. Keep the hose tidy and horizontal and the hose will not snag. Each of the two cylinder hoses must be connected to one of the two "end" ports remaining on the valve. This is in essence, what is in the diagram I sent.
The return hose you describe not going to the cap T I described is the reason it will not go down with the Liftall rod in any position but all the way in.
The positions for the rod on the Liftall are up= all the way pulled out. Hold= hooked on the little knob on the rod. Lower= pushed in.
Ask more questions if this is still unclear. JimN
 
Jim,

Thanks again for all your help, I really appreciate it. I just want to make sure I'm using this thing in the right manner- not that it seems to be doing any damage to run it the way I am, but just so it's correct.

My current setup is as follows:
* Single line from Lift-All output on right side of tractor to the left side inlet on the Remote Control valve assembly
* Single line from upper (pressure) rear port on Remote Control valve assembly to break-away, then to hydraulic tee
* Two single lines from either side of the above tee to the pivot-side ports on two double-action cylinders on the 3-point hitch
* Two single lines from the piston-side ports of the above cylinders to a hydraulic tee
* Single line from hydraulic tee to a breakaway valve, then on to the lower (return) rear port on the Remote Control Valve assembly
The two Lift-All ports on the left side of the tractor are capped, as is a port on the right side of the Remote Control valve assembly.

As I mentioned, I have the Operator's Manual for the M as sold on this site, but the pictures are very grainy, and do not clearly show the routing of the hydraulic lines, especially as pertains to the Remote Control valve assembly. Your diagram seems to make sense for a single-spool double-action valve like the one you show, but that doesn't help when I'm trying to figure out this Remote Control unit.

I just went outside and took some washed-out pictures of my hydraulic setup with our old digital camera, but cannot find the cable to download them! Once I find that, I will post them to my Photobucket site and will post a link here.

Nick
 
If the remote valve you have is a two way valve, it should have 4 ports. (one may be capped) does the valve connect to the top of the Liftall where the fill cap is? If so it might be a so called "christmas tree" valve with a built in return to the top fill pipe under the cap. If it just hooks to a bolted on bracket it should have a return hose connection to the reservoir. This return hose eliminates the need to push in the Liftall control rod to lower the cylinders. We will get it right. JimN
 
Jim,

I think this is the "christmas tree" type valve, as you can (maybe) tell from the pictures. It does not bolt on to a separate bracket, but instead threads into a pipe, which then threads to an elbow that tees into the filler neck.

There are indeed four ports, the one in the front of the valve is capped. I don't know if it's pressure or return. The pressure from the main comes in at the left side of the 'tree', the lift pressure goes out from the upper of the two rear ports, and the 'return' is on the lower of the two rear ports.

Once I replace the front tire I had patched, I'll start it up and try it with the main lever held all the way out, and push and pull the remote lever. I may have to remove the mowing deck to figure out if it's actually powering down or if it's still just gravity down, but I got the impression from one of the other responses that the remote ('christmas tree') valve is double-action, not single. Provided the PO plumbed it right, that'll be great.

Nick
 
The way you describe the plumbing, you have a CORRECT two-way hydraulic setup. Your 3pt will power up and power down.

All you need to do is secure the Liftall lever back so that it is providing pressure. Hooking that nub on the lever should work, but maybe the linkages are worn. How much further do you have to pull it to make it work? Maybe weld a piece of key stock on the rod to take up the slack?

A bungee cord could be used to hold the Liftall lever back, or you might be able to secure a small hose clamp on the rod to hold it pulled back, but beware if you have to force it ahead for some reason, you won't be able to.

You will need to use collars on the cylinders to limit height. There is no position control available, unless you sit down and design it yourself. It drops down because you have a leaky christmas tree valve.
 
Jim,

I took the M out mowing, and discovered that the remote control valve is indeed double-action- the upper of the two rear ports provides pressure when the rod is pulled toward the driver, the lower of the rear ports provides pressure when the rod is pushed in. During this, the main rod MUST be pulled ALL the way out, not in the 'hold' position.

I have read about a live hydraulic setup, mounted in front of the distributor. The assembly ahead of my distributor has two levers on it, but they are stuck in place. Also, I'd read that the usual live hydraulics in that location were aftermarket conversions, and that they usually reconfigured the distributor to sit vertically. Mine is still horizontal, and I haven't located any ports... what are the levers for?

Thanks,
Nick
 
Mkirsch,

Thanks for the input. I've learned quite a bit over the last few days, thanks to all of you who've replied here!

I like the idea of the bungee cord versus the hose clamp, but as power down is about the same as gravity down, I don't think I'll be too concerned. If it must be held all the way back to provide pressure to the christmas tree (which it does), is there any way to improve or adjust the linkage?

Rather than limiting the cylinders to control height, I've actually decided to weld on a pair of adjustable height brackets to the front of the mower, to which I can attach a pair of 10" swivel casters. This would allow me to control the height of the deck, but at the same time keep the deck the right height off the ground without using the hydraulics. Actually, if I power the 3-point down past the 'resting point' of the deck so equipped with casters, the 3-point will float, thus treating the deck like a floating drawbar style.

I'll have to do more research into what makes them work, but I had actually toyed with the idea of designing my own position control. Whether or not, at the end of it all, it would be cheaper than buying one aftermarket (if such a thing existed), I don't know, but when they work properly, they sure are nice to have.

I'll get the LiftAll service manual (along with the M service manual) soon, so I can repair the leaking valve. It's a little unnerving when I stop the tractor to do some side work (the other day I had a 35-gallon barrel of water on the mowing deck and was siphoning water out of it to water new trees) and the deck slowly creeps downward with clunks and groans!
 

We sell tractor parts! We have the parts you need to repair your tractor - the right parts. Our low prices and years of research make us your best choice when you need parts. Shop Online Today.

Back
Top