|
| |
| Project Journal - D14 Engine Rebuild - Teardown |
| Handle: |
YTSupport |
|
| Project Name: |
D14 Engine Rebuild - Teardown |
|
| Tractor: |
AC D14 |
|
| Started: |
14:47 07/11/17 |
|
| Updated: |
18:55 07/16/17 |
|
|
| Expand/Contract all Journal Entries Show newest journal entry on top |
15:16 07/11/17
15:16 07/11/17
15:16 07/11/17
15:16 07/11/17
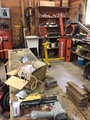
|  15:16 07/11/17 Starting the rebuild 15:16 07/11/17 Starting the rebuildIn my Engine Removal journal, I described the process of pulling the engine out of the AC D-14. After it, I left it sit in the shop, for 8 years. Really a mistake, but I've been too busy with the website and farm to do anything with it. I'm finally getting started. So many projects have taken place on the benches over all these years, the it was a mess. First step was cleaning up the mess just so we could think about the teardown. Fortunately that was only about 45 minutes to clean the bench and extricate the hoist so we could lift it and get it on the bench.
The tractor had been covered with a tarp all these years since the shop leaks right where I had the engine sitting. Under the tarp, the mice decided that the cylinders made a perfect place to build a nest. So I cleaned that out before we started to hoist it. I decided not to put it on the stand, because I wanted to pull the flywheel and look inside the oil pump located underneath. I would imagine it's never been touched in all these years, so it's due for a rebuild along with the engine.
It was up on the bench and the flywheel came off easily but unfortunately, under the clutch and pressure plate, the flywheel surface is pretty scored, before I put new parts in there, I'm going to have to take it to my brothers shop and resurface it. I also noticed that the ring gear is pretty worn, that is a job I don't look forward to, but it would be a crime not to replace or at least flip it around while it's off.
It was getting late so we didn't go further other than to clean up some of the parts laying around to make them ready for painting at a later session. Like the mount and bolts. Since my son will be doing his own restoration soon, I thought I'd impart some of my zen process of restoration. I love using the original pieces everywhere possible, and I could spend hours mindlessly cleaning up the bolts with the bench grinder. Very relaxing.
Now one big mistake I made. Note the oil pan is on and the drain bolt is in it. I have no idea if I drained the oil the last time I pulled the pan. When I was diagnosing this engine, I pulled the pan a couple of times, filled the oil too. I just can't remember, I'm sure I did but... The real mistake is to never let a project sit for 8 years. Well, on the bright side, the wood in the bench may get some preservative. | | | Comments | kevinthefixer
19:31 07/11/17 | Glad to see you started back on it! Just hoist it up again, by the head bolts, drain it while it's in the air. |
|
|
| 
20:53 07/12/17
20:53 07/12/17
21:00 07/12/17
21:00 07/12/17
| 19:26 07/12/17 Only a few minutes to workI had but a few minutes to actually work on the engine today, firewood for winter will get critical if I don't work that now, and most of my outside time was chainsawing and hauling. But when done, we decided to at least pull the pan, oil pickup, and oil filter housing.
First thing that happened was my nearly 30 year old air compressor died on the first bolt we pulled. Slowed to a crawl and just quit, it's been coming for a long time. It's probably too old to find parts but I'll look at that another day. We pulled the pan bolts the old fashioned way, a non-pneumatic ratchet. As it turned out, I hadn't left oil in the engine before pulling it, and the pan came off with no mess.
I shot ample pictures of the bottom end since one must put the rods back in, in the correct orientation. There is a long side and short side to each rod bearing cap, and in this case, the inners are different than the outers. Long side on number one and four face to the inward, and on two and three have the long side pointed outward. Interesting because I don't recall it being that way on BE and CE engines for B, C, and CA. I will check the manual tonight.
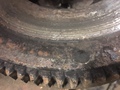
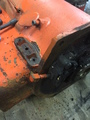
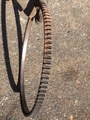
I also shot a photo of the ring gear issues and the surfacing needed on the flywheel. Very scored. Then I too a few of just how things looked, since the aging memory can remember things incorrectly. The governor linkage seemed a good one to capture.
| | |
|
|  | 13:30 07/13/17 Flywheel and ring gear issuesSpoke with my brother on surfacing the flywheel and he pointed out that we'd waste hours getting a perfect chuck on his lathe and I'm certain he's right because he is a perfectionist, my lathe is too small, so he suggested I see if the local tire place could chuck it up accurately with their disc turning lathe. What a great idea.
I also wanted to try something I heard. Flipping the ring gear around to the new surface and then filing a slight bevel to the gear edges. What I heard is that this will create a very smooth starter drive engagement and eliminate the grinding sound I also have had on my old tractors. It sounds like an interesting thing to try. I've never had a bad ring gear before, so this is a chance to experiment. Of course the ring gear is machined to only work one way, with a bevel cut on the side that supposed to mate to the flywheel. But what I've heard is that has no impact in operation, only installation.
I'm also going to try removing the ring gear with a propane torch. I loaned my oxyacetylene rig to my brother three years ago, and frankly don't have space to borrow it back, plus he uses it frequently. Supposedly you can get it hot enough and then knock it off with a punch. | | | Comments | kevinthefixer
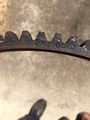
19:26 07/14/17 | Chris, that ring gear is in BAD shape, fully a third of some teeth missing. If possible replace the whole thing. The clutch surface should be ground, not turned 'cos hot spots get hard and cause bits to chatter. I sincerely doubt you can get the ring gear hot enough with propane, I've always had to turn them orange all the way 'round before they'd budge. Problem is that it WILL hurt to try! If it's still flat after removal, you can heat it in an oven and let gravity install it. Bend it and you're OOL. | YTSupport
06:58 07/15/17 | Thanks for the info Kevin, I'll check with the machine shop on the clutch surface. Ring is cheap and available, I just figured if I had over half he gear teeth left, it would be sufficient, but you have a point given the cost. I'm still going to try the propane torch, just because I don't have my gas welder here. Was going to try that today. If it doesn't work, I'll take it out to my brothers since he has my rig. |
|
|
| 
07:34 07/15/17
07:34 07/15/17
07:34 07/15/17
07:34 07/15/17
07:34 07/15/17
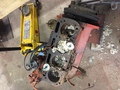
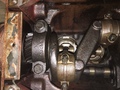
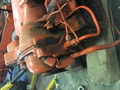
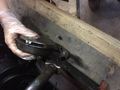
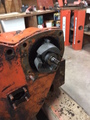
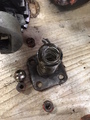
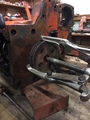
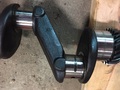
| 07:34 07/15/17 More TeardownYesterday we removed the governor, oil pump, crank pulley and engine front cover. I had more trouble getting the puller in shape to use than any of the actual work. It was well rusted. The pulley took most of the actual time but it's now off. It's a great feeling when a tough pulley finally breaks loose. Once again I had only a propane torch to heat the pulley and was lucky. I've broken pulleys like this in the past and then getting them off is a nightmare. This one came off nicely. There are two types of pulleys for the D14, up to some serial number in 59, they still used a hand crank capable pulley, this engine was apparently after they dropped the inserts for the hand crank. Replacements don't have the crank slot but otherwise, I believe they are interchangeable.
Engine is getting down there. Will pull cam and crank today then start on the nastiest job, removal of the liners. Fortunately, I was able to break the pistons loose so they will slide out the bottom now when it comes time.
The only interesting note today is a reminder that the governor doesn't just slide off, it has the arm linked to the machined shaft that moves it back and forth. It is not a pressure related job to get it off, it just takes finesse to move the arm gently back and forth, and eventually you'll find the position where it slips right off.
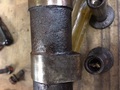
Also need to remove the plate on the front cover quite carefully, Behind it is the ball valve under spring tension. I have another D-14 engine where on removing this plate, the ball shot across the shop and it's never been seen again. The same care needs to be taken when removing the oil pump off the back. It has two very small springs that tension it's rotors and you don't want to lose those. | | |
|
| 
08:42 07/16/17
08:51 07/16/17
08:51 07/16/17
08:51 07/16/17
08:51 07/16/17
08:51 07/16/17
08:51 07/16/17
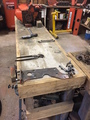
| 20:07 07/15/17 Teardown CompleteI pulled the crankshaft and pistons out, removed the camshaft and popped out the pistons today. Almost time to start my cleanup journal for this tractor.
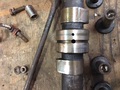
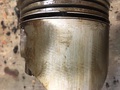
Some of the rod bearings were quite unbelievable in how bad they were. Mains not too good either. Fortunately, this is getting a new crankshaft because this one would have required some serious work. We no longer have any machine shop in the area that will do them, and it would have required shipping anyway. Since we have a source for new ones, I'm going that whole way. Trouble though, is that camshaft is pretty scuffed up, no ridges that I can feel, but it doesn't look too healthy. We don't list it in the catalog, but I think maybe I should look into whether we can get it. I don't like the look of the center bearing surface.
Took the head into a machine shop and told them to do a valve job. Since the head is so easy to pull, I want to try to make due with the existing parts. It saves some money and I'm going to do that with everything not associated with splitting the tractor again.
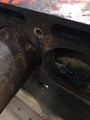
I removed the sleeves the wrong way, used a one inch piece of steel that fit roughly over the bottom of the sleeve, held a old pin from my backhoe (about 1 1/2 inch round stock a foot long, and had my son "tap" it with the sledge. They came out easily, and I tapped them out the rest of the way with a fresh face on a long punch. No damage and not difficult. I was pleased because I've never made a puller for these, and that would taken me much of the time I had to work.
I'm not going to be able to hot tank the block. I can't remove the oil pickup tube, and the shop that does it, refuses to take it with the tube in the block (it can't set flat on it's bottom with the tube in). I put enough pressure on that tube that it should come out if it was going to. It concerned me to keep reefing on it, because that would be hard to replace if I bent it. The BE and CE engines I've done before had a different setup and the tube always popped right out. I'm going to use a combination of solvent and the pressure washer to clean it up. I'm not happy about that because it will just force crud into passages. I will think about this more on how to do it without that happening. I wish the shop would just take it with the tube in. | | | Comments | kevinthefixer
10:41 07/16/17 | Look for a local high-volume auto shop, ask if they have an automatic parts washer big enough. If it was me I'd walk across the street from work and ask the owner of Hickey Automotive if I could borrow his. Knock out any freeze plugs beforehand. Quite right on the crank, it might or might not be turnable. Cam is also junk, the rust damage on that one lobe makes the rest of it into a fine boat anchor. Checked the block for flat yet? | YTSupport
19:05 07/16/17 | New crank will be part of the order, still unsure about the cam, it doesn't feel scored at all, but it is pretty badly scuffed. I was actually surprised by how bad the damage was given that it ran so well before the leak occurred. From the time I bought the tractor, the crank knocked badly so that wasn't as much surprise, but the cam is. This week I'll work out the parts list with our lead salesman and look to getting a cam. I didn't even think about the freeze plugs. I've always replaced them on the BE/CE engines. Now that you've got me thinking, I think the head has the only plugs on this engine. Just went through the parts manual to verify. |
|
|
| 
18:55 07/16/17
18:55 07/16/17
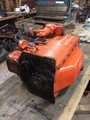
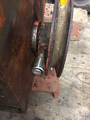
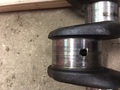
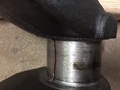
| 18:55 07/16/17 One moreI removed the ring gear from the flywheel and realized it can't be turned around. I could spin it 90 degrees but it has already been spun 180 so a lot of material is missing in two places. Turning it around is impossible because it's machined with a lip on the face side that I didn't notice. The bevel on the other side also mates with a bevel on the flywheel itself. It's not like an some other flywheels I've seen where the two sides aren't so very different. I'm buying a new one. Using the propane torch did appear to be enough, it came off easily enough with a punch. I heated for 5 minutes then started working my way around. By the third pass, it was noticeably coming off.
The flywheel cleaned up nicely but it still is headed for the grinder in the morning. I'm going to put it in the freezer at the house so it can get down to 0 degrees Fahrenheit. When I go to put the new one on, that's where I'm not sure if the propane will do the job. I'll bring the gear up to 500 in the oven and see if that's good enough, but I need to get my parts order in before any of that can happen.
I think I'll start the clean up and parts acquisition journal and let this one stop now. | | |
|
| |
|
| | Return to Journal list |
|
What are Project Journals?
Project Journals are a place where YT Community members can document their tractor and farm projects. Each journal created, can have many photos and accompanying text entries. You can also enable comments to allow other members of the YT Community to comment on your journal. If you do enable comments, it is up to you to moderate what people enter in your journal according to the site policy of Yesterdays Tractors. Journals may also be used as photo posting area, to post your photos of your farm, tractors and related photo topics. If you would like to create a journal, just be sure you are logged in to the Classic View of the forums, and a link will appear to do so when you next come to this page.
. |
Home
| Forums
Today's Featured Article -
Farmall 460: That's My Girl - by LeAnn R. Ralph. How many sounds can you think of that are as familiar to you as your own breathing? What about the hum of your refrigerator? Or the thump of your clothes dryer? Maybe the engine of your car? You hear those sounds every day, and you don't think much about them, do you. I can think of a few common, ordinary sounds in my daily life, too.
... [Read Article]
Latest Ad:
Super WD9.
[More Ads]
Copyright © 1997-2024 Yesterday's Tractor Co.
All Rights Reserved. Reproduction of any part of this website, including design and content, without written permission is strictly prohibited. Trade Marks and Trade Names contained and used in this Website are those of others, and are used in this Website in a descriptive sense to refer to the products of others. Use of this Web site constitutes acceptance of our User Agreement and Privacy Policy TRADEMARK DISCLAIMER: Tradenames and Trademarks referred to within Yesterday's Tractor Co. products and within the Yesterday's Tractor Co. websites are the property of their respective trademark holders. None of these trademark holders are affiliated with Yesterday's Tractor Co., our products, or our website nor are we sponsored by them. John Deere and its logos are the registered trademarks of the John Deere Corporation. Agco, Agco Allis, White, Massey Ferguson and their logos are the registered trademarks of AGCO Corporation. Case, Case-IH, Farmall, International Harvester, New Holland and their logos are registered trademarks of CNH Global N.V. Yesterday's Tractors - Antique Tractor HeadquartersWebsite Accessibility Policy |
|


