The Fordson F Ignition System A fellow restorer contacted me earlier this year asking for some help and advice on a model F that he was restoring. He had over a period of months spent a fair amount of his hard earned cash on replacement parts for the old "trembler" ignition. Sadly though all his efforts seemed to be a waste of time and money as he still couldn''t get the temperamental old thing to run correctly!! If i said that this was a little frustrating for him that would be "conservative" in fact the problem had reduced him to tears of frustration!! The old Fordson Model F represented in many instances the farmers first experience of a gas engine machine. This "mistique" seems to survive even to the present day as many modern restorers and would be restorers, view it with grave misgivings and tend to keep the magneto conversions on their machines, without really getting to know the fordson ignition system or attempting to restore it along with their tractor. The magneto conversions to these machines, of which their are many, are in their own right of historical importance. Owners of such conversions may wish to retain these "working changes" to save the character of their tractors and with this i have absolutely no problems. It does though, without doubt serve to prove that the simple Fordson system with its in built quirks of character was never really understood or appreciated. The Fordson F ignition system is probably the easiest to repair and " gettable" ignition system used on early tractors, it had to be, ...in the days when farmers had to be their own mechanics with little more to guide them than an instruction manual and a prayer. Nowadays of course to many people it seems unduly complicated...but this is not so...trust me. It is usualy the simple things, like too much oil on the distibuter roller and its track allowing the build up of dust which acts as an insulator, or maybe a bad connection and "shorts" where the wires fit onto the back of the coil box. With all these points serviced and clean there is little more that can go wrong.
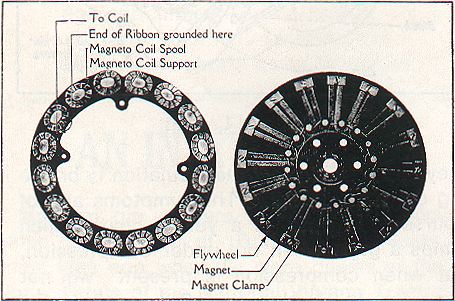
In the old days it has been said that it was often neccessary to close gaps to start and warm an engine, then clean and re-gap one or more of the plugs and the engine would work okay....Untill it had to start from cold again!! It is not unusual for all the coils to fail together, so if one cylinder constantly misfires, change the coil to another cylinder to prove the suspect coil unit...but mark it first to avoid confusion!! It is easy to forgett which one was the original suspect. The generator is the unit which is the most "trouble free" of all components of the model F ignition (just as well as the tractor has to be split to get at it!!) the unit can be seen in the original manual illustaration. There are two main problems, the first is man made...ie if a battery is used for starting and the lead is not removed from the pick up on the fly wheel there is a serious risk of the magneto becoming demagnetised....this has disasterous results to the current generation!. The second is simply wear,....whether by fair use or because the previous owners have neglected to change the oil often enough, or even let it run too low.
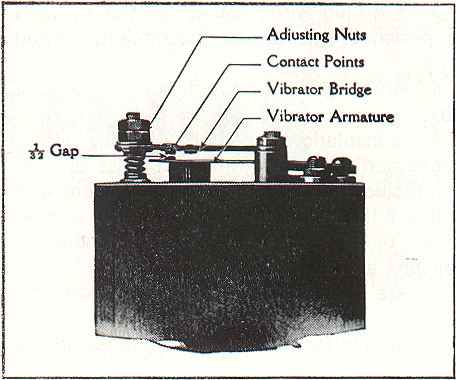
This excess play provided the answer which puzzled many old time users who if needs meant that they had to hand over to another driver, would caution them to "be sure and stop her facing downhill, or her won't start!" but could give no explanation for this. A little thought now tells us that if the gap is too wide it would not be possible to turn the engine fast enough by hand, to generate the current rquired to start the machine.! Facing the tractor downhill meant that the magnets were closer to the coil!. This of course should be taken into consideration if your restoration project has had its crank ground and new bearings metalled into the block!! I wonder, how many tractors in otherwise perfect order are difficult if not impossible to start without a battery due to the thrust faces on the rear main bearing being incorrectly machined. thus resulting in a more than correct gap between the coils and magneto? Now regarding the distributor / commutator located on the front timing cover. This will give little trouble if it is cleaned and lightly oiled everyday, no oil will induce premature wear on the cam or roller. Too much oil will cause dust and dirt to collect on the roller track and is likely to lift the roller away from the four contacts, which is prone to cause bad starting and misfiring. To remove the commutator assembly, disconnect the control rod, take off the retaining spring and remove the cap and leads. Remove the camshaft end lock nut, and pull off the roller assembley. Now inspect all the parts, look for cracked or perished leads, renew if necessary, inspect the cap, being sure that the steel segments are sound and that the fibre insulating ring is not undulating, which might cause the roller to bounce at high revs. Check that the fibre is not perished as that will cause loss of insulation, make sure that the roller and its bearing pivot are not worn, then clean everything before re-assembly. When rebuilding this assembly be sure that No:1 exhaust valve is closed and the roller is at the top, the commutator case lug should always be pointing towards the right hand side of the tractor ( sitting on the seat). Having made sure the spark plugs and leads are in good working order, turn now to the coil box and coils, again it is the simple things that give the most trouble. If you have taken the coils indoors and kept them really dry. Will all this effort come to nothing because the insulation for the contacts in the coil box, wood or fibre is damp or rotting? Does the coil box rain in?...Did you leave the coil box lid open and allow the damp to creep in, when the coils were removed? If all this has been properly sheilded from the weather then we can turn to the coils. Each unit is seperate to the other three, but is interchangeable. When they are removed from ther case inspect them individually to make sure the brass contact disks are clean and bright, also that the wooden cases are not damaged or split. A good coat of varnish will often help keep the damp from penetrating small cracks on the wooden case, modern new coils have plastic cases which are undisputedly better for insulation but not as traditional in appearence. Inspect the contact points (see picture no:2) make sure they are clean, use a fine file to clean both faces of the contact points and be sure the spring is free to work and not corroded thus stiff to move. Set the gap by using the lock nuts, don't as previously mentioned bend or modify the flat strips upon which the points are mounted. Remember it will be necessary to hold down the vibrator armature to check the points gap. Now it's time to look at a few places ignition problems occur, if you have a misfirew that is difficult to locate proceed as follows: Have available a 12v D.C battery (small car type) but never connect battery to flywheel terminal. Before we start our check, let me draw your attention to the dangers associated with the cranking by hand when testing or repairing this ignition system...especialy when using a battery in place of the fly wheel magneto! Always place your thumb on the same side of the starting handle as your fingers!! that's if you like your thumbs that is!! and when starting with a battery never "spin" the engine just pull up sharply with the handle, Remember after working on the ignition system if you have not replaced everything as it should be a rogue spark in the wrong place may cause a severe kick back!! this can dislocate a thumb as i found to my misfortune!! so ...be warned! If you are lucky enough to have a belt pully.and even luckier to have two tractors! it is well worth belting them up when starting an engine for the first time. A belt driven engine is usefull to check the voltage output from your fly wheel. The manual states that the F should dispense 14 volts at 1000 rpm. Down to 6 volts at 300 rpm. This lower voltage at cranking speed is why it is doubly important to have and keep points, plugs, commutator etc clean and adjusted correctly. Talking of the fly wheel generator, if you are able to motor your machine via a pully get it up to speed about 1000 rpm, disconect the wire from the fly wheel pick up and connect it to a voltage meter. As stated it should read 14 volts. If it is low stop, remove the nipple from the pick up point on the casting, check that the spring is clean and not shorted out by dirt or pieces of swarf, or metalic particles. If metal is found then one must assume that the magnets are also contaminated and the machine should be split and corrective repair work under taken.If it is just gunge and dirt contaminating the nmagnets, try adding some deisel to the oil and flush the whole thing out...not forgetting to refill with clean fresh oil!! and under no circumstances should you attempt to run the machine with diesel in the oil. There is another way which is very useful if you find or suspect the generator is down on output even if clean. This may be evident by the fact that the tractor cannot be started by hand without the use of a battery, but will run once the battery is disconected. The second way is outlined in a fordson service memo put out in 1922 and forms the part of a directive for in field re charging of the magneto to avoid splitting the tractor. The directive recomends the use of a rectifier to produce a 24 v D.C current to be connected positive to the magneto contact and negative to earth. It aklso suggests a number of fully charged 12 volt units connected positive to negative in series will do the same job. Now the generator may be down on power due to dirt, but more like it is because someone has used a battery to provide starting current without disconnecting the lead from the magneto post. This is almost always fatal to the magnetic field! This being so...one may ask how 24 volts connected to the magneto post can repair the situation? the answer is the positioning of the magneto in relation to the coils and never turning the engine whilst the current is connected. To carry out this operation proceed as follows: First obtain two vital pieces of equipment. A sensitive compass and a 3 ohm resistor to limit your 24 volt output to 30 amperes, this resistor can be obtained from automotive stores. Next...if possible run the machine to get it warm, stop the tractor and remove the plugs, with a colleague to turn the starter handle hold your compass close to the crank case about 1&1/4 inches below the magneto post, and slowly turn the engine untill the north seeking hand of the compass turns to face the rear of the tractor, now place the compass the same distance above the magneto post and the compass should turn and face the front of the tractor. A fairly sensitive compass is required, but if the magnets are completely discharged it may be necessary to remove the sump to get a reading. With the compass telling you that the magnets are in the correct position, and the positive wire connected to the magneto post, it is now necessary to firmly touch the negative wire to the tractor body for two seconds, wait 5 seconds and repeat the process ten times! Turn the engine a 1/4 turn and check position with the compass repeating at each 1/4 turn untill a complete revolution is made, the magneto field should now be strong. Is all this trouble and effort worth it...well if the proceedure worked and the coil is now up to strength, you should have trouble free starting for your model F, just the way Henry meant it to be. On the other hand if it doesn't then we are forced to consider that the coils are irreparably damaged and need replacing. If like me you are willing to experiment and have as go at restoring your machine to its former glory then the whole exercise has been worth it just for the experience of getting to know your tractor a little better!!.....safe and happy mendings from the UK.
We sell tractor parts! We have the parts you need to repair your tractor - the right parts. Our low prices and years of research make us your best choice when you need parts. Shop Online Today. Copyright © 1997-2024 Yesterday's Tractor Co. All Rights Reserved. Reproduction of any part of this website, including design and content, without written permission is strictly prohibited. Trade Marks and Trade Names contained and used in this Website are those of others, and are used in this Website in a descriptive sense to refer to the products of others. Use of this Web site constitutes acceptance of our User Agreement and Privacy Policy TRADEMARK DISCLAIMER: Tradenames and Trademarks referred to within Yesterday's Tractor Co. products and within the Yesterday's Tractor Co. websites are the property of their respective trademark holders. None of these trademark holders are affiliated with Yesterday's Tractor Co., our products, or our website nor are we sponsored by them. John Deere and its logos are the registered trademarks of the John Deere Corporation. Agco, Agco Allis, White, Massey Ferguson and their logos are the registered trademarks of AGCO Corporation. Case, Case-IH, Farmall, International Harvester, New Holland and their logos are registered trademarks of CNH Global N.V.
Yesterday's Tractors - Antique Tractor Headquarters |