by Steven Gussey
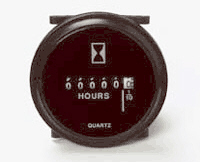
First, I bought a waterproof hourmeter from JCWhitney that will operate on anything from 4 to 40 volts DC. Other hourmeters need more than 6 volts. For the power wire on the hour meter, run a wire from either ammeter terminal. If your tractor is positive ground, run this wire to the (-) negative side of the meter. If your tractor is negative ground, run this wire to the (+) positive side of the meter.
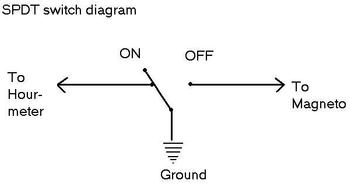
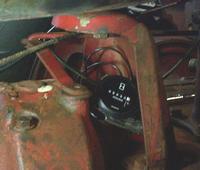
Please note, these instructions are for a MAGNETO equipped tractor. If you have a distributor, read the paragraph at the bottom of the page. Really simple: look at the diagram on your right. One wire goes from the switch to a ground, one goes to the negative terminal on the hour meter, and the last one goes to the grounding terminal on the magneto. When you flip the switch it ungrounds the magneto and grounds the hourmeter, allowing the tractor and hourmeter to both run. Below is a picture of where I mounted the meter on my H.
I mounted
the meter under the rear gas tank support so it is out of the weather a
little more. It is supposed to be water proof, but I didn't want to find
out the hard way. Also, down there no one can see it unless they look for
it.
INSTRUCTIONS FOR DISTRIBUTOR EQUIPPED
TRACTORS: For the power wire on the hour meter, run a wire from either ammeter terminal. If your tractor is positive ground, run this wire to the (-) negative side of the meter. If your tractor is negative ground, run this wire to the (+) positive side of the meter.
We sell tractor parts! We have the parts you need to repair your tractor - the right parts. Our low prices and years of research make us your best choice when you need parts. Shop Online Today. Copyright © 1997-2024 Yesterday's Tractor Co. All Rights Reserved. Reproduction of any part of this website, including design and content, without written permission is strictly prohibited. Trade Marks and Trade Names contained and used in this Website are those of others, and are used in this Website in a descriptive sense to refer to the products of others. Use of this Web site constitutes acceptance of our User Agreement and Privacy Policy TRADEMARK DISCLAIMER: Tradenames and Trademarks referred to within Yesterday's Tractor Co. products and within the Yesterday's Tractor Co. websites are the property of their respective trademark holders. None of these trademark holders are affiliated with Yesterday's Tractor Co., our products, or our website nor are we sponsored by them. John Deere and its logos are the registered trademarks of the John Deere Corporation. Agco, Agco Allis, White, Massey Ferguson and their logos are the registered trademarks of AGCO Corporation. Case, Case-IH, Farmall, International Harvester, New Holland and their logos are registered trademarks of CNH Global N.V.
Yesterday's Tractors - Antique Tractor Headquarters |