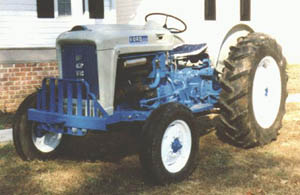
by Tommy Duvall After two summers of having to park my old 1964 model 4000 gas 4 cyl. on a hill just in case the 6 volt system, for whatever reason, would not crank her, I decided to try the 12 volt conversion. After some research of convert or not, I decided to go ahead, the main reason being that this tractor was a working tractor, not a show tractor (yet). I did keep everything I replaced for the day I do want to restore her to showroom condition.
The Parts: 1. Delco 10si Alternator. I used the 1 wire Marine version, but the 3 wire version is not much more difficult to wire. I got mine at the local alternator shop for around $50, but this was expensive. The new alternator I got had a 3/8 pulley, where the generator had a ½ pulley. This makes the belt ride kinda high, but still works well so far. I am going to leave it for now, but there are ½ pulley available for the 10si. 2. A bottom alternator mounting bracket of some kind. This scared me the most, as I am not very good at fabricating things (that work anyway) (* See Below) 3. Wires & Terminals:
4. A 3 ohm, 12 volt coil, with internal resistor. This was EXPENSIVE for a coil - Paid over $40! (* See Below) Note: The primary resistance of coils from different manufacturers varies. So long as the coil is not a high output type, or intended only for use with electronic ignitions or racing, the primary resistance of the coil should fall within an acceptable range. Most of the high output coils have a lower primary resistance, and can go through a set of points in no time. And for that same reason, having a standard type coil WITH an internal resistor is very important. 5. A Voltmeter. About $20-$30 at the parts store. (* See Below) 6. (not required, but smart) A 12 volt solenoid, which is activated by grounding the "S" terminal with the starter button. Most automotive solenoids WON'T work, as they require "+" flow to one post, and the other bypasses the external ballast resistor to deliver more power to the coil to aid in starting. These are $15 at most tractor repair shops, or Ford/NH dealers. Be sure to tell them you want 12 volt solenoid - not 6. Also you can use a Napa ST-56, which has only the S terminal. It is 12 volt, and can be wired just like the original Ford solenoid, except you dont need the wire from the key switch to the I terminal, since it does not have one. 7. A good 12 volt battery that fits in the battery box. Removing Stuff: 1. Remove the old battery completely. Now might be a good time to replace or at least clean and patch up the battery box. 2. Remove the air cleaner and tubing to the carb. I also took this opportunity to soak the cleaner element in solvent, and later rinse out good. Of course, change the air filter oil and clean the cup before reassembling. 3. Unscrew and detatach the wires from the existing 6 volt generator. 4. Detach the wire from the coil on the opposite side of the tractor and pull the wire from the coil back around to the generator side of the tractor, and together with the wires to the generator (they are taped together) and pull back to the solenoid. 5. Remove the wire from the coil to the distributor. 6. Pull the wires from the two front posts on the solenoid. 7. Remove the key switch and unattach the 2 wires attached to it. 8. Remove the 2 screws holding the voltage regulator under the dash 9. Remove the connections to the voltage regulator and remove the regulator. The 10si alternator is internally regulated, so you won't need the voltage regulator any more, but keep it in case you ever want to restore 6 volts. 10. Unconnect the wire on the starter button and pull it back up under the dash. 11. Remove the existing wiring, except the headlight/rear light wiring. This is separate to the ignition and starter wiring, and only attaches to the voltage regulator to get power. It has a separate switch and in-line fuse, and need not be replaced, given the wires still look good. HOWEVER DO replace the bulbs or they will fry pretty quick getting 12 volts! 12. Unbolt the generator from the mount, leaving the existing mount in place. It will be used with the brackets to mount the new alternator. Keep the generator in case you may want to restore it back to original 6 volt someday. 13. Remove the 6 volt coil. Now, the reassembly: 1. Mount the new mounting brackets by bolting them to the existing bracket. This is hard to explain, but not hard to do. You will see when you get the brackets in-hand. Be sure to get the alternator lined up with the fan and crankshaft pulleys. If you choose to make a bracket, make sure it is sturdy enough to hold the alternator. Now, mount the alternator. 2. You will need a new, longer belt, since the alternator is farther away than the old generator was. I took my old belt to the auto parts store and got them to let me take 3 belts: one that is 1/2" longer than mine, one that is 1" longer than mine, and one that is 1 1/2" longer than mine. The one that is 1" longer worked for me, and I returned the others. I wish I had saved the sleeve to give you the Gates number, but I discarded it. (learned something) 3. The top adjustment bracket can be used as is. I loosened the bolt holding it to the block so I could get the alternator bottom brackets adjusted properly. Now, place a few flat washers between the top bracket and the alternator to get the positioning right. Notice the bolt will now enter from the back of the alternator mounting ear, thru the bracket and the washers. 4. If you got a new solenoid, remove the old one and mount the new one now. 5. Mount with the new coil. I mounted mine with the "-" post towards the distributor, but since we will be rewiring, it really doesn't matter. 6. I mounted the voltmeter in the place of the fuel gauge on mine, since my fuel gauge does not work, and isn't missed much. My fuel gauge now is a clean 28" piece of bamboo I keep in the shed, and dip into the tank to see how far up the bamboo gets wetted. I'll fix *someday*. Please be aware, however, that 12 volts will also fry your 6 volt fuel gauge. (Something about frying and fuel just dont go together very well) It will either need to be replaced, or resistors added to its circuit to reduce the voltage. I havent checked, but a dollar says the fuel gauge from the diesel versions of these will work! Now the wiring: 1. Crimp 2 small ring terminals onto each end of a 6" piece of wire, and run from the "-" side of the coil to the distributor. 2. Run a wire from the "+" side of the coil back around the tractor to the switched side of the key switch (i.e. the side that only gets power when the key switch is on) Crimp terminals on each end to attach. 3. Run a 10 gauge wire from the "BAT" (and only terminal on the 1 wire version) terminal to the side post on the solenoid where the battery connects. This will require a small 10-12 gauge ring on one end, and a large 10-12 gauge ring on the other end. 10 gauge wire is required here because the alternator can really put out some amps if the battery gets low, and the alternator needs to recharge it. 4. Run a wire from the solenoid post where the battery cable attaches to the "hot" side of the key switch. This too will require a small ring on one end, and a large ring on the other end. 5. Run a wire from the switched side of the key switch to the "I" terminal on the front of the solenoid. Attach using small ring terminals. 6. Run a wire from the pushbutton starter on the top of the transmission to the "S" terminal on the front of the solenoid. Attach using small ring terminals. 7. Run a wire from the switched side of the key switch to the "+" side of the voltmeter. Then run a wire from the "-" side of the voltmeter to the "-" battery post, frame, sheet metal, or other suitable ground. Attach using suitable rings. 8. This is optional, but I put most of my wiring in automotive conduit, available at most auto parts stores. This shields the wires from things like engine heat and stray limbs, bushes, etc while working. Now the battery: 1. Place a 12 volt battery in the battery box, with the positive ("+") side towards the inside. Notice this is opposite from the way the 6 volt battery way in the box. Take the old 6 volt to the battery store with you so you can both match the physical size, and dispose of the old battery properly. 6 volt batteries are still made and widely available. 2. Hook the POSITIVE ("+") side of the battery to the solenoid, and the "-" side to the ground. 3. BE SURE the key switch is in the "off" position, and attach the negative ("-") post of the battery to the ground wire. (NOTE: BE SURE you have the "-" side of the battery grounded. Get it backwards and your alternator has had a bad day) Now check it out: 1. With a small DC test light, hook the light ground clip to the "-" side of the battery. Turn the switch on and observe the voltmeter mounted in the dash - It should rise to 12 volts (or close to it).
2. If all the above check out, hit the starter button. It should spin over MUCH faster than with the 6 volt system, and will probably crank almost immediately. (Be aware that now you are sending 12 volts to a starter designed for 6 volts. The starter could be damaged by excessive cranking, so if she doesnt start pretty quickly, let the starter rest between attempts. I personally wont let the starter run over about 5 to 7 seconds at a pop.) The voltmeter should read about 13.5 to 14.5 volts with the engine running. If it stays at 12, rev up the engine. Mine took this to begin charging. Don't forget to put the air cleaner back on. Lastly: Replace all the light bulbs with 12 volt bulbs. My dealer looked up the bulbs for the diesel version of mine, but said they were the same as most of the "Blue Thousand Series" until well up into the 80's. I had an aftermarket rear fender light on mine which had no replacement bulb, but I only paid $10 for it at a flea market. I will get another 12 volt light at the same flea market later on. The light bulbs dont have to come from a tractor dealer, however. Any auto parts counter man(excuse me, person) who is willing to spend two minutes doing it, will be able to come up with 12 volt replacements of the same types and candlepower. That was it on mine! I have just completed this conversion, and will see this spring when it is time to hookup the ole 2-bottom or brush-hog, but I feel that, given how much better she cranks, my starting problems are well diminished. Besides, I can now boost her off with my pickup or other tractor, without worrying about a battery explosion.
We sell tractor parts! We have the parts you need to repair your tractor - the right parts. Our low prices and years of research make us your best choice when you need parts. Shop Online Today. Copyright © 1997-2024 Yesterday's Tractor Co. All Rights Reserved. Reproduction of any part of this website, including design and content, without written permission is strictly prohibited. Trade Marks and Trade Names contained and used in this Website are those of others, and are used in this Website in a descriptive sense to refer to the products of others. Use of this Web site constitutes acceptance of our User Agreement and Privacy Policy TRADEMARK DISCLAIMER: Tradenames and Trademarks referred to within Yesterday's Tractor Co. products and within the Yesterday's Tractor Co. websites are the property of their respective trademark holders. None of these trademark holders are affiliated with Yesterday's Tractor Co., our products, or our website nor are we sponsored by them. John Deere and its logos are the registered trademarks of the John Deere Corporation. Agco, Agco Allis, White, Massey Ferguson and their logos are the registered trademarks of AGCO Corporation. Case, Case-IH, Farmall, International Harvester, New Holland and their logos are registered trademarks of CNH Global N.V.
Yesterday's Tractors - Antique Tractor Headquarters |