" What I"ve read is to put the #1 cylinder on TDC and then adjust the points so it fires."
No.
While setting the timing is part of a tune up including replacing the points, timing in and by itself is rarely a problem. What is the usual problem is worn points or bushings. Or both.
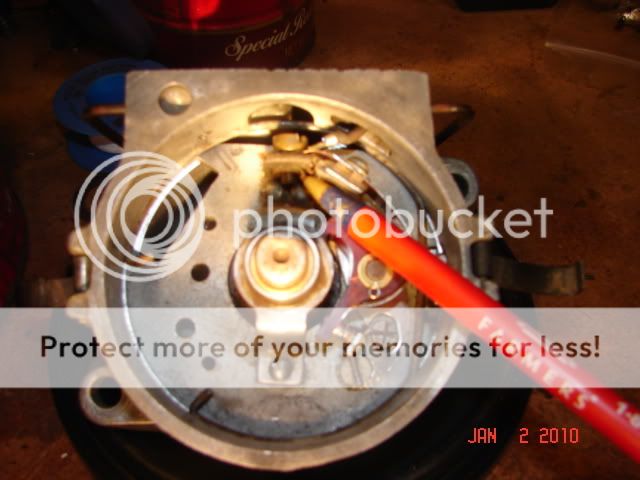
The front distributor was designed to come off of the tractor to replace/adjust the points. Remove the wire on the coil, remove the coil bail, remove the distributor cap & take the two bolts off. The base of the distributor has an offset tang & can only go back one way unless you really force it on. Look at how the points & condenser set in the distributor before you start pulling it down! Turn the tang & observe how the points open & close. If this is your first time doing it, draw a sketch!. Make sure you are using quality parts; the points should have a phenolic rubbing block & not the cheap white plastic crap. Use only Wells, Blue Streak or Echlin brand points. (* see below) Be careful not to ground the tip of the condenser wire to the body of the distributor when you replace the points. Do not break the little copper strip that goes to the points. (If you do, make another out of the old set of points) Also, make sure the condenser wire does not go through the same opening in the distributor that the coil pig tail does. The condenser wire goes the opening on the top right. Look at the old points; are they burned, pitted or mis-aligned? Check the point gap, .015 on all four lobes. Make sure the blade is at a perfect right angle to the points & you want to feel just the slightest bit of drag when you pull the blade through the points. Set the points on the highside of the cam. Make sure you have the star washers under the screws on the points. Dress the points by running a piece of card stock or brown paper bag through them. New points sometimes have an anti-corrosive dielectric coating on them & old points can corrode or pick up grease from a dirty feeler gauge or excessive cam lubricant. And, don�t forget to lube the rubbing block w/ cam lube; not Vaseline, not bearing grease, but cam lube. (** see below)
Now, set the timing. Do it exactly like TOM IN MS said.
After you set the points & timing, do a continuity check before you put the distributor back on the tractor. Before you start, make sure your meter/light works (don't ask....)
With the distributor still off the tractor, follow these steps:
1. Coil off, cap off, points open. One probe on the brass screw & the other on both sides of the open points. On the side closest to the cam, you should have continuity. Not on the other side! If you do, you will also have continuity everywhere because the points are grounded.
2. Coil off, cap off, points open. One probe on the brass screw & the other anywhere on the body of the distributor. You should have no continuity! Now, rotate the tang on the distributor....as the points open & close, you have continuity (closed) and lose it when they open.
3. Put the coil on the distributor, cap off, points open. One probe on the lead on the top of the coil, the other on the cam side of the open points. You should have continuity!
4. Coil on, cap off, points open. One probe on the lead on the top of the coil, the other anywhere on the body of the distributor. You should have no continuity!
At this point, I just put the distributor, coil & cap all back on the tractor as a unit. The reason I do this is because it is real easy to get the cap or coil mis-aligned trying to put it back together one piece at a time & the result is something gets broken or you get a �no spark� problem.
It's possible to put it back on wrong & break it. Look at the slot on the end of the cam shaft. What ever angle it happens to be, turn the distributor tang to match it. Make sure you can tell the wide side from the narrow side on both the cam & distributor! (close counts) Then place the distributor on the front of the engine, gently push it in place & slowly turn the distributor body until you feel the tang slip into the slot. Rotate the distributor body until the bolt holes line up. Then, hand tighten the two bolts until the distributor body is flush w/ the timing gear cover.
We sell tractor parts! We have the parts you need to repair your tractor - the right parts. Our low prices and years of research make us your best choice when you need parts. Shop Online Today. [ About Us ]
Today's Featured Article - Recollections of a John Deere GP - by Charlie Cook. I grew up on my dad's 280 acre general farm in Western Michigan. Dad's only tractor when I was very young was the old GP. My first recollection of this tractor was when dad allowed my brother and myself to ride on the tractor with him driving. One of us would sit on the left fender (away from the clutch) and other would sit on the gas tank and hold onto the crankcase breather pipe.
... [Read Article]
All Rights Reserved. Reproduction of any part of this website, including design and content, without written permission is strictly prohibited. Trade Marks and Trade Names contained and used in this Website are those of others, and are used in this Website in a descriptive sense to refer to the products of others. Use of this Web site constitutes acceptance of our User Agreement and Privacy Policy
TRADEMARK DISCLAIMER: Tradenames and Trademarks referred to within Yesterday's Tractor Co. products and within the Yesterday's Tractor Co. websites are the property of their respective trademark holders. None of these trademark holders are affiliated with Yesterday's Tractor Co., our products, or our website nor are we sponsored by them. John Deere and its logos are the registered trademarks of the John Deere Corporation. Agco, Agco Allis, White, Massey Ferguson and their logos are the registered trademarks of AGCO Corporation. Case, Case-IH, Farmall, International Harvester, New Holland and their logos are registered trademarks of CNH Global N.V.