1951 Farmall H will not start

bsmart10

Member
My friend has a 1951 Farmall H that he has been working on for some time now. He took it all apart, cleaned it up and made it pretty (didn't do any internal work on the engine). He replaced the wiring harness on it some time ago as well while he had it apart. He had also put new plugs, points, condenser and coil on it.
He had it running some time back (several months ago), but can't get it start up now. We thought it had a carburetor problem, so we pulled it off and I took it apart to look inside. Turns out it looked pretty good and I found no real problems there. Was clean inside, and all small ports were clear, pinhole ports were clear as well. Cleaned all internals with carb cleaner.
We put the carb back on and tried to get the tractor to start, but no-go, not a hint of trying to fire up. We took each spark plug out of its cylinder one at a time to inspect, and only the #4 plug looked like it had been firing sometime in the past (dry and light brown color). Plugs 1 - 3 were carboned up really bad and looked wet. Decided to check for spark on each plug one at a time and sure enough each plug will spark. Not sure the timing of the spark is correct though. I was looking on-line and read that the 6V systms have a Positive (+) ground. Is this correct? Is the + post of the battery supposed to be connected to the frame of the tractor ??
While checking each spark plug for spark, we noticed that fuel is getting to each cylinder based on fuel odor from the open spark plug hole.
So we have fuel, air, and spark, but no hint of starting and running. Friend says he's never messed with the timing on it, so that shouldn't be the problem.....Hmm.
Engine turns over smoothly when we attempted to start it. Plug wires from distributor to cylinders appear to be in the correct locations. Firing sequence is 1-3-4-2 and wires are located accordingly.
What are you experts thinking it will take to get this gal running again?? HELP !
 
Condenser......... Try the old one. It
can spark with a bad one. But wont run...
Don't ask how I found that out.
 
When you said the engine turns over smoothly, did you mean that there is no compression? If the 1,2,3 plugs are wet and #4 is dry, then I suspect a hung up open valve on #4. Probably the intake valve. Also if the distributor has been removed and replaced, it could set the timing off by 180 deg. Use a feeler wire to determine when piston #1 is at TDC and verify that the rotor is actually pointing to the #1 plug wire.

I have also encountered old gas that will not fire for starting, but if a small amount of ether or carb cleaner is sprayed into the carb the engine has started and then runs on the old gas. Maybe in the process of his working on the tractor, the gas has gotten to that point.

Good Luck

Paul in MN
 
Yes, positive ground on 6V system for the H. I second the "fresh gas" suggestion. I have been there myself.
 
Easy test of the valves, disconnect and ground the coil wire.

Remove the air cleaner hose, hold your hand tightly over the intake horn of the carb.

Spin the engine through. You should get a strong, steady vacuum on your hand, and it be wet with gas.

No vacuum, there are stuck open valves.

Vacuum and no gas, there is a fuel delivery problem.

Leave the air cleaner disconnected until you get it running, just in case it is clogged.

Double check the ignition system.

Be sure you have 1/4" spark to ground at each plug. The plug end of the wire, not the distributor.

Double check the firing order, and that it is wired to the correct rotation of the rotor.

Check the wires are correct to #1 on compression. Remove the #1 plug, hold your finger over the hole, bring the piston up feeling for compression. Carefully bring the piston to just before TDC. The rotor should point to #1 cap terminal.

The cylinders may be dry. Put a spoon of oil in each cylinder, spin it out with the plugs out. The oil will raise the compression for easier starting.

You can jump it with 12v. Remove the battery from the circuit, and be careful not to leave the ignition on between start attempts.
 
Black fuel carboned plugs can be a cause of no start. Unusual but a plug may fire in the open air but when it
gets under compression pressure it will fire down the electrode to the round insulator that is covered in black
carbon and not ignite the fuel mixture. Take a propane torch and heat them up till you nearly have the ground
electrode glowing red. Wait for them to cool and wire brush them. Spray them with carb cleaner then blast them
with compressed air. Put them back in and see what happens.
 
Whoa, I thot I was mishearing that the first time I saw it on a video. My friend declares he put the new wiring harness in, just like the old one came out. But, he has the negative (-) battery terminal grounded to the frame. Wouldnt this cause the Starter to rotate in the wrong direction ?
 
Your thots remind me of what Id forgotten to mention. We choked it while trying to start it and gas came out of the bottom hole of the carb. (Why is that hole there, open to atmosphere?) Seems like it will let unfiltered air into the engine. We also tried to start it with Starting Fluid sprayed directly into the intake but no-go. Again the fluid came out the bottom hole.
I like your other ideas, and will pursue that path. Thank you!!
 
It seems that our spark across the plug gap is weak, but its consistent plug to plug, from one plug to the next. I like the idea of checking spark from wire to ground to see if it will jump 1/4 gap.
 
Great suggestion to clean the plugs.. never woulda thot of that method. I think youre right about plugs being wet, not igniting the fuel.
I bet we also have a timing issue as others suggested. Gonna pursue both remedies.
 
A lot of tractors were converted from 6V positive ground to 12V negative ground without changing the starter. Starters are "series wound" and do not care about polarity--they always turn the same way. They are one of the few classes of DC motors that work this way.
 
Since this is 6V with a distributor, you may have the situation where the starter is stealing enough electricity from the ignition coil to weaken or extinguish the spark when trying to start. The spark inside the cylinder under pressure is often weaker than it appears outside the cylinder. You can jump start from a 12V to see if that makes any difference or use separate batteries for the coil & starter. There are directions on how to do this--you have to be careful not to parallel the 6V and 12V battery--I converted mine to magneto to make this a non-issue. If the distributor was ever off the tractor, it is very easy to put it on 180 degrees out, so it is sparking at the exhaust stroke instead of compression. Most of the other good advice is already here: clean & gap plugs, fresh gas, check timing, oil in the cylinders to improve compression, etc. Two years ago "stale gas" stumped me good. Especially true this time of year when it is cold and damp.
 
If this is 6V, I assume it has a generator on it. I am pretty sure the generators require positive ground unless you have one that is reverse polarized, but I do not know why you would. For starting the generator can be disconnected to make that a non-issue. It will run fine without the generator for a few minutes. At least long enough to get it started to see what else is wrong. Coils are usually marked positive or negative ground. I do now know what this one has, or if it is even has a 6V coil. I am not a coil expert, but I can see a 12V coil, or a 6V coil installed backwards (wrong terminal relative to ground) causing problems. Especially if you are trying to run a 6V system negative ground with a coil that is expecting a positive ground. A 6V battery with a 12V coil would most certainly not work.

Bottom line: put the battery in positive ground to match the generator. Then make sure you have a 6V coil installed, also with positive ground. (Note: my 340 had its coil in backwards and still ran, so this may not matter). Link provided to some interesting reading about coils. I make no claim to its accuracy.
Coil Polarity Discussion
 
(quoted from post at 09:23:09 11/16/20) Since this is 6V with a distributor, you may have the situation where the starter is stealing enough electricity from the ignition coil to weaken or extinguish the spark when trying to start. The spark inside the cylinder under pressure is often weaker than it appears outside the cylinder. You can jump start from a 12V to see if that makes any difference or use separate batteries for the coil & starter. There are directions on how to do this--you have to be careful not to parallel the 6V and 12V battery--I converted mine to magneto to make this a non-issue. If the distributor was ever off the tractor, it is very easy to put it on 180 degrees out, so it is sparking at the exhaust stroke instead of compression. Most of the other good advice is already here: clean & gap plugs, fresh gas, check timing, oil in the cylinders to improve compression, etc. Two years ago "stale gas" stumped me good. Especially true this time of year when it is cold and damp.

Good advice from all...we finally got it RUNNING !!! But, it will only run for about a minute at a time. Wait for about a minute and it will start up and run for about a minute again. BACKSTORY...today we pulled all of the plugs, did the burn-off cleaning of them as suggested. Checked the gaps on each plug and found them at about .040, so adjusted them to about .025 each. Looked at the points gap and they looked pretty, so checked and adjusted to about .021 gap.
Checked the timing by checking the position of the #1 cylinder at TDC, (compression at the plug hole) with the double mark on the flywheeh at the timing pointer. Confirmed that the dist rotor was pointing to the #1 post (plug wire).
Put a little oil in each cylinder as suggested to let it soak for a while. Checked the compression of each cylinder, just to know how they were doing, and found them to be at about 75 psi each using the hand crank to test. Probably do higher than that if starter cranked, but didn't test for that.
Confirmed spark to ground from each dist post by inserting a wire into each plug wire one-at-a-time and starter cranking. We got a good 1/4" spark across the gap.
Ok, we've got spark to the plugs, (had that before) the timing looks to be right, we've got fuel to the carb....this gal's gotta start.
Put her all back together, plugs in, wires connected, fuel on, cranked her over.....NOTHING. Not a hint of trying to fire. Choked her, nothing again.
Ok, time to get that battery reversed like its supposed to be, so the (+) is connected to the chassis. Pulled the battery out of the box and rotated it 180 deg and wired it back up. Engaged the Starter, cranked it over....nothing! Lets try some Starter Fluid in the intake.....spray, spray, crank, crank, varooooom! She fired up and sputtered a bit and died. Spray and crank again...varoom and running, a little rough, but running! Started to smooth out, and warm up, but then died. Spray and crank, and she fired up again, ran about a minute, pretty smoothly, then died. Waited a minute, choked her a bit, and cranked her over and she ran. Again, for about a minute, pretty smoothly, and then seemed to starve for fuel. Choked and started again, noticed it seemed to be running RICH, some black smoke from exhaust pipe, ran about a minute then died.
Forgot to mention that the fuel is fresh new fuel, with 10% ethanol.
Noted a couple of things near the end of this process. Saw a vapor plume emitting from the small hole in the bottom of the carb intake port after the engine dies.
Noticed a small fuel drip from the Power adj screw at the bottom of the carb. which I stopped by snugging the brass fitting it goes into.
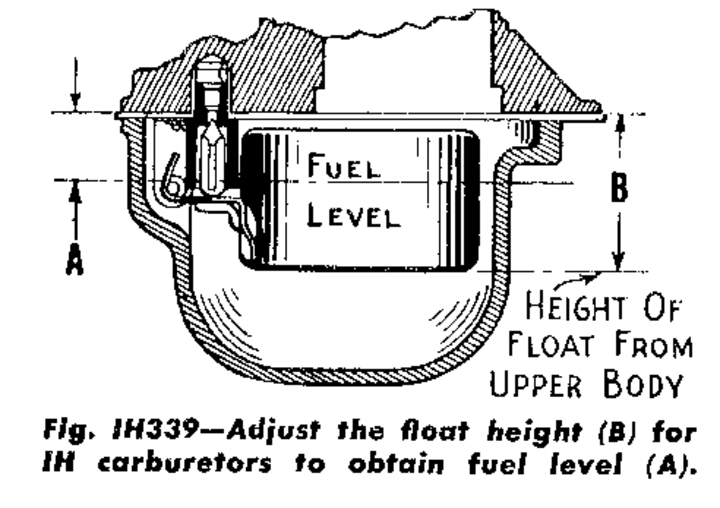
I had this carb apart last week to clean and inspect, but didn't really find anything obviously wrong there. I cleaned it, making sure all of the ports and pinholes were clean and clear, and I adjusted the float per a video instruction. Set to 1 and 7/8" from the flange where the 2 halves of the carb bolt together. I think this may be a mistake. I adjusted by about 1/4" or a little more.

Anyway, what are your thoughts of what's happening now??
Too low a fuel bowl level ?
Is there any way to prevent these carbs from running 'RICH' ?


There is supposed to be a filtering plug in that hole at the intake, and it is perfectly normal for the gas to run out there with an updraft carburetor when it doesn't start. This confirms that you are getting gas. You are chomping at the bit to try getting into your timing. If you can't control yourself go ahead, but it is much more likely that your problem is just the spark.
 

I meant to mention that this is happening at about 6800 ft elevation, probably has an impact on running 'rich'.
 
Could very well be fuel bowl level or another carb adjustment. The manual for the H carb I have lists the float height as 1 53/64, so you're off by 3/64 inch--not sure that is significant. If this is an H is should be the "D 10" carburetor. Could also be a clogged fuel supply. With the fuel on at the tank, you should be able to open the drain on the carb and get a steady stream of fuel flow out. If it only dribbles, there is a clog in there. That carb also has an idle air adjustment--the screw at the 9 o'clock position as you look at the carb. This is turned out for more *air.* The main jet at 5 o'clock is opposite--out is more fuel. Turn this in "in" for less fuel, but turn the idle screw "out" for less fuel.

I have an H and have rebuilt the carb in it but never had the problem you are describing. My H did have a manifold air leak. Your carb should also have some sort of filler in the little hole at the bottom. You should not be able to see up in there. I think the filler is some sort of felt to allow excess fuel to drain out. Congrats on getting it running if only for a little while. Fine tuning from here.
 
Sounds like my 1950 H last winter. Distributor cap center electrode was worn down. It was a really old distributor cap, so I
replaced it and the rotor. Voila', all fixed. Has run great ever since. Cheap fix. Get the brass one, not the aluminum one.
 

Oh, I forgot to mention that my friend had replaced the dist cap, along with condenser, rotor, and plug wires. I think we're all good on the electrical now. Thanks.
 
Yes, it is a D10 as you mention. Good call on the fuel line coming to the carb, we will need to check that next.
I think I'll try to get the float set back to where I found it, which would allow about 1/4" higher fuel level in the bowl before the needle valve closes off the inlet. That would put the float at about 1 and 3/4" which is further away from your manuals spec, not closer to it.
Let me clarify; the measurement was from the top half (turned upside down) of the carbs center body flange with the gasket sitting on it, to the bottom of the float body, (or top since its sitting upside down at the time of measurement) not including the seam thickness around the float. The float seam is maybe 1/16" thick and the gasket thickness is maybe 1/32".
I'm not familiar with how these D01 carbs work, so what is the danger of having too high a fuel level in the bowl ? Will fuel ooze out of the gasket where the 2 body parts meet?
Someone mentioned 'updraft' flow, what difference does that make? I see there's a big venturi in the middle of the carb body, but not sure how the fuel level interacts with that. Need some insights on this...
I'm definitely not seeing anything in that small hole at the bottom of the carb intake throat, its wide open. Guess I need some 'felt' to stuff in that hole
Thanks for all input....keep it coming, please.
 
I will see if I can get a scanned picture, but my manual shows the measurement from the upper carb surface, not the gasket surface. The measurement is from the flat surface of the upper carb body to the bottom (or top, as you're upside-down) of the float. Also, inside the fuel inlet connection there is a fine screen mesh that can get clogged and/or rusted up if there was ever water in the tractor's fuel system--another thing to check.

If the carb is set excessively rich it is possible it is drinking gas faster than the fuel tank can supply it. Is the air filter connected? If it is clogged, the mix will be rich. But if it is removed, the engine will run lean (getting too much air). The air filter has no replaceable element: just a metal mesh and an "oil bath" in the bottom cup that keeps the mesh wet & sticky with oil. That oil needs to be checked and replaced very so often. The mesh itself can be rinsed clean with kerosene.
 

cvphoto63277.png


I found this image online--it matches my manual. I would give you a link to it but it is from a spam website so this picture is all I'll post here. This picture was just "click-bait," but is still accurate.
 
UPDATE: I had my friend take the fuel line and rout it to a gas container, then open the sediment bowl valve full open and watch the flow into the catch container. He reported that it was just dribbling flow. He left it to drain for several hours, and the tank never drained out.
I went over to see what was going on. We removed the fuel line from the sediment bowl under the gas tank and blew it out with compressed air. Crap blew out, pretty nasty. Inspected the tube and found about 1/3 blocked with sediment buildup. Sprayed carb cleaner thru the tube a few times and blew out with compressed air.
Checked for flow out of the sediment bowl, not much there. We took the bowl off the bottom of the tank, and it was crudded up badly. The screen inside was full of sediment crap, the inlet port to the top of the bowl was full of sediment, nearly plugged up. Cleaned all bowl ports with carb cleaner and reassembled. Put the sediment bowl back under the gas tank. Put fuel in the gas tank and checked for flow thru the cleaned bowl assembly....good flow now. Assembled fuel line to bowl assembly, and installed carb to manifold, then installed fuel line to carb. Opened the fuel valve at the bottom of the tank and got distracted with conversation with my friend. After a couple of minutes we heard a trickling sound, and looked back at the tractor to see fuel running out of the bottom hole of the carb body. Dang it!! We shut the fuel off at the bowl to stop the leak and waited a few minutes to ponder what was going on.
Decided to see if the tractor would run now that we know we have good fuel flow to the carb so we wired the battery back up and cranked the starter. Nothing!
My friend cranked it again...nothing! Then he remembered he didn't have the ignition switch ON. Flipped it ON, sprayed Starting Fluid in the intake and .... Varoooom!
She started right up so I quickly opened the fuel valve at the bowl under the gas tank.
Tractor continued to run. Running pretty good, but really RICH, lots of smoke out the exhaust. Tried to adjust with the idle air screw, but no real difference made. It will go from smooth idle, to not so smooth idle, but the smoke is considerable out the exhaust.
I also noticed that there is no fuel dripping or running out of the carb while the engine is running.
We let her run for about 5 minutes trying to make idle mixture adjustment, then decided to quit for the day as it is now dark outside. Shut the fuel off at the bowl valve just in case it decides to pour our the carb again, and shut the engine down.
Will adjusting the timing slightly make a difference in how RICH the carb is running?
We've still got to figure out a fuel line issue.
Gotta nail down fuel coming out of the carb.
You mentioned a screen inside the carb body top where the fuel line attaches. That screen was all crumpled up inside the fitting hole, so I removed it. I plan to put a plastic/paper in-line filter in the fuel line after we resolve the above issues.
Thoughts ??


Gas runs out the bottom of the carb only by passing through the float valve. You need to address this leaking by, and it will probably also clear up your black smoke. CONTROL YOURSELF!!! DO NOT MESS WITH YOUR TIMING UNTIL YOU HAVE THE ALREADY NOTED ISSUES RESOLVED!! The float valve is probably only debris which you have plenty of, but it could be a bent tab at the hinge or possibly the float rubbing against the bowl but that is less likely.
 
You're definitely making progress. I suggest one thing at a time. The tractor runs, but runs rich. So you know you have spark, compression, and fuel--just too much fuel. I would not adjust the timing until you have that carburetor working properly. As another poster mentioned here, the float is possibly getting hung up or the needle valve is not seating properly. I do not recall if the needle valve seat is replaceable on these but if it is, there is a gasket around it and that seat can be unscrewed and that gasket replaced--another source of leakage.

You should be able to remove the carburetor and test it on the bench with a fuel line hooked up above it allowing fuel to flow in by gravity. Or you can use air--just a few psi. The air should stop flowing when turning the carb over, which should allow the needle valve to seat.

*After* you get that carb leakage fixed, you should re-install everything, and then use a screwdriver to gently "seat" both the main jest screw and the idle air screw. Then back out the main jet screw 2 1/2 turns. The idle air screw should be backed out 1 1/2 turns. Adjust up or down from there for best operation. There are many guides to tuning a carburetor on the internet, but in general, get the engine warm at high throttle, then tighten the main screw until it starts to miss, then back out until it is rich, and go for the mid-point between these. The idle air screw is the same except that you should be at low idle and out=lean, so the turning is reversed. You mentioned you were at 6800 feet, so I defer to anyone with high-altitude experience to take it from there. You'll probably end up tuning the carburetor "by ear" for smoothest operation.

While there is no fuel in the system, it may be worth-while to completely unscrew the adjustment screws and look at them. I have seen where the end gets pitted or rusted away and they will not seat or adjust anything. If that happened on the main jet it would also help explain the exceptional richness.

One last thought and not to insult you, but also verify that the choke is not on. The air filter also needs to be cleaned as well. A clogged air filter or stuck choke will also cause richness.

Good luck. You're doing all the right things. Dave
 
You're's and Others comments keep reminding me of things I left out in previous posts.
The breather has been off for all of the run tests we've done so far, and the choke has been open as well, so no issues with either of those yet.
I had the carb opened up previously and had the float set at about 1 and 7/8" from the body flange gasket. ( I mentioned this before) Yesterday I opened the carb up again and re-inspected it and compared where the float was now sitting, to a pic of it before I did any adjustment to it.
That's where I think I messed up, I should have left it where I originally had set (about 1 and 7/8") it a few days before. Instead, I looked at the picture and tried to get it set back closer to where it had been when i originally opened it to look inside.
I'll make that float adjustment back to about 2" and it shouldn't allow fuel to dump out the bottom of the carb.
Then I'll be ready to start the adjustments on the mixture screws as you all have described. I hope to get to that point tomorrow.
 
If I recall correctly, I had both of the mixture screws out previously to inspect them, and didn't notice anything particularly wrong with either of them.
I'll take a second look at them while I'm at it.
 
Good to hear. If the leak doesn't stop, you may have a pitted needle or seat. Also be mindful that if you adjust the carb with the air cleaner off, then when you re-install it will require a little more adjustment (rich/lean) as the mix will change when the filter is re-connected. I think the end is in sight.
 
INDEED !! She lives and breathes again!
Today we took the carb off again and opened it up. The float was right at 2" per the reference points we've talked about before. I adjusted it to 2 and 1/8" and reassembled everything. We fired her up...no ether required, and let her idle a few minutes. Carb exterior remained dry as she idled and all looked pretty good. i adjusted the idle screw OUT to lean out the mixture and listened for smoothest operation.
My friend opened the throttle fully and we make an adjustment on the POWER needle valve, again listening for smoothest operation. It was more evident that this adjustment was doing something and a 'sweet spot' was located.
Back to idle speed and adjusted the idle screw OUT to its limit with little impact noticed on the sound of operation. It can't be adjusted any more or there will be no tension on the spring around the idle screw. So, we turned it in just enough to put a little tension on the spring, so the screw doesn't vibrate out.
Time for a test run. My friend throttles up a bit and takes the tractor out on the street..off he goes, out of sight, out of hearing distance.
I'm waiting, waiting, but he doesn't come back. Turns out, he got half way around the block and ran out of gas! Put more gas in the tank and head up a pretty good incline, and the engine loads up a bit and some smoke comes out the exhaust, but she makes it to the top and smooths out a bit. So, under load shes not really struggling for power, but she doesn't run quite as smooth as when at idle, or on level ground. But, shes ALIVE again, and my friend is as proud as can be!
Got her back to the house, let it idle a bit and then shut her down. Waited a few minutes to see if the carb would stay dry on the exterior, and she did. Looks like we got that float set about right....finally.
Now we have a few loose ends to tie up and fix and we'll leave it at that for a while.
Thanks to all for your input and suggestions on what to look for and what might help! Greatly appreciate your input!! THANKS !
 
(quoted from post at 23:02:22 11/19/20) INDEED !! She lives and breathes again!
Today we took the carb off again and opened it up. The float was right at 2" per the reference points we've talked about before. I adjusted it to 2 and 1/8" and reassembled everything. We fired her up...no ether required, and let her idle a few minutes. Carb exterior remained dry as she idled and all looked pretty good. i adjusted the idle screw OUT to lean out the mixture and listened for smoothest operation.
My friend opened the throttle fully and we make an adjustment on the POWER needle valve, again listening for smoothest operation. It was more evident that this adjustment was doing something and a 'sweet spot' was located.
Back to idle speed and adjusted the idle screw OUT to its limit with little impact noticed on the sound of operation. It can't be adjusted any more or there will be no tension on the spring around the idle screw. So, we turned it in just enough to put a little tension on the spring, so the screw doesn't vibrate out.
Time for a test run. My friend throttles up a bit and takes the tractor out on the street..off he goes, out of sight, out of hearing distance.
I'm waiting, waiting, but he doesn't come back. Turns out, he got half way around the block and ran out of gas! Put more gas in the tank and head up a pretty good incline, and the engine loads up a bit and some smoke comes out the exhaust, but she makes it to the top and smooths out a bit. So, under load shes not really struggling for power, but she doesn't run quite as smooth as when at idle, or on level ground. But, shes ALIVE again, and my friend is as proud as can be!
Got her back to the house, let it idle a bit and then shut her down. Waited a few minutes to see if the carb would stay dry on the exterior, and she did. Looks like we got that float set about right....finally.
Now we have a few loose ends to tie up and fix and we'll leave it at that for a while.
Thanks to all for your input and suggestions on what to look for and what might help! Greatly appreciate your input!! THANKS !


Congratulations!! You can't get a meaningful adjustment on the high speed without putting a load on it. Unless you are heading out to the pulling competitions you are probably good just going with the 2.5 turns or whatever it is that your manual says. Every other year or so I put my pulling tractor on the dyno to try to squeeze a little more out of it with fine adjustments, but I never seem to get any more HP.
 

We sell tractor parts! We have the parts you need to repair your tractor - the right parts. Our low prices and years of research make us your best choice when you need parts. Shop Online Today.

Back
Top