Bathroom remodel question

Total kids bathroom re-do. You could almost call it new construction because everything is new including interior wall studs. We are moving the laundry into the kids bathroom.

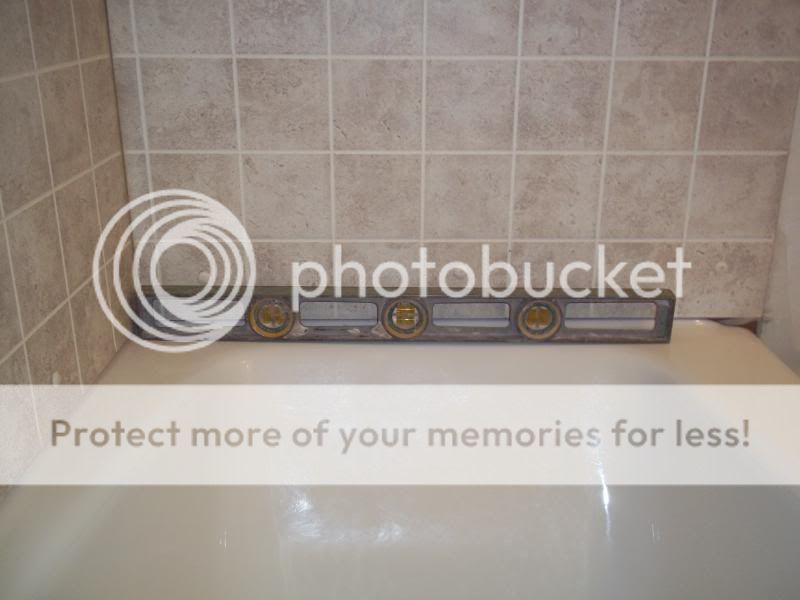
Got a new <a href="http://www.bootz.com/?q=content/kona">steel tub</a> and built stud walls around 3 sides to where tub fits snug into space. Manufacture instructions say to put tub right next to studs so that’s what I did just like I have seen it done many times in the past. Installed all new plumbing and now today I am putting up 1/2" green sheetrock.

And BAM it hits me. Why do they install tubs like this? Why do they not space the tub out from the wall a little so the outer edge of the sheetrock is flush with the inside edge of the tub flange. I mean this tub only has a 2" space around the top. Sure glad I am not putting in a tile shower surround with 1/2" rock board behind it. The surface of the tile would almost be sticking into the tub.

So how do I close this up? I assume I stop the sheetrock just touching the top of the flange to prevent wicking. I was thinking about some plastic molding but with the sheetrock stuck 1/2" in from the flange do not see how the bottom will be supported

If I had thought about it from the get go I would have installed sheetrock first and just put tub in over the sheetrock. Might go get one of those glue up surrounds and glue to sheetrock cause I can have it touch the top of the tub and just caulk the small gap.

Any Ideas or explain how the flange area is trimmed.
Thanks.
 
I did that once. Never did get that shower to seal. Water would always wick up the rock and start molding, usually around the outside the tub. Tried every kind of caulk and none would work because the water would come from behind and push it loose. Ended up removing and replacing it to get the rock behind.
 
I would never use a steel tub anymore. If I am tearing out the entire wall then I use a full enclosure that is a single piece. If the wall are not coming out I buy the four piece units that you can assemble in place. The have built in drip rails so the water can not run back into the wall.

The steel type you have is made for the sheet rock to go down past the flange on the inside of the tub. Then you finish the sheet rock right down to the top of the tub. Then you caulk it to sell the bottom edge.

I would get a surround to cover the green board myself. I never have seen the green board finished to the top last very long. The cheap plastic sheet stuff is not much better.

Really tile would be the best since you are so far along. It is not that hard to install or just hire the tub area done. A little extra now may save you a lot in the long run.
 
Do not use green sheet rock or any kind of sheet rock. Use cement board Dura rock. This will not mold. You will be able to tile over it with no problems.
 
I really never wanted a shower from the get go. Just a tub with sheetrock walls.
So the full enclosure that is a single piece was not even a option. My choices were a steel tub or a fiberglass tub. I elected steel for strength.

I only mention the glue on surrond as a way to cover this mess up and make it look good.

I do not have the sheetrock up around the tub yet. Stopped to find out my options.

I may just pull the tub out; move the 3ft wall over 1 inch and run the sheetrock down behind the tub flange. Then I could just use plastic molding over the tub flange.
 
Sheetrock is not for tub surround walls at all. There are a few different cement based products for that, some are as smooth as drywall but waterproof. Sheetrock can and will wick water and mold regardless of how well things are caulked etc.
Just re-did our main bathroom about 3 weeks ago and the old steel tub was attached to the studs directly and it had cement board down over the tub flange then tile over top which is what I did when I installed the new fibreglass/acrylic tub. The tub we put in was designed for use with a glue up surround but I opted for tile instead. It does leave the ledge a little small but it's the right way to go about it so as not to cause leaks, rotting and mold.
 
John look down toward the bottom of the page I am linking to. They have panels you can use as tub walls. This company's stuff is pretty good quality and not too pricey. You do not have to have a shower head but you do need the water/moisture protection above the tub area. I would not move the walls. The studs being open behind the tub would be better. That way any moisture can get away.

If you can find it I have a rental house that the prior owner put glass panels on the wall about two feet above the tub top. They are just held in with the silicone caulk on the corners and bottom. I have owned the house for fifteen years and it has been fine all that time and it was several years old then. The glass is about 1/4 inch thick and is full width of the tub.

I have seen some hotels that had a sheet of Stainless steel used in the same way.

IF money is real tight I have a friend that cut the steel off the front and sides of an old freezer and made a tub surround out of the sheets. It actually looks real neat. He cut it real carefully and a bead of caulk covered up any cut edge/corners. He just glued it to sheet rock he had behind the tub. He did that 25 years ago and it has held up.
Onyx wall panels can also be used for bathtub walls.
 
cement based products for that, some are as smooth as drywall

That sounds like me. Look of sheetrock but water proof. Where can I find this and what is it called???

I was also thinking I could run the sheetrock down to about 3 inches above the tub then put a 3 inch piece of cement board. I could tile over the cement board with 1 tile high to make something that would look like a backsplash. I wonder how that would look?????
 
Not sure what the name of it is, I saw it at Menards when I was buying the cement board for our shower. If you were to go to the trouble of getting cement board and tiling a small area you might be better to go the whole way and tile........just what I would do. The cement board comes in 4'wx5'h sheets so it's pretty convenient to work with.
With tile only going one high you would still have a joint of some sort to contend with above that. If you are not using it for a shower at all then that would probably be ok but if it is even occasionally used for showering then I'd do something different.
 
Like just about everyone else said, use a cement-based tile backer board, even if don't intend to tile it. For a little more expense, you'll have a much better installation. I like "HardieBacker". Use 1/2" backer on walls; the 1/4" stuff is for floors. And yes, it does go inside the tub flange, so there's no possibility of a leak caused by bad grout or caulk.
 
You may just want to save space and put in a 3x3 stand up shower instead. Who the H*** needs a bathtub anyway? I have not used the bathtub I have now..........Ever.
 
A bathtub is installed first because because they are so heavy and hard to manage its easier to get in place and attach plumbing while the room is just rough framing. They don't have to be flush with the wall. There is no reason you couldn't build a short wall the same height as the tub and make a ledge around the tub. If its any easier you don't have to use cement board around a tub. If there is a leak there is going to be mold in the wall regardless of what you do. I would at least use the water resistant rock, however there is no telling how many old houses I've remodeled that had standard rock and there was only one with water damage.

When you rock the wall you run the rock or cement board all the way down on the tub itself over the lip. Then caulk the seam. When you tile over it it will cover.
 
I just got done putting up new plastic coated masonite on the tub wall in a trailer house I am staying in, last week. The back side of the tub flange had been screwed into the wall at one time to hold it off the floor. It had coated aluminum strips to finish off around the top of the tub. The way the manufacturer had installed the tub I couldn't run the masonite down over the edge of the tub so I stopped at the top of the flange and put the strips back on and used silicone caulk behind them and screwed them back. Then I caulked the top and bottom where they met the wall and top of tub. I was at Home Depot getting supplies to do the job and found a nice three piece surround that I would have liked to use, but it was six inches longer than the trailer house tub so it wouldn't fit.
 
I can understand your selection of the tub, but this kind of problem is typical when one does not take a closer look at the details, even create a rough sketch with dimensions, which may have prompted you to make a change prior to installation.

Anytime waterproofing is involved, its important to look at the design in detail, with dimensions, so you can see what it will look like and how it would perform, but I hear ya, I've done it, get going, and then you see it, human nature. Of course water over the dam or maybe not so just yet.

If you insist on the gyp board wall terminating as is, it will be flashed and you won't have to rely just on a sealant joint, however, it will taper over the flange a bit and painted gyp bd. is not a good choice for a finish in a wet area, pardon me if I am being redundant. Tile or some covering on the gyp bd. solves that problem.


If the gyp bd. is flush and terminates on top of the flange, you do not have much of a space for a sealant joint, and sealant does require a certain dimension to perform as designed, so you would need to leave a gap of a certain size and most likely place closed cell backer rod in the annular space to back up the 1 of 3 sides of the sealant, and make sure to get sealant that will bond to both the tub material and the edge of gyp. bd. the latter I do not believe will achieve any bond, nor is there a material that will, as the gypsum is dry, granular, loose, there is no way it will hold. If you go flush, you may get a veneer coat of sealant, but it may be too thin, may not bond to the gyp bd. paper, in short, this detail really does not perform.


What I am wondering, with the steel tub, isn't there a surround that is compatible with it, they are easy to install, perform and although its the same flange detail up high out of the shower spray area, its flashed and cannot trap water, sealant is more aesthetic.


I hear what you are saying though, I did one 3 or 4 years ago, but was the complete tub and surround, I would like the more rigid steel tub feel but with the surround for the above and obvious reasons, the gyp bd. flashing over the top of tub surround flange did stand out to me as well as the bottom of the sheet would not be flush, but you really don't notice it and it does perform.

I would be concerned about carrying a gyp bd. wall that low to a tub and not having a flashed over detail, like with overlapping flanges, or a gyp bd. with say a covering like polycarbonate ( for example and this discussion, could be done with a pre built tile board) whereas you could remove the gypsum, leave the thin face sheet of poly or something else that waterproofs the gyp. bd., just to overlap the flange, and create a right angle small inside corner, making a concave area much more suitable for a sealant joint that again would be for looks more than performance because you have overlapping flanges.

Hopefully this is of some help !
 
No sheetrock as others have said. You need waterproofing on the walls to make the job last.

You don"t mention what you are facing the walls with (tile?) but you need to make sure whatever is on the walls has the ability to stop water migration through the wall. Even if you use a tub surround you need to assure that the walls won"t harbor mold.

So far as the 2" gap that sounds like plenty to me. Sould give you room to install a wall board and tile or the surround kit and still have room for a small caulk bead.

I would suggest that you look on YouTube for tub installation videos.

Good luck, I am remodeling/gutting my daughter"s bathroom this summer. I will be following your progress.
 
The tub is designed with a lip for a reason. The proper installation is as follows: Frame the walls, install the tub flush with the faces of the studs, sheetrock (moisture resistant green board) the stud walls running the sheetrock down over the lip but holding it up off the "ledge" approximately 3/8", and finally tile(or install whatever finish you choose) over the sheetrock. The 3/8" gap is a caulk joint to allow for expansion and contraction of the materials as well as create a seal. By following the proper installation instructions, you create a watershed in which all water is shed to the drain. By running the materials over the lip, water is not allowed to get into the wall or under the tub. Also note, simply painting sheetrock in a shower is never advised and not a good idea
 
Did a new house one time where they wanted a full walking shower. We had a company that makes the cultured marble vanity tops make the floor and surround for it out of the same material as the tops. Look pretty neat when they got it installed. The drywallers around here quit using the green board and use a purple one now. Not sure of the difference if any. On the house with the walking shower, they also had a whirlpool tub that we used the same cultured marble for the surround . It went up about 2 feet above the tube and they could make all kinds of fancy moldings to finish off the edges.
 
Hi John,

The cement based sheet goods are Hardibacker, Durock, and Wonderboard. All three come in 1/2" and 1/4" (or 3/8") thicknesses. Hardibacker has a fibrous feel, something like a dense, hard Masonite. Durock and Wonderboard are like sheets of concrete without gravel. They have a plastic netting material embedded in the front and back surfaces. All three materials require some practice to cut cleanly, and they are relatively difficult to cut.

Not to say that others aren’t giving you good advice, but in my experience jason the red has described the process for using gypsum board most accurately. One minor detail I do differently is to put furring strips on the studs down to the top of the tub flange so that the sheet goods (particularly gypsum board) don’t bend out away from the wall as they go down over the sloping flange.

If you decide to go with a plastic tub surround over whatever sheets goods you use on the walls, be sure to make sure that the adhesive you use is approved for both the plastic of the surround and for the surface you are attaching it to. Last summer I installed a cheap tub surround over painted wallboard using the adhesive which the Home Depot paint department employee advised. I followed all instructions to the letter, and did everything I could to make it work (time, temperature, surface prep, etc.) It failed disastrously. Not only did the edges not adhere adequately, but the adhesive also damaged the plastic of the tub surround. The Home Depot manager wouldn’t do anything but offer a 5% discount on replacement materials because he said it was my fault for using the wrong adhesive---the one their employee had recommended. Home Depot had saved me over $1,000 earlier in the year (long story), so I didn’t make the stink about this issue I would have otherwise. Short version: be careful, not all adhesives are necessarily right for both surfaces. You have to find one that is.

Stan
 
Not much of a help with your question, but it's great to hear you're finally getting indoor plumbing......
 
Lot of answers here.
Some are goofy some are good.
Use hardy board or dura rock. Both cut easily with an ordinary skill saw and a carbide blade.
I nail it on with a roofing nailer. Use 1 3/4" roofing nails. Screws are ok but much harder to use and take a lot longer.
The most important thing to consider when installing a tub is to install it so it kants toward the back wall about 3/32". See first photo.
No one ever gets this right - not even professional plumbers. By kanting it back it will prevent water from spilling over the edge of the tub and onto the floor.
The number ONE place where your bathroom will rot out is on the corners of the floor by the ends of the tub. A level tub or one kanted outward will be your ruin.
I don't do vinyl surrounds anymore. They are just not worth it. You can install inexpensive tile for not much more money and have a finished product that is worth more and looks much nicer.
Steel tubs are fine for an inexpensive but long lasting job. Cast iron is better but costs about 3-4 times as much.
It breaks my heart to have to install a nice tile job over a plastic tub.
You will have a job where the tub will last for 10 years while the tile next to it lasts for 25.
Just about all I do for a living is remodel bathrooms.
If you want to ask me anything just email me your phone # and I'll be glad to help.
I've done about 200 of them in my life.
Photos below are a before and after of a job I recently finished.

100_11661_zpsa2319397.jpg


100_10191.jpg


100_11231_zps18fe4f89.jpg
 
Outstanding!

What are the tricks to get the tub properly "bedded" for proper support and correct pitch?

I have an open basement below where the tub will go for access if needed.
 
Ultradog, I like the combination of colors and tile in the last pic. What did you create the black border with or was it part of a tile mat? Really good looking job and nice work!!
 
(quoted from post at 16:35:41 03/31/13) The tub is designed with a lip for a reason. The proper installation is as follows: Frame the walls, install the tub flush with the faces of the studs, sheetrock (moisture resistant green board) the stud walls running the sheetrock down over the lip but holding it up off the "ledge" approximately 3/8", and finally tile(or install whatever finish you choose) over the sheetrock. The 3/8" gap is a caulk joint to allow for expansion and contraction of the materials as well as create a seal. By following the proper installation instructions, you create a watershed in which all water is shed to the drain. By running the materials over the lip, water is not allowed to get into the wall or under the tub. Also note, simply painting sheetrock in a shower is never advised and not a good idea

Good advise here, but DON'T use green board any place where water will splash on it, even if it's tiled. Use the cement board (tile backer, Hardi Board, whatever you choose to call it). Just went through the same thing in our main bathroom, stripped most of it down to studs especially around the tub, which was replaced, all new fixtures and toilet. Had lots of water damage to fix due to leaks around the tub. I used the cement board all around the tub and tiled the entire wall on all sides. I found it a bit hard to cut easily but with the recommended screws it is very solid. I put it over the lip with the lowest tile just off the tub and a good bead of calk has it sealed up nicely. Even with a gap in the calk water will do nothing but be on the lip and won't wick up into the board.
 

We sell tractor parts! We have the parts you need to repair your tractor - the right parts. Our low prices and years of research make us your best choice when you need parts. Shop Online Today.

Back
Top