You should upgrade or use an alternative browser.
- Thread starter tmcguire
- Start date
Bruce (VA)
Well-known Member
Bruce (VA)
Well-known Member
(quoted from post at 17:22:52 05/29/16)
This is what I'm dealing with and can't quite get it.[/img]
I'll try to help you if you will answer my question.
You do NOT need to remove the side distributor from the tractor to set the timing.
So I'll ask the question again: did you remove the distributor and try to reinstall it?
Bruce (VA)
Well-known Member
If that's not the cause, then time to start over.
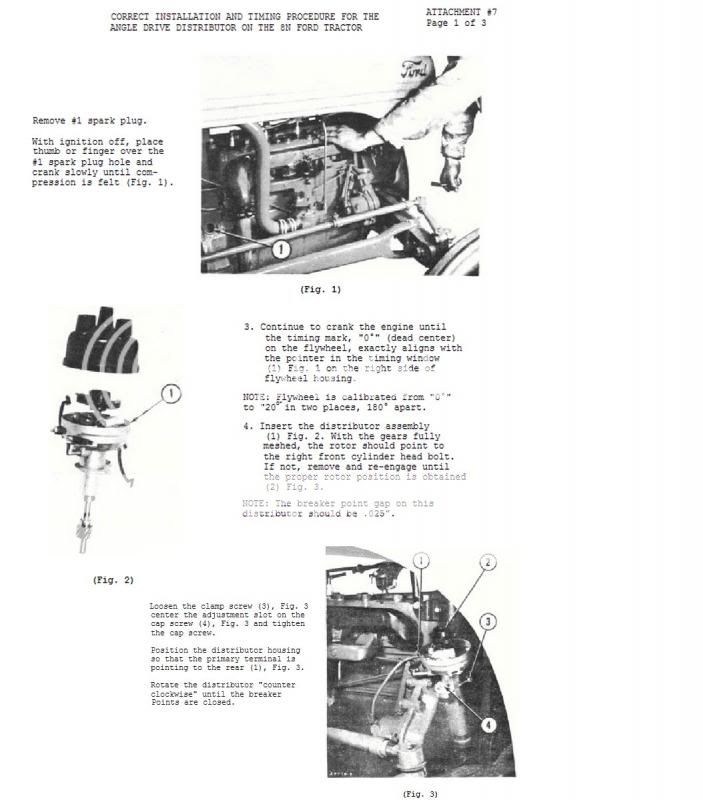
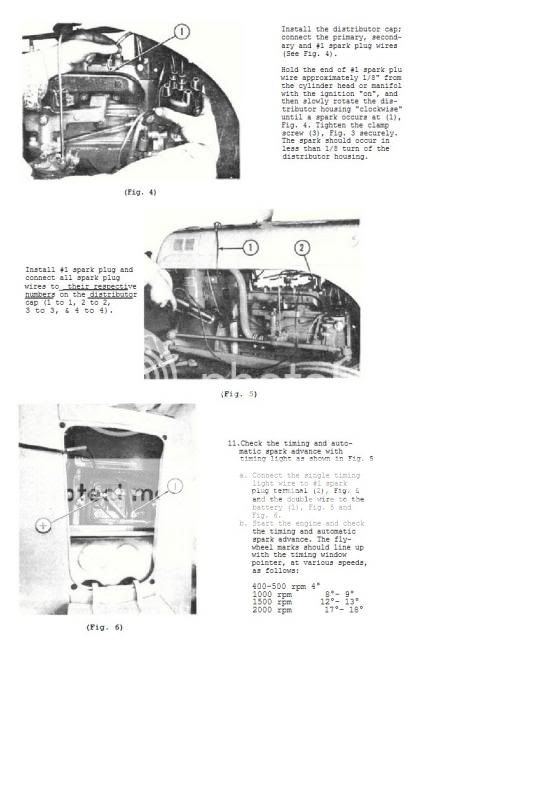
Remove the #1 spark plug. (removing all of them makes the job a bit easier) Ignition off, place your thumb over the #1 spark plug hole and crank slowly until compression is felt. Continue to crank the engine until you see the timing mark, 0* (top dead center) on the flywheel through the timing hole in the right side of the bell housing. Use chalk on the flywheel to exactly align the 4 degree mark with the pointer. Remove the distributor & hold it beside the engine. W/ the distributor oiler at the 7 o?clock position & the stud at 9 o?clock, turn the rotor until it points roughly at the right front head bolt. (close counts) Now insert the distributor. Rotate the distributor housing counter clockwise until the points are closed. Put the cap on & double check the plug wires, 1-2-4-3, CCW. Then, remove the primary wire from the side of the distributor (or at the coil, whichever is easier) Put one lead of your VOM (set on resistance) on the stud on the side of the distributor & the other on the block or other good ground. Slowly turn the distributor. The needle will move as the points close & then open. Find the exact spot just as the points open & then tighten down the distributor.
Now check your work (and the dynamic timing) w/ a light.
If it won't idle below 500 rpm (400 is better) don't bother w/ a light.
If it idles ok, make 3 marks w/ chalk or white paint on the flywheel:
4*
10*
17*
Start the engine.
At idle, the light should flash & the marker should line up exactly at 4* if you did the static timing correctly.
If not, loosen the distributor & turn it until the marks line up. It should take very little adjustment.
Once you've got that done, increase the engine speed to 1200 rpms. The light should flash & the marker should line up w/ the 10* mark. Then, increase the rpms to 2000 & look for the marker to align w/ the 17* mark.
Close counts on the advanced timing. A degree or 2 either way is ok. But, no movement or 5* or more off means you have an advance weight problem. You don't adjust the distributor to fix that.
75 Tips
Bruce (VA)
Well-known Member
(quoted from post at 16:09:17 05/30/16)
Ok so I set the time again and checked that all the plugs where correct and still only backfires
Did you remove the distributor and reinstall it exactly as described?
(quoted from post at 09:05:00 05/31/16)
Yes did exactly like your instructions said.
You may have to repeat the entire process several times to get it right. Don't worry, back in the day when a distributer was common I knew professional mechanics who would have to stab a dizzy several times to get it right. A person who can get it right the first time every time is very few and far between.
Rick
Bruce (VA)
Well-known Member
No, it's not normal.
You either get the distributor in correctly or you don't. Trying to turn it after you install it is a waste of time.
Start over.
Follow the instructions exactly.
HINT: the distributor has a helical gear. It will turn when you install it. Watch the rotor when you push down. This is the important part that I think you are missing: [b:de43dd8d6e]W/ the distributor oiler at the 7 o'clock position & the stud at 9 o'clock, turn the rotor until it points roughly at the right front head bolt. (close counts) Now insert the distributor. Rotate the distributor housing counter clockwise until the points are closed. [/b:de43dd8d6e]If you have #1 at TDC and your timing marks aligned and you insert the distributor and the rotor ends up pointing somewhere else than the right front head bolt, start over.[i:de43dd8d6e][/i:de43dd8d6e] As Rick said, it may take you two or three tries. If you are happy w/ the install & it still back fires, try again. Do not attempt to get it to stop back firing by turning the distributor; it's probably one tooth out.
(quoted from post at 13:48:55 05/31/16)
Ok to make sure hole the distributor beside the engine with the rotor pointing at the bolt then insert. When I insert the distributor the rotor no longer point at the bolt correct?
Yea as the dizzy goes in the shaft will rotate as the gears slid together. The rotor should be pointed where the book says AFTER it seats all the way.
Rick
this time"? What did you change since 'last time'?(quoted from post at 19:25:23 05/31/16)
Ok so this time instead of backfiring it stalls. I'm sure it's the same problem just checking.
K, then it now starts & runs for X period of time & then stalls..........correct?(quoted from post at 19:37:55 05/31/16) Just set the time again. Following the instructions exactly and it will crank then stall? And cranck again.
thebrain600
New User
(quoted from post at 16:21:06 05/31/16) Don't forget that there are two sets on timing marks on the flywheel. Make sure you have right ones.
My tractor is assembled and I am have the same problem. But I was wondering if there was 2 sets of timing marks or if it was just my eye. Which set of timing marks should I be using? Also I assume I should be turning the crank CW to find TDC?
Chris
You use the ones that show up when number one piston is coming up on the compression stoke.(quoted from post at 11:58:52 08/03/16)(quoted from post at 16:21:06 05/31/16) Don't forget that there are two sets on timing marks on the flywheel. Make sure you have right ones.
My tractor is assembled and I am have the same problem. But I was wondering if there was 2 sets of timing marks or if it was just my eye. Which set of timing marks should I be using? Also I assume I should be turning the crank CW to find TDC?
Chris
Dune Country
Well-known Member
One (obvious) thing not explained here is when inserting the plug wires the number 1 wire goes into the hole in the cap that the rotor is pointing at.
ot a late side mount block.(quoted from post at 16:47:40 11/17/16)
I am working on a 8N with a side-mount distributor and the block does not have a hole at the right rear to check the timing. Any thoughts?
istributor not mounted to block. Mounted to timing cover.(quoted from post at 11:39:10 11/18/16) The distributor is mounted on the right-front side of the block. What gives?
ust use various parts such as timing cover, camshaft, distributor, etc. from a newer tractor & then have no hole to look thru to set timing, unless you make a hole. Have to male a new generator mount, too. The more forward location of the oil filler tube and oil filter will interfere with re-located left side generator, for which there are no block mounting bosses. Not impossible but too much trouble for most.(quoted from post at 13:14:23 11/18/16) Was there some kind of conversion available to change a front-mount distributor engine to use a side-mount distributor?
ou don't. Don't need them if follow shop manual procedure to set timing.(quoted from post at 15:55:25 11/18/16) The owner of this 8N says the engine was rebuilt a few years ago. Someone must have changed something. How do you find the timing marks on the flywheel of a front-mount 8N?
Similar threads
- Replies
- 11
- Views
- 385
- Replies
- 7
- Views
- 479
We sell tractor parts! We have the parts you need to repair your tractor - the right parts. Our low prices and years of research make us your best choice when you need parts. Shop Online Today.
Copyright © 1997-2024 Yesterday's Tractor Co.
All Rights Reserved. Reproduction of any part of this website, including design and content, without written permission is strictly prohibited. Trade Marks and Trade Names contained and used in this Website are those of others, and are used in this Website in a descriptive sense to refer to the products of others. Use of this Web site constitutes acceptance of our User Agreement and Privacy Policy TRADEMARK DISCLAIMER: Tradenames and Trademarks referred to within Yesterday's Tractor Co. products and within the Yesterday's Tractor Co. websites are the property of their respective trademark holders. None of these trademark holders are affiliated with Yesterday's Tractor Co., our products, or our website nor are we sponsored by them. John Deere and its logos are the registered trademarks of the John Deere Corporation. Agco, Agco Allis, White, Massey Ferguson and their logos are the registered trademarks of AGCO Corporation. Case, Case-IH, Farmall, International Harvester, New Holland and their logos are registered trademarks of CNH Global N.V.
Yesterday's Tractors - Antique Tractor Headquarters
Website Accessibility Policy


