Distributor

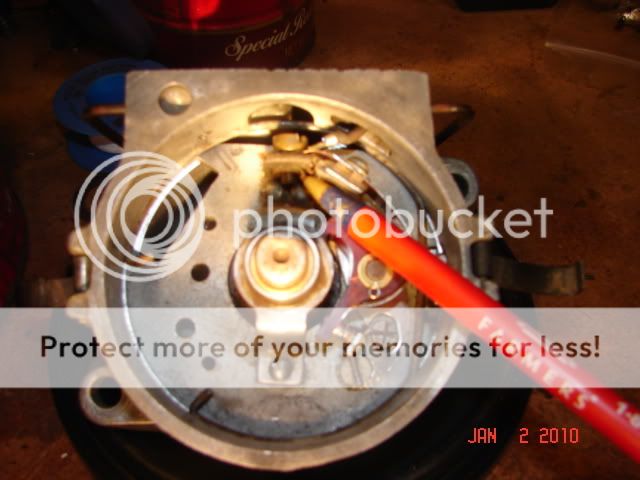
1949 8n 6 volt serial number prior to 263844.As posted previously she wont start.I tried all the suggestion and still no go.So I ordered the gizmo from OH to set the dizzy as suggested.Well I removed the dizzy and found the brand new rotor button busted to pieces.How the heck did that happen Oh well.Something to ponder.I replaced the entire breaker plate with points and condenser .Plate seemed awful tight to install.I had to tap it in place in order to install the retaining snap ring.I am using the FO_4 manual and find it some what confusing.If I follow it step by step I set the points at .015. Then it says to set the static timing with the 2 straight edges or the (Old Hokie tool).Now is when I get really confused.Timing to engine.I assume that the breaker plate is moved in one direction or the other so that the points are just beginning to open.Like I said the breaker plate is really tight to the housing.Lastly,I hope,is there a proper way for the snap ring to be installed or does it just pop in ? Thanks for your patience folks.
 
I am going through the same process right now - with essentially the same tractor. I replaced the shaft bushings and my shaft is really tight. I put a abundant amount of oil on it, and turning the shaft with a crescent wrench via the tangs has loosened it up a bit.

See my thread on the subject:

http://forums.yesterdaystractors.com/viewtopic.php?t=1215018

I too had to press the breaker plate on, and then my wire retaining clip went in its slot just find. I pressed just until the breaker plate was low enough to get the clip in. I suppose you could press the breaker plate too low.

Are you getting a spark at the plugs? Is your coil getting juice? In my case, my ballast resistor was rusted to the point of being open, so I had no juice to the coil. I have a new one to install as soon as it quits raining.

Todd[/url]
 
I ran a wire from the batt.to the coil. Still no start.I'm gonna play with dizzy tonight and see if I can figure out this advance/retard thing.I think if im on the right track I move the plate just until the points start to open.
 
(quoted from post at 15:18:15 05/13/15) I ran a wire from the batt.to the coil. Still no start.I'm gonna play with dizzy tonight and see if I can figure out this advance/retard thing.I think if im on the right track I move the plate just until the points start to open.

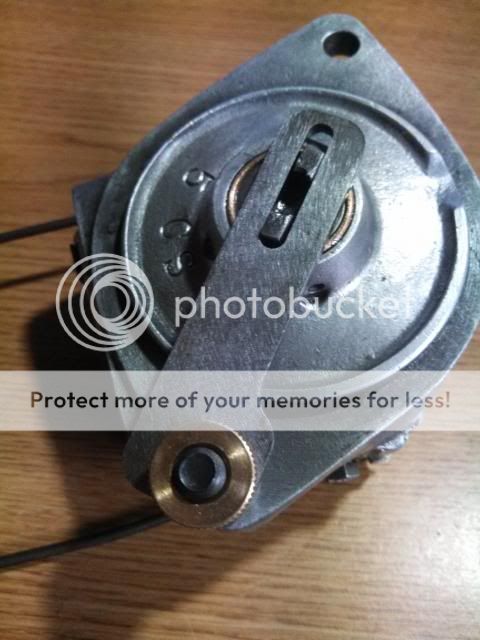
You are on the right track. Make sure that the gig you have is installed correctly. See pict. What may be hard to see is that the wide part of the dist tang is toward the coil.

If you have access to an OHM meter (with Sound is a plus) connect each lead to each of the contact point arms. As you spin the plate you will be able to determine exactly when the points open by either not getting a resistance reading or not hearing the meter make a sound.

mvphoto20794.jpg
 
I just received my distributor jig yesterday. going to use it tonight. From what I understand is that you set the points to .015, install the jig, the either advance or retard the timing by loosening the plate screw on the side and move the plate till the points just start to open then tighten the screw. Reinstall the distributor and you might have to tweek the timing once it runs till you get the most rpms. I believe this is correct, any advice from others?
 
(quoted from post at 16:10:04 05/13/15) I just received my distributor jig yesterday. going to use it tonight. From what I understand is that you set the points to .015, install the jig, the either advance or retard the timing by loosening the plate screw on the side and move the plate till the points just start to open then tighten the screw. Reinstall the distributor and you might have to tweek the timing once it runs till you get the most rpms. I believe this is correct, any advice from others?

Once you set it up and re install back on the front of the engine, there is nothing to tweak. Its not like the old days where you spun the dist cap and listened for a change.

I don't even know if you could get at the screw to change the timing let alone while the engine was running and walk away with all of fingers.
 
Set the points at .015. If you are using quality points and cannot get the gap to open to .015, chances are you need to replace the bushings.

Get a meter or test light and the jig. Put the distributor face down w/ the condenser on the left & the timing plate lock screw on the bottom as in the picture. Look at the end of the shaft: it has a narrow side & a wide side. Make sure you can tell the difference. Now, attach the jig exactly as shown in the picture with the wide side of the shaft to the left....exactly as in the picture. The distributor points should start to open (get your meter/light out now & check). If not, loosen the jig & timing plate lock screw and turn the plate to advance or retard the timing (move the plate down to advance timing, up to retard). Remember, each one of those little hash marks represents about 4° of timing. Re-attach the jig & see w/ your meter if the points are just opening. Keep adjusting until you get the proper setting. (if the plate won’t move, you might need to remove the big C clip to loosen it a bit. Reinstall the clip as shown in the pic) As you’re adjusting, eliminate backlash by turning the shaft backwards (CW as viewed from the front) and bring the shaft forward (CCW as viewed from the front) to measure your setting. When you can attach the jig just as the points begin to open, the timing is set correctly. This will get you static timing at top dead center.

As you can see from the picture, this particular distributor needed to have the timing advanced by about 8° (two hash marks) to achieve the ¼” measurement.

After you set the points & timing, do a continuity check before you put the distributor back on the tractor.

With the distributor still off the tractor, follow these steps:

1. Coil off, cap off, points open. One probe on the brass screw & the other on both sides of the open points. On the side closest to the cam, you should have continuity. Not on the other side! If you do, you will also have continuity everywhere because the points are grounded.

2. Coil off, cap off, points open. One probe on the brass screw & the other anywhere on the body of the distributor. You should have no continuity! Now, rotate the tang on the distributor....as the points open & close, you have continuity (closed) and lose it when they open.

3. Put the coil on the distributor, cap off, points open. One probe on the lead on the top of the coil, the other on the cam side of the open points. You should have continuity!

4. Coil on, cap off, points open. One probe on the lead on the top of the coil, the other anywhere on the body of the distributor. You should have no continuity!
At this point, I just put the distributor, coil & cap all back on the tractor as a unit. The reason I do this is because it is real easy to get the cap or coil misaligned trying to put it back together, one piece at a time. The result is something gets broken or you get a ‘no spark’ problem.

It's possible to put it back on wrong & break it. Look at the slot on the end of the cam shaft. Whatever angle it happens to be, turn the distributor tang to match it. Make sure you can tell the wide side from the narrow side on both the cam & distributor! (close counts). Place the distributor on the front of the engine, gently push it in place & slowly turn the distributor body until you feel the tang slip into the slot. Rotate the distributor body until the bolt holes line up. Hand tighten the two bolts until the distributor body is flush with the timing gear cover.

Double-check your firing order & plug wires. It’s 1-2-4-3, counterclockwise. It’s very easy to cross 3 & 4.

And finally, do not forget to remove the distributor on an annual basis (more often, depending on use) to check the point gap and re-lube the cam.


* NAPA part numbers:

• Points: FD-6769X
• Condenser: FD-71
• Rotor: FD-104
• Cap: FD-126


** Distributor cam lube:
http://www.napaonline.com/Catalog/Result.aspx?Ntt=ECH+ML1&Ntk=Keyword&Nty=1&Dn=0&D=ECH+ML1&Dk=1&Dp=3&N=0


** Distributor cam lube
http://www.carquest.com/webapp/wcs/stores/servlet/subcategory__10151_-1_10651_11340
IMG_20140212_144953_385_zpsd84210ac.jpg

IMG_20140212_144910_554_zps7098b9a8.jpg

distributorinsulator.jpg

75 Tips
 
bruce,
that is a really , really good post . im glad you mentioned seating the distributor , i think thats the first time i heard it mentioned . ive never broken one but its allways in the back of my mind . us newbes need that kinda info.
thanks
 

We sell tractor parts! We have the parts you need to repair your tractor - the right parts. Our low prices and years of research make us your best choice when you need parts. Shop Online Today.

Back
Top