Re starter over run........you can get the newer style bendix or you can do a tune up on the tractor. Getting the point gap & timing correct will help tremendously.
It works like this......the bendix engages the ring gear on the flywheel & turns the engine over. When the engine speed exceeds the design speed of the bendix (because the engine is running) it disengages. (and I can never remember what RPM that is) All the new style bendix does is allow a higher engine speed before it disengages.
What is happening in your engine is that 1 or 2 plugs fire, the engine momentarily exceeds the bendix disengage RPM.....and it disengages before you have all 4 firing.
" So ill remove it and reset it ? "
Yes, but set the points first. (.015)
I've always found it a lot easier to use a drill bit as a measuring point when setting the timing w/ a straight edge.
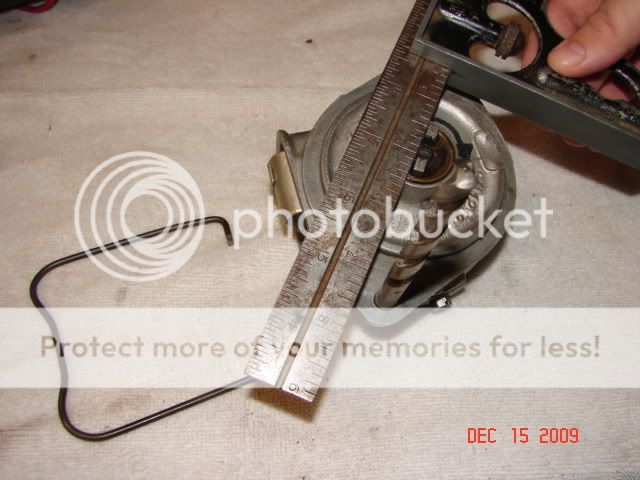
Get a meter or test light, a 21/64” drill bit (*** see below) & a metal straight edge. Put the distributor face down w/ the condenser on the left & the timing plate lock screw on the bottom. Look at the end of the shaft: it has a narrow side & a wide side. Make sure you can tell the difference. Now, place the drill bit in the bottom mounting hole (this will be your reference point for measuring). Next, place a straight edge on the wide side of the tang on the shaft as shown in fig. FO83 in the picture. Rotate the shaft CCW (as viewed from rotor side OR CW as viewed from back/tang side) until the straight edge is ¼" beyond the outside edge of the drill bit you stuck in the distributor mounting hole. At this distance, the distributor points should start to open (get your meter/light out now & check). If not, loosen the timing plate lock screw and turn to advance or retard the timing (move the plate down to advance timing, up to retard). Remember, each one of those little hash marks represents about 4° of timing. Keep adjusting until you get the proper ¼" setting. (if the plate won’t move, you might need to remove the big C clip to loosen it a bit) As you’re adjusting, eliminate backlash by turning the shaft backwards (CW as viewed from the front) and bring the shaft forward (CCW as viewed from the front) to measure your setting. This ¼" setting will get you static timing at top dead center.
As you can see from the picture, this particular distributor needed to have the timing advanced by about 8° (two hash marks) to achieve the ¼” measurement.
After you set the points & timing, do a continuity check before you put the distributor back on the tractor. Before you start, make sure your meter/light works.
With the distributor still off the tractor, follow these steps:
1. Coil off, cap off, points open. One probe on the brass screw & the other on both sides of the open points. On the side closest to the cam, you should have continuity. Not on the other side! If you do, you will also have continuity everywhere because the points are grounded.
2. Coil off, cap off, points open. One probe on the brass screw & the other anywhere on the body of the distributor. You should have no continuity! Now, rotate the tang on the distributor....as the points open & close, you have continuity (closed) and lose it when they open.
3. Put the coil on the distributor, cap off, points open. One probe on the lead on the top of the coil, the other on the cam side of the open points. You should have continuity!
4. Coil on, cap off, points open. One probe on the lead on the top of the coil, the other anywhere on the body of the distributor. You should have no continuity!
At this point, I just put the distributor, coil & cap all back on the tractor as a unit. The reason I do this is because it is real easy to get the cap or coil misaligned trying to put it back together, one piece at a time. The result is something gets broken or you get a ‘no spark’ problem.
75 Tips