" If so which way do I move the screw up or down?"
The screw just holds the plate in place. You need to loosen the screw to move the plate. That's how you change the timing.
The first thing you need to check is bushing wear. If the shaft has any sideways movement AT ALL, the bushings must be replaced. (see below)
Set the points at .015. If you are using quality points and cannot get the gap to pen to .015, chances are you need to replace the bushings.
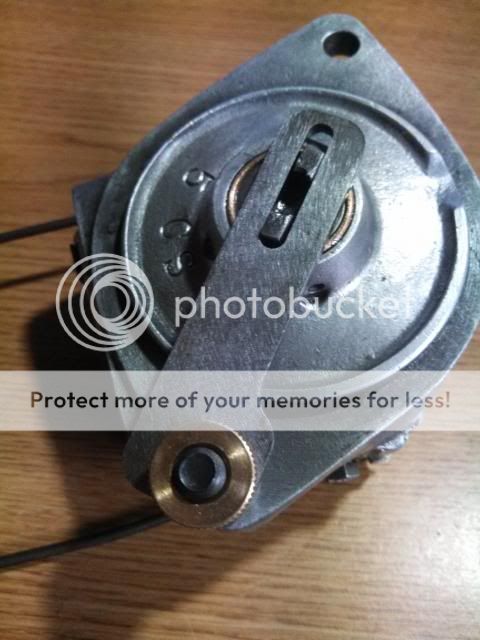
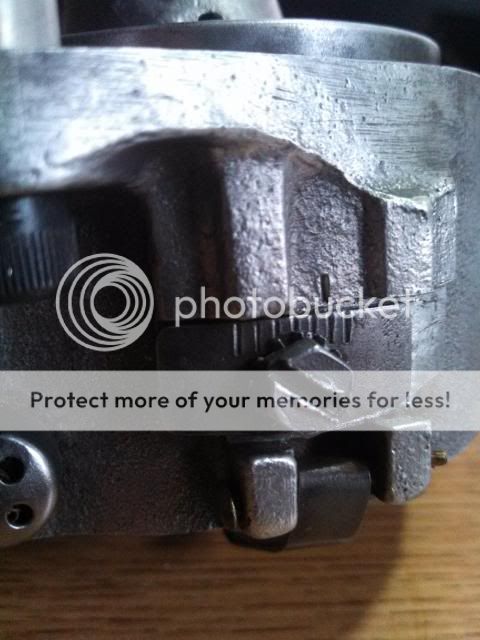
Get a meter or test light and the jig. Put the distributor face down w/ the condenser on the left & the timing plate lock screw on the bottom as in the picture. Look at the end of the shaft: it has a narrow side & a wide side. Make sure you can tell the difference. Now, attach the jig exactly as shown in the picture with the wide side of the shaft to the left....exactly as in the picture. The distributor points should start to open (get your meter/light out now & check). If not, loosen the jig & timing plate lock screw and turn the plate to advance or retard the timing (move the plate down to advance timing, up to retard). Remember, each one of those little hash marks represents about 4° of timing. Re-attach the jig & see w/ your meter if the points are just opening. Keep adjusting until you get the proper setting. (if the plate won’t move, you might need to remove the big C clip to loosen it a bit) As you’re adjusting, eliminate backlash by turning the shaft backwards (CW as viewed from the front) and bring the shaft forward (CCW as viewed from the front) to measure your setting. When you can attach the jig just as the points begin to open, the timing is set correctly. This will get you static timing at top dead center.
As you can see from the picture, this particular distributor needed to have the timing advanced by about 8° (two hash marks) to achieve the ¼” measurement.
After you set the points & timing, do a continuity check before you put the distributor back on the tractor.
With the distributor still off the tractor, follow these steps:
1. Coil off, cap off, points open. One probe on the brass screw & the other on both sides of the open points. On the side closest to the cam, you should have continuity. Not on the other side! If you do, you will also have continuity everywhere because the points are grounded.
2. Coil off, cap off, points open. One probe on the brass screw & the other anywhere on the body of the distributor. You should have no continuity! Now, rotate the tang on the distributor....as the points open & close, you have continuity (closed) and lose it when they open.
3. Put the coil on the distributor, cap off, points open. One probe on the lead on the top of the coil, the other on the cam side of the open points. You should have continuity!
4. Coil on, cap off, points open. One probe on the lead on the top of the coil, the other anywhere on the body of the distributor. You should have no continuity!
At this point, I just put the distributor, coil & cap all back on the tractor as a unit. The reason I do this is because it is real easy to get the cap or coil misaligned trying to put it back together, one piece at a time. The result is something gets broken or you get a ‘no spark’ problem.
It's possible to put it back on wrong & break it. Look at the slot on the end of the cam shaft. Whatever angle it happens to be, turn the distributor tang to match it. Make sure you can tell the wide side from the narrow side on both the cam & distributor! (close counts). Place the distributor on the front of the engine, gently push it in place & slowly turn the distributor body until you feel the tang slip into the slot. Rotate the distributor body until the bolt holes line up. Hand tighten the two bolts until the distributor body is flush with the timing gear cover.
Double-check your firing order & plug wires. It’s 1-2-4-3, counterclockwise. It’s very easy to cross 3 & 4.
And finally, do not forget to remove the distributor on an annual basis (more often, depending on use) to check the point gap and re-lube the cam.
* NAPA part numbers:
• Points: FD-6769X
• Condenser: FD-71
• Rotor: FD-104
• Cap: FD-126
** Distributor cam lube:
http://www.napaonline.com/Catalog/Result.aspx?Ntt=ECH+ML1&Ntk=Keyword&Nty=1&Dn=0&D=ECH+ML1&Dk=1&Dp=3&N=0
** Distributor cam lube
http://www.carquest.com/webapp/wcs/stores/servlet/subcategory__10151_-1_10651_11340
There are three ways to replace the bushings in a front distributor:
1. Buy new bushings (part numbers 9N12120 front & 18-12132 rear). Press out the old ones, press in the new ones and ream to fit. CAUTION: do not try this unless you have a press & know how to use it. If you break the base, a new one costs $130. If you bend the tower which holds the front bushing, a new plate will cost you $30.
2. Take the new bushings and distributor to your local machine shop.
3. Send the distributor out for bushing replacement if you do not have a local machine shop.
75 Tips