Manifold glowing in the dark

I knew I had a gasket leak. So I started it up as it got dark to see what it looked like. Seems like I've read about exhaust gasket space be capable of this. When I throttled up, it blew a flame out. At idle no flame, but it glowed like this. I'm guessing once the manifold gasket is in and secure it won't glow this much?

Dale in Va.
mvphoto14149.jpg
 
Yea, I'd say it's time to fix that.

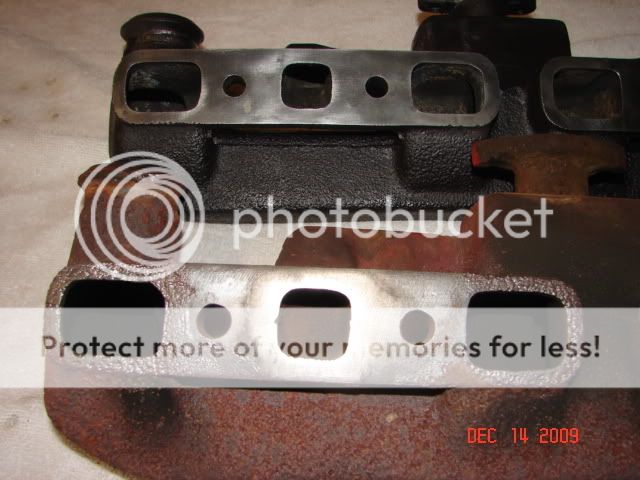
You can get your manifold resurfaced for about $30 -40 at most machine shops. If it is OEM & can be salvaged, do it.

I've got nice fitting new manifolds for $85.

The nuts are brass, 7/16-20 x 5/8, NAPA part number STN104X, 27 lbs of torque. Fastenal has them for about $1.50 each; part number 75133. OEM studs are 1-5/8 long 7/16-14. NAPA doesn’t stock the 5/8’s length, but part number RFD 86644, 1 ¾ inch, works as does part number 86632, 2 inches. These studs are “Handi-Pack” items. (I’ve used these longer studs on my 50 & 51 N’s, but you should make sure they do not bottom out in the block on your N as they are longer than OEM). If you don’t get them at NAPA, make sure that the stud has an egg-shaped center between the different threads. Use washers under the nuts.

If you're really lucky, you can get the nuts off w/o removing a stud or damaging it. And, if you buy a ticket, you could win the lottery. Drain the block & plan on at least one stud getting replaced!

There are two distinctly different recommendations on tightening the studs in the block. Because the stud goes into the water jacket & is constantly undergoing extreme heat & cooling cycles, some folks like to double-nut them & tighten them down at 37 lbs of torque. Others say that it’s a stud & should only be finger tight w/ a good dose of thread sealer or high temp silicone on them.

I’ve replaced the studs on 3 of my 4 N’s w/ no leaks; I finger tighten the studs then take a ¼ turn on them w/ vice grips.

This method of attaching the exhaust pipe to the manifold was developed for the Model A Ford in 1927. If you pay attention to what you are doing, it will not leak. You do not need tinfoil or gasket sealer to prevent leaks. Use the correct parts & install them correctly & it will not leak.

Make sure you are using the correct clamp. An automotive muffler c-clamp will not work. You need a clamp made for the N. If you have the correct clamp, it has a top & bottom. Make sure you have the clamp on correctly; check out tip # 8, below. All clamps are not created equally; the correct clamp should have 9/16 brass nuts.
Slide the tail pipe into the hanger clamp & then place the end of the exhaust pipe against the manifold. Look at it! Remember, the pipe will most always fit snugly to the OEM manifold w/o any problem, but a replacement manifold will likely not be the exact same size as the OEM manifold, so you will have some work to do. If it does not mate all the way around, put a broomstick down the pipe & into the manifold & gently bend the pipe until both surfaces mate snugly & squarely. If the exhaust pipe flange is bent, you will never get a good seal; check it out. The clamp is not a gasket; if the pipe & manifold do not mate tightly, it will leak. Do not try & hold the exhaust pipe against the manifold w/ your hand & while you tighten the clamp. Get out your floor jack & a block of wood; put the jack under the pipe to hold it tightly against the manifold. Confirm that the pipe is mated squarely to the manifold; if it is crooked, it will not seat. With the pipe jacked snugly and squarely to the manifold use your ¾ lb ball peen hammer and tap the pipe tight to the manifold flange all the way around. Its soft metal and this will only take about a minute. Tighten the clamp. (Don't get carried away w/ the jack or you will bend the pipe. Or, overtighten the clamp & snap it in two. BTDT). Put equal pressure on the clamp by tightening one side a few turns then a few turns on the other. Do not expect the clamp sides to touch; about 1/8” gap is normal.
When the clamp is tightened equally on both sides, remove the jack. If the pipe flops around, start over because you put the clamp on upside down. (Remember tip # 8)

If the block is badly pitted, (usually around # 4) you will have problems; get out the hi-temp metal epoxy. (Not JB Weld) VersaChem's exhaust manifold repair, or ThermoSteel, is said to be good to 2000 degrees. Clean the area real well with brake cleaner, put a little epoxy on it, put some wax paper over it and bolt down the manifold. After it dries take off the manifold and take a die grinder and clean the epoxy that might squish into the port. Look at the manifold, again around # 4. If it’s pitted & burned, it isn’t going to seal. Time to surface it or get a new one. Do not double the gaskets! The gasket has two pieces, left & right (or front & back.....whatever) Use hi-temp Permatex or even Copper coat. Make sure the surface is squeaky clean!
DSC03070.jpg

75 Tips
 
Bruce has got you covered on the gasket.

How hard were you working it at the glow red time?
I've seen manifolds glow like that plowing or tractor pulling, but not under light work unless there was a problem.

retarded timing
lean mixture
exhaust valve/s leaking badly
advance mechanism locked up (severely retarded timing)
blockage in the manifold or exhaust

most of these are obvious in how it runs...
So, how's it run?
Is it loud? (retarded timing)
Usually if I get a junker running and it's extra loud and the exhaust path turns chalky white......I start digging into that advance mechanism..rust/gunk/stuck mess
 
I understand the reason to use Brass Nuts. But I won't use them. When I was young I used them on the pipes to manifold studs to my '67 mustang. Few years later I needed to remove them. They all striped out. I had a heck of of a time removing those pipes. Since then I've always used Stainless Steel and anitseize. That always works good for me.
 
Fuddy........yep, BRASS nuts are supposta strip. That way they won't un-screw yer studs in the wet block. Stainless will corrode and lock on the stud and you will end up un-screwing the stud. Stainless is good fer lots of things but manifold HEAT will bugger yer stainless nuts. 'course maybe YEARS before summbuddy gotta remove the stainless nuts. .......respectfully, Dell
 
I tend to agree FD. I went the brass nut route and stripped a couple of them just putting them on.
Said to heck with it and used grade 8 nuts with antiseize.
 
I see your point. With a tractor a striped out nut wouldn't be as hard to deal with. Easy to get in there with a cold chisel. Not so easy on that car where you could barely get a wench and socket on them. And then the car I was working with a bolt. So no big deal if it breaks.
 
That's why it's important to use 5/8" nuts instead of thinner nuts so that more threads are gripping the stud.
 
(quoted from post at 18:00:06 12/19/14) If you're really lucky, you can get the nuts off w/o removing a stud or damaging it. And, if you buy a ticket, you could win the lottery. Drain the block & plan on at least one stud getting replaced!

When I replaced my manifold, all four nuts came off without any trouble at all.

When I replaced my waterpump, all three nuts came off easily and I was able to replace the studs (needed to be slightly longer) without any trouble.

Yesterday my son and I started swapping new wheels and winter tires onto my 2007 Ford Focus. First three wheels went easy. We've snapped off two wheel studs so far on the fourth wheel (and have the second broken stud and nut stuck inside my only 19mm impact socket).

I guess I've used up my luck.
 
Punch and a hammer will drive the nut and stud out of your socket, or put the stud in a vise and use a slide hammer on the socket.

P.S.
I always use a flex bar and socket (or rigid long handled ratchet) when removing iffy nuts, so that you can do a little back and forth persuasion (with MP :D ).

Most people here must know this but to me it it the most important step before attempting to remove a nut from a rusty bolt or stud. But I'm continually surprised to see people NOT do this.

I always, wire wheel, small wire brush, and fine steel wool ANY EXPOSED THREAD and then lubricate, before trying to crank the nut off over it -- whether I use heat or not.

Trying to back nuts over rusty threads friction-heats them up so much that they can become too hot to even touch or else the bolt or stud breaks.

Sometimes the end threads are crushed in which case a 3-cornered small file, followed by a thread chaser is in order before forcing the nut to chew its way over THAT.

Even if you manage to crank a nut off over rusty threads, it is very wearing on both nut and stud threads.

When a nut is super, squeeling tight, it will just push ahead any penetrant you put on so what I do is spray behind the nut after you've started getting the nut off, then crank the nut back in to where it was. It gets oil INSIDE the nut that way.
 
Had to buy a punch, but that got the nut out of the socket. I've not needed one until now. ;^)

We had done the back and forth manipulation, but it didn't help. Now have broken 4 out of 4 on that one wheel. No problems on the other three wheels. Tomorrow's job is removing and replacing the studs.

I've replaced wheel studs before, so I wasn't too excited -- my son was all "OMG! Now what do we do!?". I should have told him that he had to buy me a new car.
 

We sell tractor parts! We have the parts you need to repair your tractor - the right parts. Our low prices and years of research make us your best choice when you need parts. Shop Online Today.

Back
Top