2n electricial system (12 volt)

Having problems getting the 2N to crank and run right, ran great Friday, mowed some pasture with some pretty tough grass. Cranked it up this AM and ran great, drove about a 1/2 mile and started stumbling, got it home and checked carb, good flow. Spark looks good. It is a front mount dist, 12V battery with .6 ohlm resister in line. 6V coil new, condenser new, points new. resister is new also. I tried a 12V coil and it's start and stumble and died. I've had the dist out so many time that I can't count, rebuildt the carb a dozen times also. One question I have is with a 12V coil, do I need a resister in line. Also can I assemble the dist on the work bench and hook the 12V battery to it to test points. I do not know anything about ohlms or resistance or hardly anything about electricity except it will knock the _____ out of me. I do have a good Fluke meter, I can read continuity, 12V and 110V. Other than that, don't confuse me. What am I doing wrong. Yes, it is getting gas, air and spark and will sometimes run, sometimes not. HELP!!!!!!!!!!
 
(quoted from post at 15:36:32 08/18/14) Having problems getting the 2N to crank and run right, ran great Friday, mowed some pasture with some pretty tough grass. Cranked it up this AM and ran great, drove about a 1/2 mile and started stumbling, got it home and checked carb, good flow. Spark looks good. It is a front mount dist, 12V battery with .6 ohlm resister in line. 6V coil new, condenser new, points new. resister is new also. I tried a 12V coil and it's start and stumble and died. I've had the dist out so many time that I can't count, rebuildt the carb a dozen times also. One question I have is with a 12V coil, do I need a resister in line. Also can I assemble the dist on the work bench and hook the 12V battery to it to test points. I do not know anything about ohlms or resistance or hardly anything about electricity except it will knock the _____ out of me. I do have a good Fluke meter, I can read continuity, 12V and 110V. Other than that, don't confuse me. What am I doing wrong. Yes, it is getting gas, air and spark and will sometimes run, sometimes not. HELP!!!!!!!!!!

OK, where did you get your points from? I just had the same problem on a front mount 8N I purchased last summer. The PO had a tune up done before he sold it. Who ever did the work used cheap points and put no lube on the rub block. So the points closed the gap pretty fast. I'd say no more that 5-10 hours of run time. New good quality points, with lube and it runs well. A friend also had the same problem. I just did his this past Saturday.

The only resistor needed with the 12 volt coil is the factory one, an extra in line one will reduce voltage too far and you will have poor spark, loss of power and hard starting.

Rick
 
" One question I have is with a 12V coil, do I need a resister in line. "

All you need is the OEM ballast resistor & no other. See tip # 30 at the link. (as in the picture)

If you have the OEM ballast resistor & a 6v coil, that is all you need.

First, put your battery on a charger.

You need a strong battery to:

1. Spin the starter

2. Engage the bendix

3. Provide voltage to the coil.

As the battery gets weaker, the first thing to fail is your spark.

The more current you use to spin the starter, the less you have for the ignition.

Assuming that the bushings & advance weights are ok (*see below), & that you have correct voltage to the coil (battery voltage with the points open and about half that with the points closed), the problem is in the distributor.

Once you get the distributor on the bench, the first thing you need to check is bushing wear. If the shaft has any sideways movement AT ALL, the bushings must be replaced. (*** see below).

The most common electrical failure (no spark, weak spark) points on the front mount are:

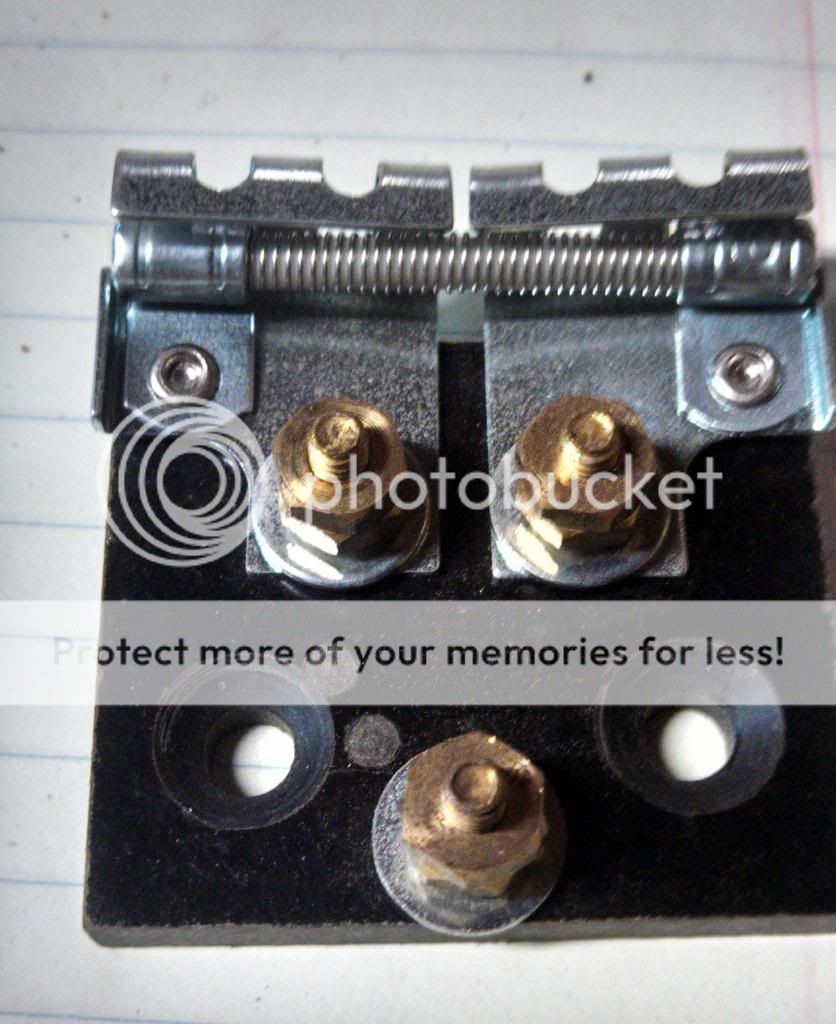
1. The insulator under the brass concave head screw & where the copper strip attaches. (it’s fiber & will wear out; poke & prod w/ your meter leads to make sure it still works) If you need to replace the insulator, use a .250 x 3/8 nylon square nylon anchor nut available at most big box home stores

2. The pigtail at the bottom of the coil not making contact w/ the concave head brass screw inside the distributor. (With the coil on, the pigtail must firmly contact the brass screw. No contact = no spark

3. The copper strip is broken or grounded to the plate. (look very carefully for cracks & breaks).

4. The condenser wire grounding to the plate or side of the distributor.

5. The tab on the bottom of the coil not making contact w/ the brass button on the cap. (With the cap on, the tab must firmly contact the brass button. No contact = no spark.)

6. Incorrect positioning of the spring clip on the plate causing the pigtail to ground. (the open part of the clip goes between 7 & 9 o’clock on the plate. That puts the straight part of the clip opposite of the timing screw at 3 o’clock)

7. Incorrect seating of the coil on the distributor due to a loose bail or no gasket.(the coil must not move at all; if it does, replace the gasket or bail. Or stick some cardboard under the bail).

8. Water/moisture inside the cap due to gasket failure or the absence of a gasket. (the cap AND coil have gaskets)

9. Dirty/corroded/burned/incorrectly gapped or misaligned points. I use only Wells, Blue Streak or Echlin brand points (* *see below). If you are using quality points and cannot get the gap to open to .015, chances are you need to replace the bushings.

10. Burned rotor, cracked/carbon tracked cap.

After you find the problem & re-check the point gap, do a continuity check before you put the distributor back on the tractor.

Before you start, make sure your meter/light works.

With the distributor still off the tractor, follow these steps:

1. Coil off, cap off, points open. One probe on the brass screw & the other on both sides of the open points. On the side closest to the cam, you should have continuity. Not on the other side! If you do, you will also have continuity everywhere because the points are grounded.

2. Coil off, cap off, points open. One probe on the brass screw & the other anywhere on the body of the distributor. You should have no continuity! Now, rotate the tang on the distributor....as the points open & close, you have continuity (closed) and lose it when they open.

3. Put the coil on the distributor, cap off, points open. One probe on the lead on the top of the coil, the other on the cam side of the open points. You should have continuity!

4. Coil on, cap off, points open. One probe on the lead on the top of the coil, the other anywhere on the body of the distributor. You should have no continuity!

At this point, I just put the distributor, coil & cap all back on the tractor as a unit. The reason I do this is because it is real easy to get the cap or coil misaligned trying to put it back together, one piece at a time. The result is something gets broken or you get a ‘no spark’ problem.


Post back w/ results or more questions.


* Remove the C clip to get the plate out. Remove the shaft & weights. The weights should freely move.

* *NAPA part numbers:

• Points: FD-6769X
• Condenser: FD-71
• Rotor: FD-104
• Cap: FD-126

*** There are three ways to replace the bushings in a front distributor:

1. Buy new bushings (part numbers 9N12120 front & 18-12132 rear). Press out the old ones, press in the new ones and ream to fit. CAUTION: do not try this unless you have a press & know how to use it. If you break the base, a new one costs $130. If you bend the tower which holds the front bushing, a new plate will cost you $30.

2. Take the new bushings and distributor to your local machine shop.

3. Send the distributor out for bushing replacement if you do not have a local machine shop.
ff5614e4-6e4e-4d93-bacf-b351f246f004_zpsa49e8a9b.jpg

75 Tips
 
Bruce, the only resister on the tractor is a porcelin one, rated at .6 ohlms resistance. There 's not one like your picture. Do I need to replace the one I have for the original and continue to use the 6V coil?
 
I used points from Tractor Supply Co, lubed them and have double checked them for .15 gap. I thought about replacing them but they look good and clean. I did use emory cloth to make sure they were clean. They only have about 3 hrs running time. I've heard about "Blue Streak" points etc, are they that much better???
 
(quoted from post at 17:06:06 08/18/14) I used points from Tractor Supply Co, lubed them and have double checked them for .15 gap. I thought about replacing them but they look good and clean. I did use emory cloth to make sure they were clean. They only have about 3 hrs running time. I've heard about "Blue Streak" points etc, are they that much better???

Mo, in a nutshell, yes, they are that much better. The rub block on Tisco, land of almost right, points is too soft and wears away quickly, even when lubed. Or at least that has been my experience. This sight sells some Blue Streak products or the NAPA Echlin brand points are both good. Most collector/showers around here get the cheap Tisco points at either TSC or Mills Fleet Farm. Now there are other Tisco parts I use but not electrical. I'm on the same set of Echlin points in my Farmall M that I installed 4-5 years ago. I haven't had the cap off the distributer. It gets run 50-60 hours a year.

I'd run what you have until they fail or if you notice that the gap is closing too fast. Unless you use your N 100plus hours a year you shouldn't have to mess with the points more than once every 3-4 years. Mine get run 100 plus a year. One is IE and the other will get converted the next time I have to take the dizzy off.

Rick
 
" Do I need to replace the one I have for the original and continue to use the 6V coil? "

Yes.

And here is why.....

Technology & materials being what they were in the 30's, that square coil would melt if it ran on much more than 4 amps for any length of time. (see tip # 38 for an example). In order to get a hot spark at the same time the starter was drawing max current from the battery, a ballast resistor was added in the ignition circuit. What that did was add about .3 ohms of resistance in the circuit, added to the 1.5 ohms of the coil. That got you 4.1 amps or so at start up. As the voltage increased when the engine was running to about 7.5 volts, the resistor heated up, adding more resistance in the circuit. 1.0 ohms hot, plus 1.5 ohms of the coil got you down to 3 amps or so to keep from melting the coil.

But get this......

Lets assume you have a 1 ohm coil. (and, I've got 2 around here that are less than 1 ohm).

Do the math: 7.5 volts/1.6 ohms gets you 3.6 amps to start. That's low. Your running current is ok.

What you have now (assuming a 1.5 ohm coil) is 3.6 amps of coil current all the time. That's ok for running, but too low for starting.
75 Tips
 
" I've heard about "Blue Streak" points etc, are they that much better???"

Yes.

See tips 66, 67 & 68 at the link.

As Rick said, those TSC points will have a short life.

And, you aren't helping that life by using abrasives on them. Clean the points w/ brown paper or card stock. Once you file them or use emery cloth, you cut into the thin metallic coating...and they will burn quicker.
75 Tips
 
Mo, are you sure that original ballast resistor is not still
mounted on the under side of your dash?
Normally it would be what all the wires are connected to.

Unless I misunderstood, a 12V battery, 6V coil, and a .6 ohm
resistor sounds like it would burn up a coil quickly.

With a 12V coil, just the original ballast resistor.

Blue Streak points are my choice too. I buy them locally.
Part number FD-6769X

You say the spark looks good, does that mean a good blue/white
color? Do you have access to a spark tester to check it for sure?
It would need to be checked right when it quits so it doesn't cool.
 
Followed your directions for checking the dist using continuity. Everything checked out good and put dist back on tractor, no fire at all thru the plugs. Pulled it off again and clipped a 12V lead to the coil and was going to test for voltage, I found voltage when the meter was connected to the metal part of the dist. To make this story shorter, the insulation where the condenser, points and the coil all make connection was bleeding voltage to the dist body. I took it to a friend and explained what I had found, he laughed and sad that it would run, then he check it out using the horseshoe shaped setting (ohlms is what he said it was), he quit laughing, it was reading lots of resistance or whatever it's called to the dist itself. I am going to try to find a new backing plate on this site and get back in business. By the way, I took dist off 9N, mounted it and ran like a top. Pulled a two bottom moldboard over about an acre, no problems.
continuity would not show the bad spot but voltage did.
 
" I am going to try to find a new backing plate "

Why????

As Royse said.....and as I said.....just fix the plate you have:

The most common electrical failure (no spark, weak spark) points on the front mount are:

1. The insulator under the brass concave head screw & where the copper strip attaches. (it’s fiber & will wear out; poke & prod w/ your meter leads to make sure it still works) If you need to replace the insulator, use a .250 x 3/8 nylon square nylon anchor nut available at most big box home stores

Royse even gave you the part number........
75 Tips
 

We sell tractor parts! We have the parts you need to repair your tractor - the right parts. Our low prices and years of research make us your best choice when you need parts. Shop Online Today.

Back
Top