Ford 8N won't start

Denna

Member
A recently purchased 8N tractor has stopped starting.

A new 12v starter with drive was purchased.

The engine will now crank, but will not start.

Any ideas on what to check next ?
 
Front distributor?

Side distributor??

Any fire/spark at the plugs??

In other words, we need more information,....
 
TOM N MS,

Thanks for the quick reply.

The distributor is front mounted.

How can I tell if there"s spark at the plugs ?
 
It takes three things for an engine to run: spark at the right time, compression, & fuel/air in the right mixture. For the moment, forget about compression & concentrate on narrowing the problem down to spark or fuel.

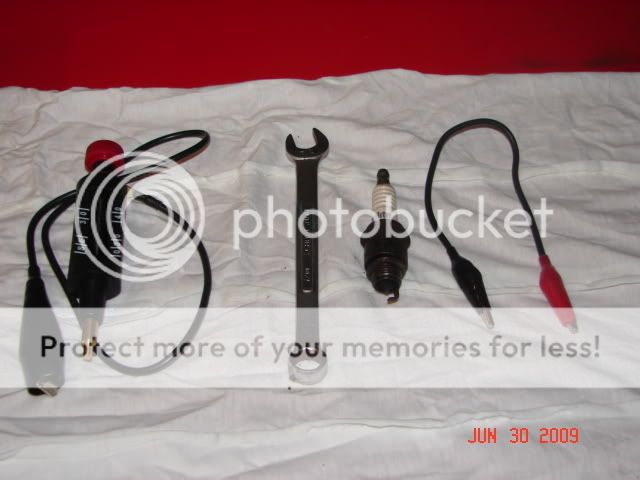
There are three very important tools you always need to have in your N tool box: a 3 inch piece of wire w/ alligator clips on each end, a spark checker w/ an adjustable gap (* see below) and a 7/16 box end wrench. (see tip # 50 at the link below) And, you really do need a working ammeter on the tractor; it is a very important diagnostic tool. With these tools, you can quickly narrow down most N problems to spark or fuel.

First, check for fuel (**). Get a can & put it under the carb. Remove the bolt in the bottom of the carb; as long as the fuel is turned on, you should see gas flowing out of the carb. Let it run for at least 30 seconds. If it’s a dribble, or runs for 5 seconds & stops, or none at all, you have solved half the problem: it’s fuel related. If gas flows well out of the carb & only stops when you turn it off at the sediment bowl, chances are very good it’s not a fuel problem. So, next, turn the key on, crank the engine & look at the ammeter. What is the needle doing? Does it show a constant discharge, no movement at all, or does it move back & forth slightly? Next, hook up your spark checker, turn the key on & crank the engine. If the spark jumps the 1/4” gap, you probably don’t have a spark problem. If it won’t jump the ¼” gap, you have a spark problem. If the ammeter needle shows a constant discharge, or doesn’t move at all, that also tells you that you have a spark problem. Jump the ignition switch w/ your jumper wire & see what happens. If it runs, you found the problem. If it doesn’t have spark after you jump the ignition switch, post back for more info on further troubleshooting. (and do not forget to turn the ignition switch off; see tip # 38)

If it does not have gas coming out of the carb at a steady stream w/ the bolt out for at least 30 seconds, you have a fuel problem. First, remove the gas cap. Your vent could be clogged & it vacuum locked. If that doesn’t work, tap the carb bowl w/ a hammer handle in case the float is sticking closed. (don’t whack it w/ the head of the hammer; you can crack the bowl). If you still don’t see gas flowing, the N has three fuel screens; one in the brass elbow, one in the top of the sediment bowl & one on the stem of the sediment bowl in the gas tank. Check the screen in the elbow & the screen in the top of the sediment bowl. (don’t worry about the one in the tank) Both probably need to be cleaned. If you have the fuel knob turned on all the way, & 1 gallon or less in the tank, it may be trying to feed off of the reserve inlet which is probably clogged. Only open it 2 full turns. Put at least 2 gallons in the tank. (and do not forget to turn the gas off; see tip # 9)

There are ways to check for spark & fuel that work & ways that don't. For example, having gas to the carb is nice, but having it past the float is what counts! That’s why removing the 7/16” bolt in the bottom of the carb is the way to check for fuel. And, same thing w/ spark at the plugs. Some folks think that checking for spark means pulling a plug wire off & looking for one. Well, it's the distance the spark jumps at the plug that gives you the info you want. It takes about 17kv to jump a 3/16" gap & 22kv to jump ¼” in the open air. Remember, it’s 14psi outside of the engine & about 90psi at a 6:1 compression ratio in the cylinders & compressed air creates electrical resistance, so you really need the 17-22kv to fire the plugs when the engine is running. A store bought plug checker (in the picture) will work better than an old plug because it won’t shock the snot out of you like an old plug might!

Post back with results or more questions.


*If you don’t own a spark checker w/ an adjustable gap, buy one. In the meantime, an old spark plug w/ the gap opened to at least ¼” will work. Ground it to a rust & paint free spot on the engine turn the key on & look for a spark.

** On most gas engines, you would check for spark first. But, the N gas tank has a pin-hole size vent that easily clogs, causing vacuum lock. By the time you check for spark, the vacuum lock will dissipate w/ the engine off
DSC02519.jpg

75 Tips
 
pull a plug and lay it somewhere you can see it with it still plugged in. use jump clips to ground the threaded area to chassis and then turn key on and roll her over. got spark?
 
Bruce and Soundguy,

Testing for spark seems easy enough.

It might be a couple days before I can get someone else to crank the engine while I watch the plugs.

If there"s spark on all plugs, does that mean the distributor could be the problem ?

If so, how do you test the distributor ?
 
" If there"s spark on all plugs, does that mean the distributor could be the problem ?"

Generally speaking, no. It means you probably have a fuel problem.

If you have a spark that jumps a 1/4" gap in open air, chances are you do not have a spark problem.

While you are waiting for an assistant, put the battery on a charger(see tip # 60 at the link) The usual cause of a weak spark is a weak battery.

" If so, how do you test the distributor ?"

Assuming that the bushings & advance weights are ok (*see below), & that you have correct voltage to the coil (battery voltage with the points open and about half that with the points closed), the most common electrical failure (no spark, weak spark) points on the front mount are:

1. The insulator under the brass concave head screw & where the copper strip attaches. (it’s fiber & will wear out; poke & prod w/ your meter leads to make sure it still works) If you need to replace the insulator, use a .250 x 3/8 nylon square nylon anchor nut available at most big box home stores

2. The pigtail at the bottom of the coil not making contact w/ the concave head brass screw inside the distributor. (With the coil on, the pigtail must firmly contact the brass screw. No contact = no spark

3. The copper strip is broken or grounded to the plate. (look very carefully for cracks & breaks).

4. The condenser wire grounding to the plate or side of the distributor.

5. The tab on the bottom of the coil not making contact w/ the brass button on the cap. (With the cap on, the tab must firmly contact the brass button. No contact = no spark.)

6. Incorrect positioning of the spring clip on the plate causing the pigtail to ground. (the open part of the clip goes between 7 & 9 o’clock on the plate. That puts the straight part of the clip opposite of the timing screw at 3 o’clock)

7. Incorrect seating of the coil on the distributor due to a loose bail or no gasket.(the coil must not move at all; if it does, replace the gasket or bail. Or stick some cardboard under the bail).

8. Water/moisture inside the cap due to gasket failure or the absence of a gasket. (the cap AND coil have gaskets)

9. Dirty/corroded/burned/incorrectly gapped or misaligned points. I use only Wells, Blue Streak or Echlin brand points (* *see below).

10. Burned rotor, cracked/carbon tracked cap.

After find the problem & re-check the point gap, do a continuity check before you put the distributor back on the tractor.

Before you start, make sure your meter/light works.

With the distributor still off the tractor, follow these steps:

1. Coil off, cap off, points open. One probe on the brass screw & the other on both sides of the open points. On the side closest to the cam, you should have continuity. Not on the other side! If you do, you will also have continuity everywhere because the points are grounded.

2. Coil off, cap off, points open. One probe on the brass screw & the other anywhere on the body of the distributor. You should have no continuity! Now, rotate the tang on the distributor....as the points open & close, you have continuity (closed) and lose it when they open.

3. Put the coil on the distributor, cap off, points open. One probe on the lead on the top of the coil, the other on the cam side of the open points. You should have continuity!

4. Coil on, cap off, points open. One probe on the lead on the top of the coil, the other anywhere on the body of the distributor. You should have no continuity!

At this point, I just put the distributor, coil & cap all back on the tractor as a unit. The reason I do this is because it is real easy to get the cap or coil misaligned trying to put it back together, one piece at a time. The result is something gets broken or you get a ‘no spark’ problem.

It's possible to put it back on wrong & break it. Look at the slot on the end of the cam shaft. Whatever angle it happens to be, turn the distributor tang to match it. Make sure you can tell the wide side from the narrow side on both the cam & distributor! (close counts). Place the distributor on the front of the engine, gently push it in place & slowly turn the distributor body until you feel the tang slip into the slot. Rotate the distributor body until the bolt holes line up. Hand tighten the two bolts until the distributor body is flush with the timing gear cover.


* Unscrew the plate hold down screw & remove the C clip to get the plate out. Remove the shaft & weights. The weights should freely move.

* *NAPA part numbers:
• Points: FD-6769X
• Condenser: FD-71
• Rotor: FD-104
• Cap: FD-126
75 Tips
 

We sell tractor parts! We have the parts you need to repair your tractor - the right parts. Our low prices and years of research make us your best choice when you need parts. Shop Online Today.

Back
Top