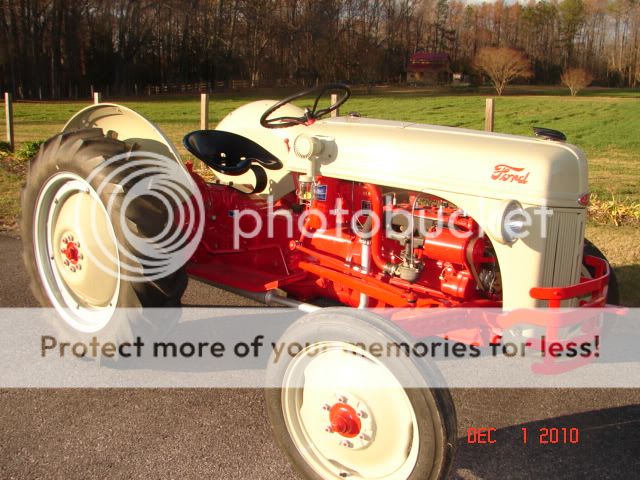
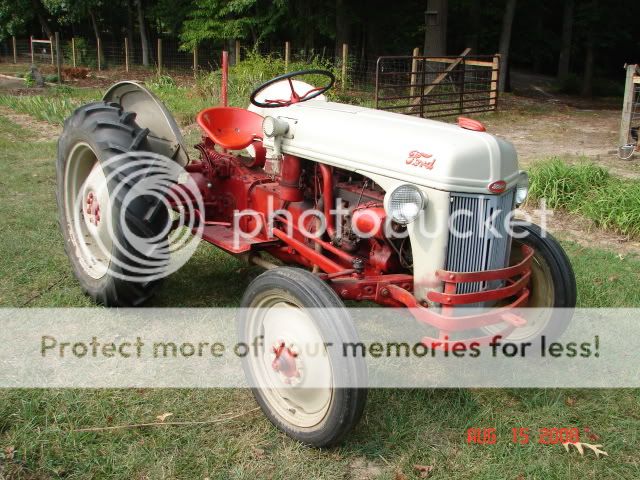
Fresh Barn Find 8N

I'll be pulling this 1949 8N out of the barn soon. It hasn't moved in 50 years. The tires are flat. The rear wheel outer rims are disintegrated by rust. Hasn't run in 50 years. Here are few photos. I am a newby tractor guy and would really love to hear any suggestions on how to move slowly and cautiously with this very nice tractor. BTW I am paying a family friend $200 for the machine.
 
Congrats! That's great news!

Try the pics again because they didn't post.

Do not attempt to turn the engine over. You could break the rings if they are rusted to the cylinder walls. Pull all plugs, add a cup or more of automatic transmission fluid (ATF ) or Marvel Mystery Oil (MMO) in each cylinder. Pull both valve covers & soak everything w/ MMO or ATF. Scrub it all down w/ a wire brush. Remove the 15/16 hex nut to the right of the water pump. This is where your oil gallery is for the valves/lifters is. Don't lose the little spring under the nut. Use an oil squirt can to put about a cup of oil in here. Replace the spring & nut. Then, start looking for mouse/hornet nests in places like the tail pipe & carb breather hose. Wait at least 2 or 3 days before you do anything, then try & hand crank the engine. (w/o spark plugs) If it does not turn by hand, repeat everything you just did, ie, more MMO or ATF. If it still won’t turn by hand, remove the starter (see tip # 36) and use a BF screwdriver or jack handle on the ring gear teeth to try & turn it over. Once you get it to turn by hand, then change all the fluids (check tips 3 & 4 at the link below for info on the tranny/pump/rear end fluid change) Fluids include oil & filter, oil in the air cleaner, and 50/50 water & antifreeze. Grease all fittings. Replace the points, plugs, condenser, rotor & cap. (see below) If the wires are cracked & frayed, replace them as well, or you will spend days trying to find that one short. Clean all connections bright & shiny. Put a couple of tablespoons of oil in each cylinder to help lubricate the cylinder walls & increase start-up compression. Before you put the valve covers back on, coat everything again w/ oil . Clean the fuel screens in the carb & sediment bowl. Spray the carb good w/ carb cleaner. (Some people can get a carb to work like this after setting for years. Some people win the lottery. I have never got away w/ an old carb working; plan on a rebuild). Drain the gas or whatever is in the tank. Add at least two gallons of fresh gas & make sure you have a good flow by removing the bolt at the bottom of the carb. Keep some starting fluid or propane handy. You will need a new battery; it needs a good battery to power the ignition as well as turn over the starter. Just before you try to start it, prime the oil pump by removing the 15/16" hex nut again, & use w/ 90w gear oil this time. Spin the starter over (key off) & make sure you have oil pressure showing on the gauge. Remember, you filled the cylinders w/ oil, so it will smoke a lot when it gets going. Once you get it running, just let it idle for a few minutes while you check closely for leaks (oil, water, gas) & make sure it has good oil pressure. Then, it should be run at variable RPM. Internal parts that would normally have a film of oil have gotten dry. Run the engine up to around 1500 RPM and back down, put it in gear and make a few laps around the yard at various speeds. This will quickly get some heat into the oil and splash oil everywhere it needs to be inside the engine. Continue to watch for leaks, smoke or other problems (like no brakes).

Good luck & check back!

* *NAPA part numbers:
• Points: FD-6769X
• Condenser: FD-71
• Rotor: FD-104
• Cap: FD-126
75 Tips
 
dam that's a good post!!!

simple and to the point. even a dummy like me could follow the tips.
 
You can't post pics direct. Go to Photobucket & open an account. (free) Post the pics there. Then, once the pic is in Photobucket, click on the pic, click on the "link" icon, click on " direct " and then past that into the "optional image url" box at the bottom.

You can post pics from other sources like Flicker, etc, but I haven't a clue how to do it.
75 Tips
 
and keep postin any questions you think of.

between all the members here, someone at some point will have encountered your problem and solved it.
 
Geez, that is the most perfect find I have ever seen!

The pic with the rope hanging in front is priceless. That's a calendar shot.

Good camera and great tractor.
 
Here they are:

mvphoto7351.jpg


mvphoto7352.jpg


mvphoto7353.jpg


mvphoto7354.jpg
 
WOW! Nice barn find!!! AND with good tires and good tin!

Go slow and follow the advise here and I'll bet she will be up an running before you know it!

You need to give the previous owner a case of his favorite beverage. :wink:

PS: To add to what Bruce posted (unless I missed it): After cleaning the sediment bowl and fuel screen, you will open the gas cut off on the sediment bowl two full turns WHEN you get ready to check for fuel flow. Then turn it off when done until you get ready to attempt a start. Then open two full turns again for start/run. Oh...and don't worry if the sediment bowl doesn't fill completely with gasoline when you reassemble it and turn on the gas cut off. that is normal.
 
Nice find!! The only thing I would add to what Bruce told you ( and I trust his advice 100% ) is I would not trust that old gas tank. I would make my first attempt to start it using a small gas tank mounted to a stand by the tractor. I have a small engine tank that holds about a gallon that I use on engines that have been sitting along time like that one has. I have had to many problems with old tanks being full of rust or have holes rusted thru on the bottom. If you use a temporary tank just make sure the line is well away from the manifold. Those 8n tanks can be really hard to clean out because of the baffles inside. Hope you get it running soon and let us know how it turns out and don't forget to read all of Bruce's 75 tips
 
What a great surprise! That would make me want to
get another 8N.

I had read before about some farmers having the
dealer install a light kit, but only one headlight
up front & the other as a rear worklight, but
that's the 1st one I've seen.

Thanks for posting.

Jeff
 
You've got a once in a decade find. I've found 2 over the past 16 years & bought them both. One is totally restored & the other is still cutting grass around here. Plenty of folks can help you get it running & make it pretty.

The pics are before & after of a single owner 1950 8N I bought in 2008 & finished restoring in 2010.
DSC03796.jpg

DSC02042-1.jpg

75 Tips
 
Great find there Billy! Looks to be original paint or an old repaint. Listen to Bruce and the others and you'll have her going in no time. Only thing I can add is if that is original paint you might want to preserve that, not much of that left in the N world. One fellow on a Cub Cadet forum that I'm on suggests shooting with clear coat to preserve that paint. As someone once said, they are only original once!

Let us know your progress on 'er.
 

Looks like a lot less than fifty years what with replacement tires and paint, but nevertheless very straight, a great find. Congratulations!
 
Billy, this might be redundant after all the great resurrection procedures you've been given, but here's my two cents worth.

For the 235 in my '51 chevy aluminum van, I've done this because I left too many years between startups.

I took a spare complete distributor housing and removed the gear on it that normally meshes with the camshaft. then I removed the distributor cam etc., leaving only a nice little shaft to accept an electric drill. So you drop your new oil pump driver into the distributor shaft bore so that the fat screwdriver type bit fits into its slot in the oil pump and let her fly.

You can watch the oil pressure climb on your dash guage!

It does require a little extra care punch or file marking the positions of everything before you pull your existing distributor. Have #1 at TDC on the compression stroke perfectly before you pull it and carefully mark the dist and clamp and which pole the rotor is pointing to.

Having your distributor shaft out is a perfect time to restore it and do your points and scrape the scale off the poles in your cap.

and like that . . . Good luck with it!

Terry

Just went down to my shop and took a photo of my oil pump driver.
mvphoto7616.jpg


mvphoto7617.jpg
 
Terry, that works great on a Chevy and other engines too.
But on an N with a front mount distributor it ain't gonna happen.
 
(quoted from post at 17:52:38 06/01/14) Terry, that works great on a Chevy and other engines too.
But on an N with a front mount distributor it ain't gonna happen.

DOh! Ooops!!
I stupidly assumed that it was like this overhead valve Jubilee.

Thanks,
T
 
nice find.
200 eh? ya bought a decent set of fenders that just happen to have a tractor attached to them.....

Follow the good posts and most of all, be patient, get it loose and turning with oil in everywhere.
By the looks, it'll run with very little work.
I wouldn't trust the rear tires at all.
Sitting flat for a long time, they tend to get violent
when aired up to get on a trailer.
2 of my recent ones, one made it about 10' before a 16" split opened up in the sidewall...boom. Another bigger tractor, when aired up made it on the trailer, but when cinching it down hard,
very loud kaboom on the right rear. wakes ya up..............
 
(reply to post at 16:23:00 06/01/14)

Thanks everyone for your helpful comments. Progress report:

The front and rear tires are rotted beyond use. One rear rim is rusted through and will have to be replaced.

I more thoroughly removed the rust over the serial number and discovered it is a '48, not a '49. (#8N 105XXX).

QUESTION: I am planning on using a come along to pull the tractor on to a tandem axle trailer. I am prefer to NOT replace rubber or wheel until after I get it home. The transmission is in neutral. I cannot imagine any problem pulling the tractor on the trailer, even if the rubber and outer rims disintegrate. Since I have never done this before, does anyone have a differing opinion?

QUESTION 2: I live in the Upper Peninsula of Michigan. And I have family in Middlebury, Indiana. There are bone yards around. What should I expect to pay for a rear rim?

Billy
 
(quoted from post at 06:06:26 06/02/14)
(reply to post at 16:23:00 06/01/14)

Thanks everyone for your helpful comments. Progress report:

The front and rear tires are rotted beyond use. One rear rim is rusted through and will have to be replaced.

I more thoroughly removed the rust over the serial number and discovered it is a '48, not a '49. (#8N 105XXX).

QUESTION: I am planning on using a come along to pull the tractor on to a tandem axle trailer. I am prefer to NOT replace rubber or wheel until after I get it home. The transmission is in neutral. I cannot imagine any problem pulling the tractor on the trailer, even if the rubber and outer rims disintegrate. Since I have never done this before, does anyone have a differing opinion?

QUESTION 2: I live in the Upper Peninsula of Michigan. And I have family in Middlebury, Indiana. There are bone yards around. What should I expect to pay for a rear rim?

Billy

won't hurt anything.
I've driven my old junk around on just rims, or brands with cast centers, around on the centers with no rims at all to get them out of my way or test an engine.

used tires already on rims are pretty easy to find for a little Ford.
If you want new, ya can't beat Tucker Tires, tires, tubes, on outer rims deal.
 

Wow . . . everything there and no cracks in the steering wheel even!

Having just finished an exhaustive restoration of a couple of rims
I zero'd in on the inside views of your rear rims.

T
 
(quoted from post at 09:41:33 07/03/14) Here is an 8 minute video on YouTube, about the 8N
tractor I bought. A little history on the tractor
and the tractor owner's grandson's memories on the
old Michigan farm.

http://youtu.be/zDXxiOgFQ9w

You mention many being killed by Ns rolling over. You are thinking of the earlier Fordson, and still greatly exaggerated.
 

Jan, the grandson, who I interviewed in the video, was using common sense, which is one of the two safety features on the 8N. I have personally walked the valleys he was driving the 8N in. The topography is severe and very difficult to walk up, much less drive up.
 
(quoted from post at 13:34:48 05/28/14)
Having trouble posting photos. Can anyone help? I just registered today, so do I have to wait to be able to post photos?

I addition to what Bruce said:
Make sure your clutch is not frozen in place left inside foot pedal.
Also make sure you get the correct battery it could be a 6 volt or a 12 volt pay attention to which terminal the positive and negative are on tractor may be a positive ground ( positive side of battery goes to the tractor chassis)
Radiator gets filled to the top of the fins not to the top of the fill spout.
Great looking barn find wish you the best of luck getting that antique iron going again.
 

Just came across this post. That isa great find anda great deal you got. I recently got one that was sitting for 15 years and a friend of mine told me to do excatly what Bruce said and she fired up easily. The only other tip is to have a bat charger handy as it may take a bit of cranking to get her running.
 
PROGRESS REPORT

July 10: For the past 10 days I've been attempting to free a stuck engine. When I pulled the sparkies, the electrodes were rusty. I began doing what you kind folks suggested, which was to use Mystery Oil. I did about a half gallon. Nothing moved. Last night I did a pint of acetone mixed with two pints of ATF fluid. She broke free after an hour, after the Number 2 cylinder bubbled gunk and then drained. This weekend, I hope to try to start this old girl. I'll keep you all posted! So far so good! Thanks everyone for the help!!!!!
 

READY TO TRY STARTING, but need some help first....

I have a number of 12 volt batteries around, but no 6 volt. Is there any way to temporarily use a 12 volt battery to see if starts?

Here's a pic of the generator.
20140712_091424.jpg
 
(quoted from post at 19:38:49 07/12/14)
READY TO TRY STARTING, but need some help first....

I have a number of 12 volt batteries around, but no 6 volt. Is there any way to temporarily use a 12 volt battery to see if starts?

Has there been any progress on this? It's a nail-biter....
 
(quoted from post at 14:00:20 07/22/14)
you're not kidding..lol been following this post since day 1.

any luck yet, Billy the Kid?

No luck yet with the 8N, yet, but I'm about ready to give her a try.


PROGRESS REPORT: I read some old posts about re-installing the starter. The armature had come out. Plastic zip ties on the brush springs work really great. So the armature is back in and ready to install starter.

I also found out by reading old threads that I can use a 12 volt battery on my 6 volt system. The lack of a six volt battery was holding up the situation.

And lastly, I am now the proud owner of three tractors, where as at the start of the summer I had none. I bought a Allis Chalmers WD, and a second WD for parts. It's running great. Had to get it running because I'm planning on using it for snow plowing.

Sorry if talk about Allis offends any true blue Ford fans. lol

Hoping to post in the next week on the results of actual starting attempt, the first in 34 years for this tractor. I'm betting it does....

Thanks to Bruce for his "There are four things that make starter installation easy" post. Some key information there Bruce.

Thank you to everyone who posts such helpful information! As Dell might say, I gots me some itchy-twitchy fingers just ready to turn that key on.
 

Can't blame you for getting the snow plow one ready, hence to where you're located lol

Good luck with the 8n and keep us posted. Love hearing your updates! :D
 

We sell tractor parts! We have the parts you need to repair your tractor - the right parts. Our low prices and years of research make us your best choice when you need parts. Shop Online Today.

Back
Top