9N No Spark

Anonymous-0

Well-known Member
After reading through some threads. I believe I have traced my spark issue to the ballast resistor. I did the voltage check points open and closed (key on) and the same value came back 3.4 volts for both checks. Tracking back from coil to resistor, coil side of resistor had same voltage of 3.4. Other side of resistor was about 5.5. Low most likely from failed starts and battery use. Resistor was very hot to the touch. Sound like a resistor? They are only $10 at napa but i have to get a pasture planted and cannot afford a delay. I feel like a kid, had this tractor 10 years, never a problem and 30 years ago, I could repair a breaker point ignition in my sleep using a scredriver and a test light.
 
Actually, no, it sounds like your resistor is good.
By voltage check, I assume you're measuring the voltage at the
small post on top of the coil? If so, the voltage should change to
battery voltage with the points open. Regardless of the battery state.

So I would think you have something grounded in the distributor.
Either the little pig tail from the condenser touching the plate, or
the insulator that it hooks to is cracked and not insulating, points
not actually opening because of a worn rubbing block, etc.
Have you done any work in the distributor lately?

In any event, you will need to charge that battery.
Hopefully it isn't drained too far down and will charge up Ok.
 
No I didn't do any distributor work lately. I was using the tractor and it died, like the key was shut off. I found wire on top of coil loose tightened down fired up then...same thing half hour later. Pulled the distrubutor, condensor wire loose, figured this was it tightend up and here I sit.To your question, yes my check started at the top of the coil (6V).Also had a spare condensor and points from last tune up. Worked when they came out, those have been installed and ruled out as an issue.
 
When you said, "insulator that it hooks to is cracked and not insulating". What exactly are you referring to? Coil? I have a spare coil and this wasn't the issue either.
 
I bet on points--since u put used ones back in it did you polish them? Use fine emery cloth then follow up with brown paper bag--you can't rub too much with the brown paper-it polishes and removes dust from emery cloth.....While in there I'd actually go back with new ones but "dressing" them may get you by a while and might get u by a long time...what did you set the points on? Should be set at .015 with points rubbing block on high point.we look forward to hearing back from you.
 
(quoted from post at 00:18:06 03/27/14) When you said, "insulator that it hooks to is cracked and not insulating". What exactly are you referring to? Coil? I have a spare coil and this wasn't the issue either.
Insulator inside the distributor on the breaker plate.
You also may want to check that copper strip an make sure
it is not grounded out as well.

mvphoto5310.jpg
 
Excellent troubleshooting!

You are answering your own questions.

You say: " I believe I have traced my spark issue to the ballast resistor."

Nope!

Here is the answer that says your resistor is working:

" coil side of resistor had same voltage of 3.4. Other side of resistor was about 5.5."

Next, you say: " . I did the voltage check points open and closed (key on) and the same value came back 3.4 volts for both checks. "

BZZZZT!

That's the answer that says a short in the distributor.

Points open. battery voltage! Points closed, about 4 or so volts.

First, make sure your battery is fully charged.

Don't guess; put it on a charger.

You need a strong battery to:

1. Close the solenoid

2. Spin the starter

3. Engage the bendix

4. Provide voltage to the coil.

As the battery gets weaker, the first thing to fail is your spark. If the battery is almost totally dead, all you will hear is the solenoid clicking.

The more current you use to spin the starter, the less you have for the ignition.

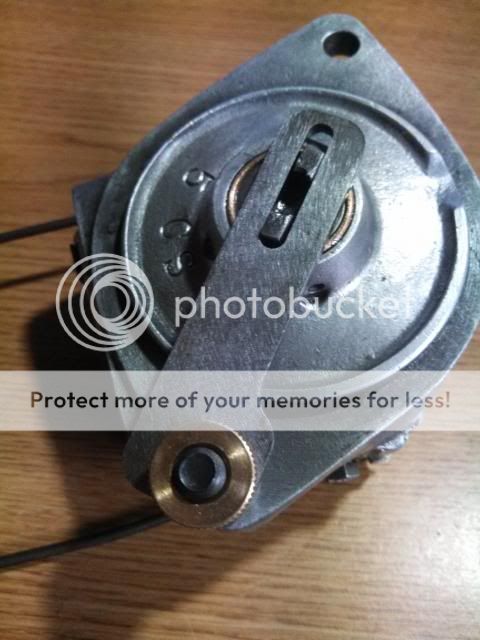
Assuming that the bushings & advance weights are ok*, & that you have correct voltage to the coil, the most common electrical failure (no spark, weak spark) points on the frontmount are:
The insulator under the brass concave head screw & where the copper strip attaches. (it’s fiber & will wear out; poke & prod w/ your meter leads to make sure it still works)

The pigtail at the bottom of the coil not making contact w/ the concave head brass screw inside the distributor. (With the coil on, the pigtail must firmly contact the brass screw. No contact = no spark.

The copper strip is broken or grounded to the plate. (look very carefully for cracks & breaks)
The condenser wire grounding to the plate or side of the distributor.

The tab on the bottom of the coil not making contact w/ the brass button on the cap. (With the cap on, the tab must firmly contact the brass button. No contact = no spark.)

Incorrect positioning of the spring clip on the plate causing the pigtail to ground. (the open part of the clip goes between 7 & 9 o’clock on the plate. That puts the straight part of the clip opposite of the timing screw at 3 o’clock)

Incorrect seating of the coil on the distributor due to a loose bail or no gasket.(the coil must not move at all; if it does, replace the gasket or bail. Or stick some cardboard under the bail).

Water/moisture inside the cap due to gasket failure or the absence of a gasket. (the cap AND coil have gaskets)

Dirty/corroded/burned/incorrectly gapped or misaligned points.

Burned rotor, cracked/carbon tracked cap.

Unless the coil is cracked or shows a dead short, chances are it's fine; square coils rarely fail cold. Pull the distributor & do a continuity check.

First, make sure your meter/light works (don't ask....)

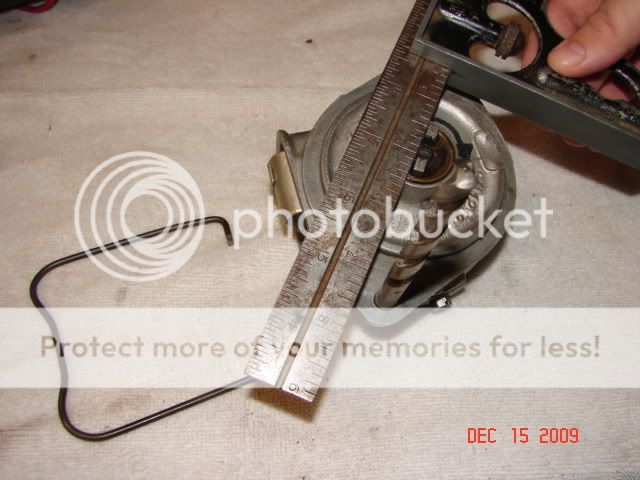
You can change points everyday & it will not fix bad bushings. If you are having trouble w/ points failure, check the shaft. If you detect movement, it needs new bushings. If you are using QUALITY** points and can not get the gap open to .015, replace the bushings.

Inspect the points; if they are pitted or burned, replace them. Next, dress the points by running a piece of card stock or brown paper bag through them. New points sometimes have an anti-corrosive dielectric coating on them & old points can corrode or pick up grease from a dirty feeler gauge or excessive cam lubricant. Make sure the points align correctly. Proper alignment is also critical to longevity. Look at the points when they are closed; both sides should mate evenly. Then, check the gap at .015 on the high point of all 4 cam lobes.

Now, follow these steps:

1. Coil off, cap off, points open. One probe on the brass screw & the other on both sides of the open points. On the side closest to the cam, you should have continuity. Not on the other side! If you do, you will also have continuity everywhere because the points are grounded.

2. Coil off, cap off, points open. One probe on the brass screw & the other anywhere on the body of the distributor. You should have no continuity! Now, rotate the tang on the distributor....as the points open & close, you have continuity (closed) and lose it when they open.

3. Coil on, cap off, points open. One probe on the lead on the top of the coil, the other on the cam side of the open points. You should have continuity!

4. Coil on, cap off, points open. One probe on the lead on the top of the coil, the other anywhere on the body of the distributor. You should have no continuity!

At this point, I just put the distributor, coil & cap all back on the tractor as a unit. The reason I do this is because it is real easy to get the cap or coil mis-aligned trying to put it back together one piece at a time & the result is something gets broken or you get a ‘no spark’ problem.

It's possible to put it back on wrong & break it. Look at the slot on the end of the cam shaft. What ever angle it happens to be, turn the distributor tang to match it. Make sure you can tell the wide side from the narrow side on both the cam & distributor! (close counts) Then place the distributor on the front of the engine, gently push it in place & slowly turn the distributor body until you feel the tang slip into the slot. Rotate the distributor body until the bolt holes line up. Then, hand tighten the two bolts until the distributor body is flush w/ the timing gear cover.

Finally, double check your firing order & plug wires. It’s 1-2-4-3, counterclockwise. It’s very easy to cross 3 & 4.

Post back w/ results & any other questions.


*Unscrew the plate hold down screw & remove the C clip to get the plate out. Remove the shaft & weights. The weights should freely move.

** Wells, Echlin, Blue Streak or CNH.
75 Tips
 
Thank you all for your posts.

Bruce I have read many of yours which helped me with my troubleshooting but one more question. You said, "The insulator under the brass concave head screw & where the copper strip attaches". I am assuming this is the screw directly under the pigtail where the points attach to the copper strip?

Unfortunately gentlemen, I have a job and won't get back to this until after 5:30PM PDT. I will post results, I can smell the exhaust already...
 
" I am assuming this is the screw directly under the pigtail where the points attach to the copper strip?"

Yep.

Check out the pic Royse posted below.

The OEM fiber insulator & copper strip have been replaced. The insulator is now a nylon; it's probably a .250 x 3/8 square nylon anchor nut. If your insulator is bad, that's the repair you will need to make.
75 Tips
 
I did see the pic posted but mine looks different. Mine has no plastic. I believe mine is original as my tractor still has the coil with the Ford logo.
 
"......... mine looks different. Mine has no plastic."

Which is why I said the OEM fiber insulator & copper strip have been replaced.

Those OEM Ford coils are pretty rare; internal resistance is usually below 1 ohm which is great.
75 Tips
 
(quoted from post at 12:00:01 03/27/14) I did see the pic posted but mine looks different. Mine has no plastic. I believe mine is original as my tractor still has the coil with the Ford logo.
Sorry for the confusion on the picture CGR, that is a replacement
insulator as Bruce said. The original went bad and it was repaired.
It is not uncommon for them to break and ground the circuit to
the breaker plate, which would cause your symptoms.

I don't want to put the cart before the horse, but if that turns out
to be the problem, they are sold at the big box stores like Lowes,
Home Depot, Menard's etc and online. Hillman Part #881189
 
OK gents I "think" I have a bingo. Pig tail is grounding on the retaining clip. Tried a few times using old gasket and...nothing. Coil wasn't seating snug and had slight movement even after some customizing on coil clip. Fortunately I have a cork gasket from and aftermarket spare coil. Needed to customize it a bit but assembling at the kitchen table and I have about 1/16" clearance from pig tail to retaining clip. I hope that's all I need. Will re-post again tomorrow after I install. ran out of daylight. Thank you all so much for your help especially when it fires. I forgot my troubleshooting fundamantals, start simple and keep working. Had I done this, my pasture would be disced, harrowed and planted and could start drinking beer at noon Eastern time on Saturday!
 
The two primary causes of the pigtail grounding to the clip are an off-centered plate & incorrect positioning of the plate retaining clip. The open part of the clip goes between 7 & 9 o’clock on the plate. That puts the straight part of the clip opposite of the timing screw at 3 o’clock.

Be careful trying to fix it w/ a gasket. All that usually gets you is no contact between the pigtail & the brass screw.

Look at the timing marks on the tab. Chances are someone has got the plate to far advanced or retarded.

Set the timing correctly & chances are very good that you won't have the problem.

This does sound like it's a serious problem if it's interfering with beer drinking. :)
75 Tips
 
I share your thoughts. Ten years owning this tractor and this has NEVER been an issue or thought. All of a sudden, it is a royal pain. What I noticed the position on the condenser screw would determine the position of the pig tail. I would think it wouldn't matter but did. Having it look like a straight road for the pig tail allowed it to move forward slightly gaing clearance from the clip. I will re-check the timing but this shouldn't change clip position in my mind?? I also found that the connecter on the condenser had broke, it was making contact but was broke. That is fixed, just waiting for 5:30pm and another try. You have any quick diagram/instruction for setting timing? I know I have it just a matter of where. Thank you, you have been very helpful.
 
" You have any quick diagram/instruction for setting timing? "

Get a meter or test light, a 21/64” drill bit (*** see below) & a metal straight edge. Put the distributor face down w/ the condenser on the left & the timing plate lock screw on the bottom. Look at the end of the shaft: it has a narrow side & a wide side. Make sure you can tell the difference. Now, place the drill bit in the bottom mounting hole (this will be your reference point for measuring). Next, place a straight edge on the wide side of the tang on the shaft as shown in fig. FO83 in the picture. Rotate the shaft CCW (as viewed from rotor side OR CW as viewed from back/tang side) until the straight edge is ¼" beyond the outside edge of the drill bit you stuck in the distributor mounting hole. At this distance, the distributor points should start to open (get your meter/light out now & check). If not, loosen the timing plate lock screw and turn to advance or retard the timing (move the plate down to advance timing, up to retard).

Remember, each one of those little hash marks represents about 4° of timing. Keep adjusting until you get the proper ¼" setting. (if the plate won’t move, you might need to remove the big C clip to loosen it a bit)

As you’re adjusting, eliminate backlash by turning the shaft backwards (CW as viewed from the front) and bring the shaft forward (CCW as viewed from the front) to measure your setting. This ¼" setting will get you static timing at top dead center.

As you can see from the picture, this particular distributor needed to have the timing advanced by about 8° (two hash marks) to achieve the ¼” measurement.

After you set the points & timing, do a continuity check before you put the distributor back on the tractor.


*** Rather than the drill bit, a jig made by Dan Allen (The Old Hokie) will make this task quicker & more accurate. http://mysite.verizon.net/oldhokie/windyridge/id11.html
IMG_20140212_144953_385_zpsd84210ac.jpg

IMG_20140212_144910_554_zps7098b9a8.jpg

timing003.jpg

75 Tips
 
Gentlemen, we have fire. Here is one for the archives. The pig tail had a slight bend and I do mean slight but enough to ground out the distributor on the retaining clip. Had to be from the worn gasket allowing some waffling around. I straightened it, stretched it a tad and installed the new cork gasket. Holds tighter than a drum and fired on the 3rd crank.
Bruce, thanks for the timing info, checked timing and it was right on the button.

The saga continues. The dist bolt on oil filter side decided that it wated to take the threads out when tightenting up the dist. Pulled the bolt and literally threads still on bolt. Gonna go down to Lowes and get a 3/8" automotive bolt and tap out the old hole. For such a small easy problem, it turned into a fiasco but at least the frustration is over and the goats will have a pasture in about 6 weeks.

You all have been great and we novice 9N tractor owners are truely grateful for guys like you, willing to help just for the love of what you do. I need to tread lightly for awhile, I am sure God is not happy with my language over the past few days.

God Bless you all.
Mike AKA California Goat Rancher
 

We sell tractor parts! We have the parts you need to repair your tractor - the right parts. Our low prices and years of research make us your best choice when you need parts. Shop Online Today.

Back
Top