8n ignition problems

Anonymous-0

Well-known Member
Hello all, I am new to the forum and new to tractors.

I grew up pretending to be a mechanic in my parents' garage and pretty much know how most automotive things work...however I started working with an HEI motor so points are not something I have much experience with.

I did read the sticky at the top but chose to post in this forum vs the Ford forum because I don't know this issue is manufacturer specific. Mods, please feel free to move if you feel otherwise.

So the story goes:

A couple months back I purchased a well-running 49 8n. The only thing strange was that it required choke to start, even when warm, but changing out the plugs (am using 437s) fixed that right up. Good.

I put about 12 hours of brush-hogging on the tractor without a single mechanical problem (just some leaky PTO seals). Then one day I try to start it and it wont fire up! I checked the basics and had fuel to carb/spark to plugs...should be working.

First thing I did was to pull apart the carb and give it a good cleaning, I hadn't done that yet. It didn't seem to bad but there were a few floaters so I thought that would do it. Both fuel filter screens looked OK and the float was set at 1/4". Both mixture screws seemed to be way off however (Idle was at 1/4 turn out and main was 5 1/2 turns out!). I set them back to 1 turn out, each, to start.

The tractor hesitantly fired up and ran better than before. I worked it for another two hours, no problems. Until I shut it down...then again it would not start! I let it sit an hour and came back and after a few tries is did start, ran fine, and I parked it in the garage. The next day the same story...it did not want to start but eventually did. Still had spark, gas tank was over half full and carb was getting fuel. I ran another 2 hours and parked it by my barn, bad idea, and again it would not start back up. At all. I even tried ether directly in the chambers and still no bang! That made me suspect the spark, though present while the plugs were out of the motor, was too weak to fire under compression.

I then ordered every ignition part as to not be messing around because next week I have about 170 postholes to dig with it: New coil, cap/rotor, points/condenser, plugs, wires and gaskets. I found one very interesting thing when I took it apart: The points were A) Waaaay too close together (probably under .010, where spec calls for .015), and B) badly burned up (which I only truly learned after seeing what new points look like). I figured the points were the cause, so I carefully replaced everything and set the points to .015 (per both the tool that came with them as well as my own blades). I verified the gap at all four lobes to make sure it was the same. Put it all back together and it started up, with a little choke, and idled fine. However it ran like total doo the moment it got past 1/2 throttle. It backfires and stutters and just runs like doo. I verified the plug gaps and the firing order, double-checked the carb...no luck. I did notice there was a timing tab on the dizzy (had been hidden by gunk when I took it apart so I don't know what it had originally been set to), I tried the middle, full advance, full retarded, half advance and half retarded...little improvement.

I then recalled that the points had been ridiculously close together when I took it apart. I tore back into it, set the points to about .010 (a little wider than when I took it apart), put it together and it fired RIGHT up, no choke, and ran much much better at high RPM. Still some missing but night and day vs the .015 gap. This made me realize the previous owner probably set the gap tight on purpose to get it running well, and that probably explains why the points were so burned up.

Sorry for the novel, just wanted to address all basic questions right away as to waste nobody's time!

HERE is my problem/question: What root problem would cause this? This is where my lack of experience with points is holding me back, that or I am missing something painfully obvious here. I searched around the internets before posting and have yet to find any clues about this. My guess is that it has something to do with timing but I don't completely buy it because the timing adjustment on the dizzy made no improvement to how it ran after mid-throttle (which I assume is where the centrifugal advance kicks in?).

I appreciate your time taken just to read though this mess, even if you don't post a reply.

Thanks,

Nick
 
" My guess is that it has something to do with timing but I don't completely buy it because the timing adjustment on the dizzy made no improvement to how it ran after mid-throttle (which I assume is where the centrifugal advance kicks in?)."

Timing & dwell are directly related. Reset the gap at .015 then set the timing correctly. which you have not done.

Usually burned points will have pits on one side & raised areas on the others. Sometimes they just wear unevenly. They will most always discolor as they have a coating on the surface. The usual causes of burned points are absence of cam/wearing block lubricant, condenser failure, a decreasing gap caused by wear on the rubbing block, mis-alignment, sanding w/ a point file, excessive current, setting an incorrect gap, leaving the ignition key on w/ the points closed, use of incorrect cam lubricant & poor quality metal. I've heard of points being welded shut, but I've never seen it happen.

You can change points everyday & it will not fix bad bushings. If you are having trouble w/ points failure, check the shaft. If you detect movement, chances are it needs new bushings.

The next trick to points lasting a long, long time is annual maintenance. (tip # 40) No matter how well it's running, pull the distributor (or cap for a sidemount), check the gap & put a dab of points lube on the cam. Not bearing grease or Vaseline; use the correct lube.

Quality parts are critical to longevity. Having learned the hard way, I most always use Blue Streak brand points. They are made by Standard parts & available at many auto parts stores. (frontmount points also fit a 48 Ford as I recall) Beware of sticker shock: $16-18 a set. My next choices are Wells or Echlin. Look for a brown rubbing block. Unfortunately, many folks have experienced problems w/ points made by Tisco, Sparex, A&I Products and any TSC ignition parts..

Correct points installation & gap is also important. Make sure the blade is at a perfect right angle to the points & you want to feel just the slightest bit of drag when you pull the blade through the points. Make sure the blade is clean & that you dress the new points by running some card stock or a piece of brown paper bag through them. Gap is .015 on the frontmount, .025 on the sidemount on all four lobes of the cam. Make sure the points align correctly. Proper alignment is also critical to longevity. Look at the points when they are closed; both sides should mate evenly.

Even as tight as I am, I always change the condenser when I change the points…….and then I toss the condenser in the “used” parts box. A bad condenser is rare; you can tell if the points are pitted/burned w/ metal transfer.

Good hold-down screws are important. (tip # 37) If the heads are wallowed out, what do you think the threads look like? You can use machine screws as temporary replacements, but you should use the OEM Fillister head screws. The larger head is there for a reason. If you do use standard machine screws, make sure they aren’t too long & interfere w/ the advance weights. Always use star washers under the screws.

Timing is important to engine performance. Make sure you set the point gap before you set the timing. Timing a sidemount is pretty straight forward; it has marks on the flywheel. It’s a bit different for a frontmount but it’s a necessary part of a tune-up nonetheless. And, contrary to what some folks think, timing a frontmount is not accomplished by getting #1 to TDC & putting the distributor back on the engine!

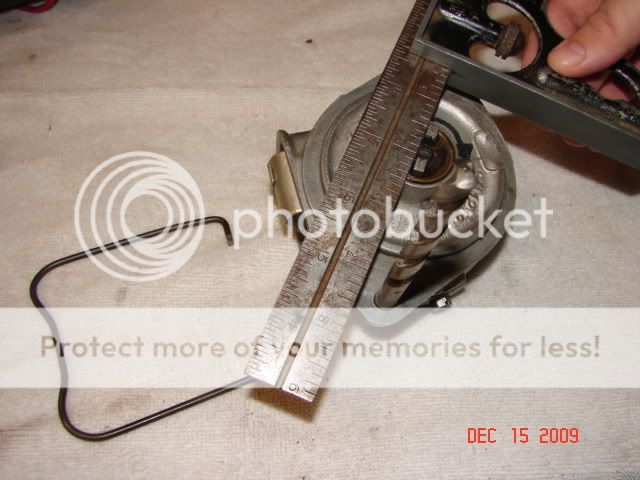
Get a meter or test light, a 21/64” drill bit & a metal straight edge. Put the distributor face down w/ the condenser on the left & the timing plate lock screw on the bottom. Look at the end of the shaft: it has a narrow side & a wide side. Make sure you can tell the difference. Now, place the drill bit in the bottom mounting hole. (this will be your reference point for measuring) . Next, place a straight edge on the wide side of the tang on shaft as shown in fig. FO83 in the I&T FO4 manual. Rotate the shaft CCW (as viewed from rotor side OR CW as viewed from back/tang side) until the straight edge is ¼" beyond the outside edge of the drill bit you stuck in the distributor mounting hole. At this distance, the distributor points should start to open. (get your meter/light out now & check) If not, loosen the timing plate lock screw and turn to advance or retard the timing. (move the plate down to advance timing, up to retard) Remember, each one of those little hash marks represents about 4* of timing. Keep adjusting until you get the proper ¼" setting. (if the plate won’t move, you might need to remove the big C clip to loosen it a bit) As you’re adjusting, eliminate backlash by turning the shaft backwards (CW as viewed from the front) and bring the shaft forwards (CCW as viewed from the front) to measure your setting. This ¼" setting will get you static timing at top dead center.

After you set the points & timing, do a continuity check before you put the distributor back on the tractor. Before you start, make sure your meter/light works (don't ask....)

With the distributor still off the tractor, follow these steps:

1. Coil off, cap off, points open. One probe on the brass screw & the other on both sides of the open points. On the side closest to the cam, you should have continuity. Not on the other side! If you do, you will also have continuity everywhere because the points are grounded.

2. Coil off, cap off, points open. One probe on the brass screw & the other anywhere on the body of the distributor. You should have no continuity! Now, rotate the tang on the distributor....as the points open & close, you have continuity (closed) and lose it when they open.

3. Put the coil on the distributor, cap off, points open. One probe on the lead on the top of the coil, the other on the cam side of the open points. You should have continuity!

4. Coil on, cap off, points open. One probe on the lead on the top of the coil, the other anywhere on the body of the distributor. You should have no continuity!

At this point, I just put the distributor, coil & cap all back on the tractor as a unit. The reason I do this is because it is real easy to get the cap or coil mis-aligned trying to put it back together one piece at a time & the result is something gets broken or you get a ‘no spark’ problem.

It's possible to put it back on wrong & break it. Look at the slot on the end of the cam shaft. What ever angle it happens to be, turn the distributor tang to match it. Make sure you can tell the wide side from the narrow side on both the cam & distributor! (close counts) Then place the distributor on the front of the engine, gently push it in place & slowly turn the distributor body until you feel the tang slip into the slot. Rotate the distributor body until the bolt holes line up. Then, hand tighten the two bolts until the distributor body is flush w/ the timing gear cover.

Post back w/ results & any other questions.
timing003.jpg

50 Tips
 
(quoted from post at 11:21:24 08/20/12) Hello all, I am new to the forum and new to tractors.

I grew up pretending to be a mechanic in my parents' garage and pretty much know how most automotive things work...however I started working with an HEI motor so points are not something I have much experience with.

I did read the sticky at the top but chose to post in this forum vs the Ford forum because I don't know this issue is manufacturer specific. Mods, please feel free to move if you feel otherwise.

So the story goes:

A couple months back I purchased a well-running 49 8n. The only thing strange was that it required choke to start, even when warm, but changing out the plugs (am using 437s) fixed that right up. Good.

I put about 12 hours of brush-hogging on the tractor without a single mechanical problem (just some leaky PTO seals). Then one day I try to start it and it wont fire up! I checked the basics and had fuel to carb/spark to plugs...should be working.

First thing I did was to pull apart the carb and give it a good cleaning, I hadn't done that yet. It didn't seem to bad but there were a few floaters so I thought that would do it. Both fuel filter screens looked OK and the float was set at 1/4". Both mixture screws seemed to be way off however (Idle was at 1/4 turn out and main was 5 1/2 turns out!). I set them back to 1 turn out, each, to start.

The tractor hesitantly fired up and ran better than before. I worked it for another two hours, no problems. Until I shut it down...then again it would not start! I let it sit an hour and came back and after a few tries is did start, ran fine, and I parked it in the garage. The next day the same story...it did not want to start but eventually did. Still had spark, gas tank was over half full and carb was getting fuel. I ran another 2 hours and parked it by my barn, bad idea, and again it would not start back up. At all. I even tried ether directly in the chambers and still no bang! That made me suspect the spark, though present while the plugs were out of the motor, was too weak to fire under compression.

I then ordered every ignition part as to not be messing around because next week I have about 170 postholes to dig with it: New coil, cap/rotor, points/condenser, plugs, wires and gaskets. I found one very interesting thing when I took it apart: The points were A) Waaaay too close together (probably under .010, where spec calls for .015), and B) badly burned up (which I only truly learned after seeing what new points look like). I figured the points were the cause, so I carefully replaced everything and set the points to .015 (per both the tool that came with them as well as my own blades). I verified the gap at all four lobes to make sure it was the same. Put it all back together and it started up, with a little choke, and idled fine. However it ran like total doo the moment it got past 1/2 throttle. It backfires and stutters and just runs like doo. I verified the plug gaps and the firing order, double-checked the carb...no luck. I did notice there was a timing tab on the dizzy (had been hidden by gunk when I took it apart so I don't know what it had originally been set to), I tried the middle, full advance, full retarded, half advance and half retarded...little improvement.

I then recalled that the points had been ridiculously close together when I took it apart. I tore back into it, set the points to about .010 (a little wider than when I took it apart), put it together and it fired RIGHT up, no choke, and ran much much better at high RPM. Still some missing but night and day vs the .015 gap. This made me realize the previous owner probably set the gap tight on purpose to get it running well, and that probably explains why the points were so burned up.

Sorry for the novel, just wanted to address all basic questions right away as to waste nobody's time!

HERE is my problem/question: What root problem would cause this? This is where my lack of experience with points is holding me back, that or I am missing something painfully obvious here. I searched around the internets before posting and have yet to find any clues about this. My guess is that it has something to do with timing but I don't completely buy it because the timing adjustment on the dizzy made no improvement to how it ran after mid-throttle (which I assume is where the centrifugal advance kicks in?).

I appreciate your time taken just to read though this mess, even if you don't post a reply.

Thanks,

Nick
ou probably did not make the mistake of setting the gap while on the 'flat' of cam, but it has been done, so I ask?
What resistor is in coil circuit?
 
If I set it on the flat then the points would
never close, correct? As it is set now the points
do open and close as the lobes pass the arm.

Forgive my ignorance, but I am unaware of any
resistor. If it matters, this is a front-mount w/
coil atop the dizzy. System is still 6v.

I would happily check my owners manual to see
if/where a resistor might be hiding, but the
"cleaning fairy" came one day, before family
visited, and moved it from the counter to a "safe
place" as to not lose it...
 
Nick........good report and descriptions......you write......."Both mixture screws seemed to be way off however (Idle was at 1/4 turn out and main was 5 1/2 turns out!). I set them back to 1 turn out, each, to start"........keep yer ittchy-twitchy fingers off'n them handy-dandy carb tweek-ums.......heres the deal. Both Ford and M/S say to set the down-pointing mainjet to 1-turn.......That is way too lean. Set yer down-pointing mainjet to 2-turns and LEAVITT!!! Understand??? Adjust yer side-pointing idlemix for FASTEST idle, NOT SMOOTHEST idle. Understand the difference??? Then adjust the behind the carb idlespeed fer extremely SLOOOoooow 400-rpms (ennythang under 500rpms is good) I do that at least 3-times before I'm satisfied. The side-pointing idlemix is BASSACKWARDS; out fer lean; IN fer ENRICH. Last time I adjusted the carb on my eazy starting 6-volt 52-8N, the side-pointing idlemix way 1/4-turn and engine idle was 435-rpms on new proofmeter.

OK.......so yer weird 4-nipple frontmount don't have no eazy tachometer connection scheme. Don't matter, just lean yer headbone on yer tractor hood and you can feel/hear the engine rpms change. It can be done, and I wear hearing aides. Adjust the side-pointing idlemix for FASTEST idle. 500-rpms or slower you can almost see the blades turn.

You do know ittza 2-bolt, 15-min job to remove yer frontmount dizzy and change the points (0.015") on the kitchen table, don't you? Just un-snapple yer capple and letter dangle. Replacement is a reversal of the removal ...except... finger start yer 2-bolts and then install yer rotor and gently rotate yer OFF-SET rotor tang until it slips into the OFF-SET camshaft drive slot. Now tighten yer 2-bolts and re-snapple yer capple. Simple, eh?

REMEMBER: yer points (0.015") tightening screw is a SHORT 3/16" 8-32 BRASS screw and BRASS wears and will slip. The condenser screw is also 8-32 but it is a longer 1/4" and easily fits the point screw but will catch the under the plate centrifugal weight springs and then you won't have enny power, but will start eazily.

As fer yer external timing adjustment, remember the low compression 9/2/8N engine was designed for 75-octane clear gasoline. And farmers had to diddle with the timing. Just set yer external timing to middle and letter bee.

Howsomevers; we are gitting complaints about the effects of gasohole gummin-up the carb jets. There are several types of panther-pizzzz that you can add to yer tainted gasohol. Me? I just use hi-octane gas with "Stable". ........Dell, yer self-appointed sparkie-meister
 
(quoted from post at 11:58:17 08/20/12) If I set it on the flat then the points would
never close, correct? As it is set now the points
do open and close as the lobes pass the arm.

Forgive my ignorance, but I am unaware of any
resistor. If it matters, this is a front-mount w/
coil atop the dizzy. System is still 6v.

I would happily check my owners manual to see
if/where a resistor might be hiding, but the
"cleaning fairy" came one day, before family
visited, and moved it from the counter to a "safe
place" as to not lose it...
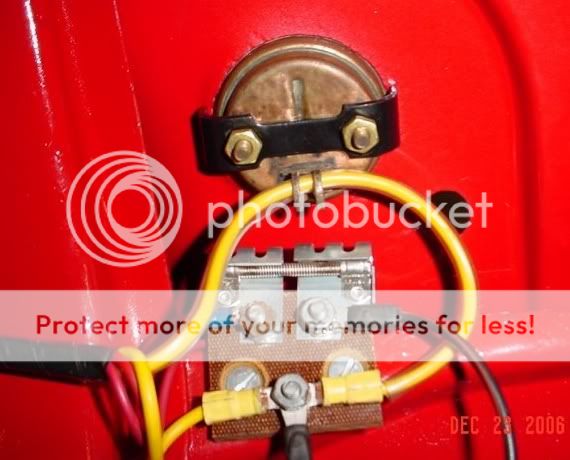
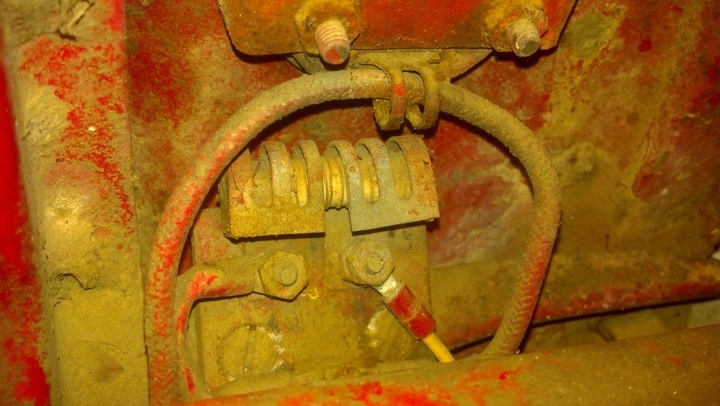
ere is what it looks like:
loop_amp_with_res.jpg
 
(quoted from post at 09:09:55 09/20/12) Inductive Ammeter? Are those still available?
retty is not a substitute for function......it it carries current to coil, let it be

No, those ammeters are no longer available....break that loop & it is ruined.
 
Well I have followed everybody's advice but to no real avail.

Since my original posting I have:

Located (and bypassed -for testing purposes) the ballast resistor. No help.

Replaced the entire dizzy as the shaft did seem to have some wiggle. No help.

Quadruple checked the plugs/wires/firing order, verified spark at all plus...etc

Adjusted the timing per the above/manual: Got worse. I had to adjust it all the way down (Retarded, if I correctly envision the firing order) just to get close to where the points would start to open with 1/4" gap between the drill bit and the straight edge (where the straight edge was on the WIDE side of the shaft). It ran terrible, and in fact only after I moved it a few notches above the center of adjustment (into the advancement now) did it go back to "normal". "Normal" means it idles OK but progressively sounds more missy as the revs increase. Backfires something bad when I really get the throttle up there.

Could somebody have rebuilt this motor and incorrectly installed a timing gear or something?

Remember, when I first got this tractor it ran great all over the RPM band, until the points burned up. Because the points where set well under .010.
 
" (Retarded, if I correctly envision the firing order) "

You don't need to "envision" anything.

I told you which way to advance & retard the timing: " (move the plate down to advance timing, up to retard) "

I'll assume you have a good distributor now & that the points were installed & gapped correctly.

Check the gap again; .015 on the high lob of the cam before you set the timing.

So go back & start over w/ the timing.

Make 100% sure you can tell the wide side from the narrow side on the tang. If you can't, then all of your adjustments are 180* off.

As in @ssbackwards.

W/ those kind of major adjustments, you removed the C clip & can see the plate move, correct?

And you are turning the tang in the correct direction (CW from the back) right?
 
(quoted from post at 11:02:24 09/24/12) Well I have followed everybody's advice but to no real avail.

Since my original posting I have:

Located (and bypassed -for testing purposes) the ballast resistor. No help.

Replaced the entire dizzy as the shaft did seem to have some wiggle. No help.

Quadruple checked the plugs/wires/firing order, verified spark at all plus...etc

Adjusted the timing per the above/manual: Got worse. I had to adjust it all the way down (Retarded, if I correctly envision the firing order) just to get close to where the points would start to open with 1/4" gap between the drill bit and the straight edge (where the straight edge was on the WIDE side of the shaft). It ran terrible, and in fact only after I moved it a few notches above the center of adjustment (into the advancement now) did it go back to "normal". "Normal" means it idles OK but progressively sounds more missy as the revs increase. Backfires something bad when I really get the throttle up there.

Could somebody have rebuilt this motor and incorrectly installed a timing gear or something?

Remember, when I first got this tractor it ran great all over the RPM band, until the points burned up. Because the points where set well under .010.
ne gear tooth would result in 16 degrees of crank to valve timing error........not at all sure you could even make this run. Total timing adjustment at distributor is +/- 12 crank degrees ignition timing & it will run at either end of range, just not a smoothly or with full power & may overheat. Point gap/dwell/timing, well, if you miss set the gap by 0.006 inch (huge error percentage wise), then you only impacted timing by about 8 crank degrees, so still not a "no run" situation. Still, like the old song lyrics, "looking in all the wrong places".
 

We sell tractor parts! We have the parts you need to repair your tractor - the right parts. Our low prices and years of research make us your best choice when you need parts. Shop Online Today.

Back
Top