Which Coil?

Caryc

Well-known Member
8N - side mount dist - 12 volts with alt.

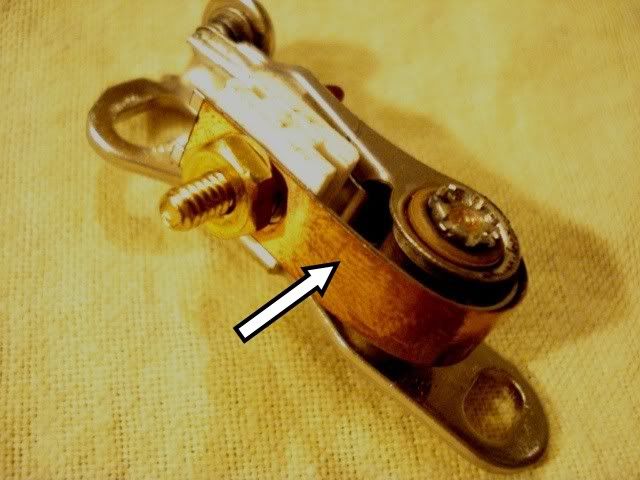
I need to replace my coil which I already have removed from the tractor. I was under the impression that no resistor was needed in a 12 volt system. Take a look at the pic below. Is that white ceramic looking thing a resistor?

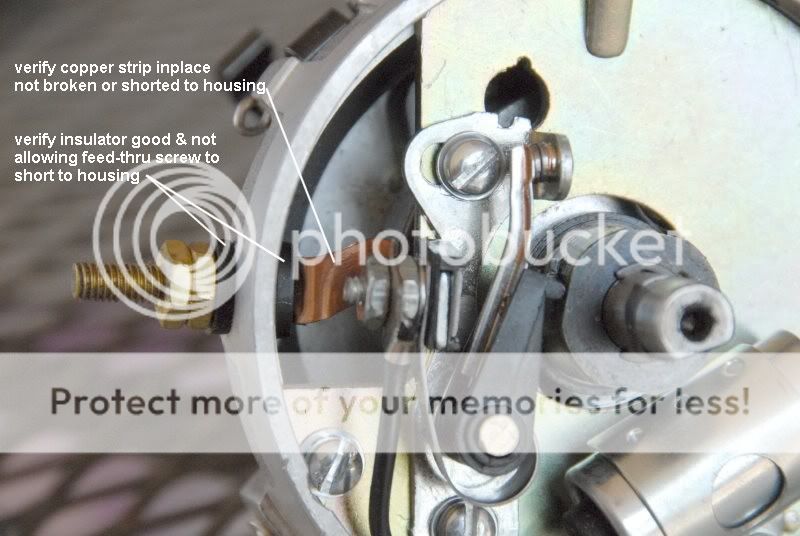
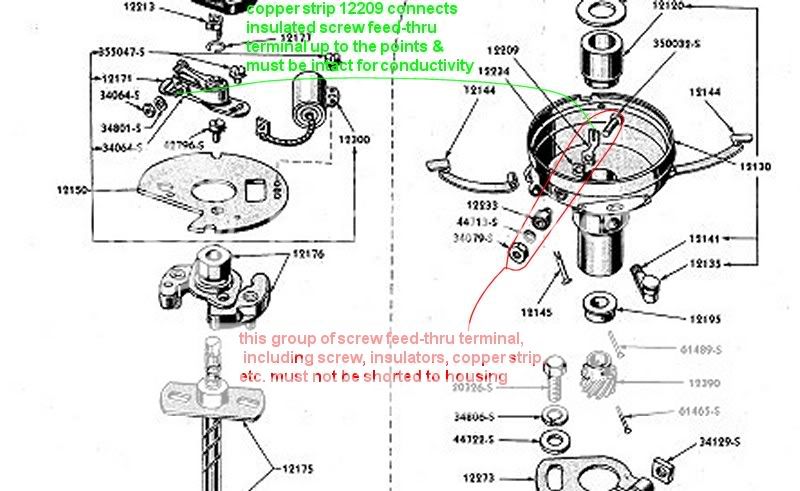
Can anyone tell me what I need to know when going to Napa for a new coil? There are no markings on the old coil except a circle with a number 20 in it. I need to get this tractor running.

If I just take this old coil in to Napa will they be able to tell me what I need?
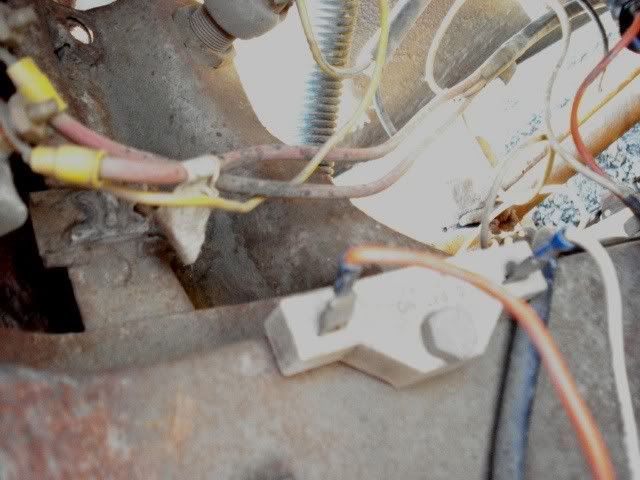
resistor.jpg
 
Yes, that is a resistor. You need a 12V coil marked "No External Resistor Required"- NAPA IC14SB. You will still need to use the original ballast resistor mounted up under the dash.
 
(quoted from post at 13:28:42 02/21/12) Yes, that is a resistor. You need a 12V coil marked "No External Resistor Required"- NAPA IC14SB. You will still need to use the original ballast resistor mounted up under the dash.
e will not need any (not even original under dash) IF he uses IC14SB.
 
(quoted from post at 10:28:42 02/21/12) Yes, that is a resistor. You need a 12V coil marked "No External Resistor Required"- NAPA IC14SB. You will still need to use the original ballast resistor mounted up under the dash.

I'm still a little confused. Since I do have the resistor why would I need a coil marked "no external resistor required"? If the coil doesn't need one, why would I have one?
 
(quoted from post at 13:37:36 02/21/12)
(quoted from post at 10:28:42 02/21/12) Yes, that is a resistor. You need a 12V coil marked "No External Resistor Required"- NAPA IC14SB. You will still need to use the original ballast resistor mounted up under the dash.

I'm still a little confused. Since I do have the resistor why would I need a coil marked "no external resistor required"? If the coil doesn't need one, why would I have one?
t can be done either way..........1) a coil that requires an external resistor, then use appropriate resistor, or 2) a coil that is "no external resistor required", then ash can the resistor (fewer parts/wires/ simpler).
 
OK, let's try to make this simple. I just want to get this tractor running so I can do some work. I don't want to be re wiring anything right now.

Since it is 12 volt and I do have that resistor, what coil do I need?
 
(quoted from post at 10:51:55 02/21/12) It's a sidemount. It does not have a ballast resistor.
50 Tips

OK, now I'm really confused. What is the white thing in my picture with the two terminals on it?
 
" OK, let's try to make this simple. I just want to get this tractor running so I can do some work. I don't want to be re wiring anything right now. "

It will probably not be as simple as you want it to be.

Chances are very good that nothing is wrong w/ the coil. Round coils rarely go bad. How do you know you have a bad coil?

It has a resistor because it's either a 6v coil or a 12v coil w/o 3.25 ohms of internal resistance.

Go to NAPA & get the coil JMOR told you to get. IC14SB

Do NOT use the resistor.

If it still has no spark, then you can do some more troubleshooting.

Or, you can do the troubleshooting now before you spend $20 on a coil you probably don't need.
50 Tips
 
(quoted from post at 10:59:51 02/21/12) It's a fixed resistor of some unknown value added when the tractor was converted to 12v. It's not OEM.
50 Tips

OK, so if I get the IC14SB coil, can I just remove those two wires from the resistor and connect them together, thus bypassing the resistor?

I realize that this is not the best way to do it but as i said, I just need to get the tractor running to do some work.
 
" OK, so if I get the IC14SB coil, can I just remove those two wires from the resistor and connect them together, thus bypassing the resistor?"

Assuming the wire goes to the coil, yes.

" I realize that this is not the best way to do it"

That's not the point. If your intention is to simply bypass the resistor, that is exactly how you do it. The point I'm trying to make is that the chances of the coil being bad are slim. Odds are you're going to spend $20 for a coil, spend the time to install it & still have no spark.

Post back w/ results or more questions.
50 Tips
 
(quoted from post at 11:15:02 02/21/12) " OK, so if I get the IC14SB coil, can I just remove those two wires from the resistor and connect them together, thus bypassing the resistor?"

Assuming the wire goes to the coil, yes.

" I realize that this is not the best way to do it"

That's not the point. If your intention is to simply bypass the resistor, that is exactly how you do it. The point I'm trying to make is that the chances of the coil being bad are slim. Odds are you're going to spend $20 for a coil, spend the time to install it & still have no spark.

Post back w/ results or more questions.
50 Tips

Bruce,

I admit that I removed the coil prematurely. But now that I did spend the time removing it. and it wasn't easy since my FEL frame is in the way, I just wanted to replace it with a new one. I've heard people here telling how a coil can exhibit problems only when heated up. Call it preventive maintenance if you want, but doesn't it make sense to replace it now that it's out? I mean, it's not like replacing a crankshaft for no reason. It's only a coil.

I will do the tests as suggested if needed once I get the new coil in there. I just want to be sure I get the correct coil.
 
Caryc, I think what Bruce is saying is that your resistor (The white ceramic thing) could very well be bad. I've had several go bad, notably on Chrysler products when they would get water on them. Do you have continuity through that resistor? If NOT, there's your problem.
 
" I've heard people here telling how a coil can exhibit problems only when heated up. "

That's most always w/ a frontcoil.

Yes, it's out now, so putting a new one in is only money. And it will not need the resistor. So, if it runs, you had a bad coil, resistor or wiring.

If it doesn't run, then at least you can take the coil out of the equation as a possible problem.
50 Tips
 
(quoted from post at 11:41:51 02/21/12) " I've heard people here telling how a coil can exhibit problems only when heated up. "

That's most always w/ a frontcoil.

Yes, it's out now, so putting a new one in is only money. And it will not need the resistor. So, if it runs, you had a bad coil, resistor or wiring.

If it doesn't run, then at least you can take the coil out of the equation as a possible problem.
50 Tips

That wire from the resistor does indeed run to the coil. So I'll buy the IC14SB coil and bypass the resistor and hope it runs. If not then I'll start with the diagnostics that were suggested here. Oh yeah I do have continuity across the resistor.

Thanks for now guys.
 
(quoted from post at 12:31:24 02/21/12) " Oh yeah I do have continuity across the resistor."

To be precise.......you have continuity across the resistor when it's cold.
50 Tips

OK, point taken, but since I'm going to bypass it, we'll never know if it was bad.
 

OK, I got the new coil. Put it in and took the two wires off the resistor and connected them. Still no fire.

I pulled the coil wire out of the dist and held it to the manifold (after cleaning a spot with sandpaper) turned the key on and cranked it over. No spark coming from that coil wire.

I checked the points with them open and the key on. No power there either. I checked the connection where I took the two wires from the resistor. One probe on batt ground and one probe on that connection with the key on I got 11.6v. My battery is now down to 11.6v from all the cranking on it. So I've got voltage going to the plus side of the coil.

Any ideas now?
 
(quoted from post at 19:02:59 02/21/12)
OK, I got the new coil. Put it in and took the two wires off the resistor and connected them. Still no fire.

I pulled the coil wire out of the dist and held it to the manifold (after cleaning a spot with sandpaper) turned the key on and cranked it over. No spark coming from that coil wire.

I checked the points with them open and the key on. No power there either. I checked the connection where I took the two wires from the resistor. One probe on batt ground and one probe on that connection with the key on I got 11.6v. My battery is now down to 11.6v from all the cranking on it. So I've got voltage going to the plus side of the coil.

Any ideas now?

Fix the points and/or the wire from the coil to the points..

TOH
 
Charge the battery.

Make a note for future reference: "Troubleshoot the problem before I buy parts"

Follow the volts.

You have battery voltage to the resistor.

Keep following the circuit.

You do not have voltage across the points.

Somewhere between the resistor and the points is the problem.

As in the wire, the insulator or the copper strip.

Re-read the troubleshooting info I gave you Sunday at the link below.
Troubleshooting
 

I just pur in a new set of points, still no juice across them. Is there some way to check that wire that come from the dist. to the coil?
 
(quoted from post at 17:24:15 02/21/12) Which wire? There are two of them.
Did you read my troubleshooting post?

I read your trouble shooting post. By secondary coil wire, I assume you are talking about the large spark plug wire coming out of the top of the coil and going to the center of the dist cap. I pulled that out and checked to each end for continuity, yes it's good.

The wire I was talking about is the small wire that runs from the minus side of the coil down to the side of the dist. Putting one probe on the minus coil terminal and one probe on the screw down on the side of the dist., I also have continuity there. I just put in new points and condenser.

As I said, I did your test by pulling the large wire out of the middle of the dist and while cranking the engine and holding it to the manifold on a cleaned spot, there was no spark there.
 
If you have continuity from one end of the primary wire to the other, chances are excellent that it's ok.

Do you have battery voltage across the points?

Do you have battery voltage from the insulator to the points?

Did you dress the points?

What is the gap?
 
(quoted from post at 18:27:57 02/21/12) If you have continuity from one end of the primary wire to the other, chances are excellent that it's ok.

Do you have battery voltage across the points?

[b:983d1b1728]No[/b:983d1b1728]

Do you have battery voltage from the insulator to the points?

[b:983d1b1728]What insulator are you talking about?[/b:983d1b1728]

Did you dress the points?

[b:983d1b1728]Dress the points? The points are brand new. I did pull a dollar bill through them several times before installing them. [/b:983d1b1728]

What is the gap?

[b:983d1b1728].025"[/b:983d1b1728]
 
The insulator on the side of the distributor.

Yes, you dressed the points by using the dollar bill.

Check the voltage all the way to the points.
 
(quoted from post at 18:41:20 02/21/12) The insulator on the side of the distributor.

You're talking about the wire coming off the minus side of the coil? This runs down to the side of the dist. Ok, turn the key on and with one probe on the wire on the side of the dist, where does the other probe go to show voltage?

Yes, you dressed the points by using the dollar bill.

Check the voltage all the way to the points.
 
The wire attaches to a stud on the side of the distributor. The stud is surrounded by an insulator. On the inside of the distributor, on the other side of the stud, a copper strip is attached. The other side of the strip is attached to the points.

Current flows from the coil to the wire to the stud to the copper strip & then to the points.

Remember me telling you to wiggle the insulator? If it's bad, it will ground the primary voltage.
 
(quoted from post at 22:18:42 02/21/12) The wire attaches to a stud on the side of the distributor. The stud is surrounded by an insulator. On the inside of the distributor, on the other side of the stud, a copper strip is attached. The other side of the strip is attached to the points.

Current flows from the coil to the wire to the stud to the copper strip & then to the points.

Remember me telling you to wiggle the insulator? If it's bad, it will ground the primary voltage.
ere, Bruce, maybe you can talk to these:
feed-thru_copper_strip.jpg

distr_side_connex_shorts.jpg
 
(quoted from post at 19:18:42 02/21/12) The wire attaches to a stud on the side of the distributor. The stud is surrounded by an insulator. On the inside of the distributor, on the other side of the stud, a copper strip is attached. The other side of the strip is attached to the points.

Current flows from the coil to the wire to the stud to the copper strip & then to the points.

Remember me telling you to wiggle the insulator? If it's bad, it will ground the primary voltage.

Look at the arrow in the pic. Is this the copper strip you're talking about?

And would the insulator you're talking about be the part 12233 on page 151 of the master parts catalog?

copperstrip.jpg
 
OK this may sound strange but I don't see any copper strip in there. There is another wire that I assume is connected to that stud. This wire has a round terminal on it and connects to the points. I'm talking about the copper strip labeled in Jmores pic.

Just to be clear, this is not the condenser wire. That little post on my points has two terminals connected to it. As I said I guess that other little wire goes down to that primary wire post.

I know I have voltage going to the plus side of the coil. How do I tell if I have voltage coming out of the minus side of the coil?
 
(quoted from post at 19:54:03 02/21/12) OK this may sound strange but I don't see any copper strip in there. There is another wire that I assume is connected to that stud. This wire has a round terminal on it and connects to the points. I'm talking about the copper strip labeled in Jmores pic.

Just to be clear, this is not the condenser wire. That little post on my points has two terminals connected to it. As I said I guess that other little wire goes down to that primary wire post.

I know I have voltage going to the plus side of the coil. How do I tell if I have voltage coming out of the minus side of the coil?

I'm talking about copper strip 12209 & insulator 12233.

No copper strip 12209? That's because someone replaced it w/ a wire.

Use your meter to see if you have voltage across the points. If it's not there, then follow the circuit back to the coil until you find it.
 
(quoted from post at 20:18:12 02/21/12)
(quoted from post at 19:54:03 02/21/12) OK this may sound strange but I don't see any copper strip in there. There is another wire that I assume is connected to that stud. This wire has a round terminal on it and connects to the points. I'm talking about the copper strip labeled in Jmores pic.

Just to be clear, this is not the condenser wire. That little post on my points has two terminals connected to it. As I said I guess that other little wire goes down to that primary wire post.

I know I have voltage going to the plus side of the coil. How do I tell if I have voltage coming out of the minus side of the coil?

I'm talking about copper strip 12209 & insulator 12233.

No copper strip 12209? That's because someone replaced it w/ a wire.

Use your meter to see if you have voltage across the points. If it's not there, then follow the circuit back to the coil until you find it.

OK, let me try this again. You said, if no voltage across the points follow the circuit back to the coil.

That's what I'm trying to do. Once again, there is the primary wire coming down from the minus side of the coil to the primary connection stud on the side of the distributor.

Using the meter how do I tell if there is juice running down this wire from the coil to the stud on the side of the dist.?
 
(quoted from post at 23:28:23 02/21/12)
(quoted from post at 20:18:12 02/21/12)
(quoted from post at 19:54:03 02/21/12) OK this may sound strange but I don't see any copper strip in there. There is another wire that I assume is connected to that stud. This wire has a round terminal on it and connects to the points. I'm talking about the copper strip labeled in Jmores pic.

Just to be clear, this is not the condenser wire. That little post on my points has two terminals connected to it. As I said I guess that other little wire goes down to that primary wire post.

I know I have voltage going to the plus side of the coil. How do I tell if I have voltage coming out of the minus side of the coil?

I'm talking about copper strip 12209 & insulator 12233.

No copper strip 12209? That's because someone replaced it w/ a wire.

Use your meter to see if you have voltage across the points. If it's not there, then follow the circuit back to the coil until you find it.

OK, let me try this again. You said, if no voltage across the points follow the circuit back to the coil.

That's what I'm trying to do. Once again, there is the primary wire coming down from the minus side of the coil to the primary connection stud on the side of the distributor.

Using the meter how do I tell if there is juice running down this wire from the coil to the stud on the side of the dist.?

  • [*:eeeb9b9256]Set your meter to DC volts[*:eeeb9b9256]Securely attach black probe to chassis ground and verify that connection is good by touching the red probe to the positive battery post.[*:eeeb9b9256]Now touch the red probe to the primary wire at the points. If you don't get a 12V indication on the meter progressively move the red probe back along the circuit towards the coil until you do. That is the last good point in the circuit. The problem is between that point and the previous test point.
    [*:eeeb9b9256] Fix that section of the circuit.
    [*:eeeb9b9256]Repeat steps 3 and 4 again starting at the points as many times as needed until you get voltage all the way to the points.[/list:eek::eeeb9b9256]

    TOH
 
OK, here's what I got so far. With one probe on a good ground. I got 9.8v on the positive terminal on the coil. On the other minus terminal I got nothing. This is with the points open.

But I did find something else. See the pic below. I found that between points A and B, I got continuity. Point B is just the rim of the dist housing.

Arrow C shows the red wire that comes from that primary stud.

If I just turn on the key and touch both small terminals on the coil at the same time, I should see voltage there, right?

RedWire.jpg
 
(quoted from post at 14:26:08 02/22/12) OK, here's what I got so far. With one probe on a good ground. I got 9.8v on the positive terminal on the coil. On the other minus terminal I got nothing. This is with the points open.

But I did find something else. See the pic below. I found that between points A and B, I got continuity. Point B is just the rim of the dist housing.

Arrow C shows the red wire that comes from that primary stud.

If I just turn on the key and touch both small terminals on the coil at the same time, I should see voltage there, right?

RedWire.jpg
I found that between points A and B, I got continuity. Point B is just the rim of the dist housing. " Don't you think that might give a clue that the terminal "A" feed through insulator might be compromised?
 

Here's a better picture. Of course I think it is wrong. I was just looking for some verification. In the pic below, am I looking at the head of the brass screw 350032-S ?

I'm wondering how hard this is going to be to fix. In the pics it looks fine because I was able to get the little camera in there close, but in reality I can't get my head in there for a real good look due to the loader frame.

In a normal situation can this be removed and fixed without disassembling any part of the dist. ? I'm just worried that I may have to pull the dist. to get at it.

How far does the dist have to come up to get it out? Does the hood have to be removed?

I'm going to spray the outside of that primary connection with PB Blaster and hope I can get it apart.

DistInsulator.jpg
 

One more thing. These part numbers are on page 151 of the master parts catalog.

350032-S
12209
12234
12233
44713-S
34079-S

Anybody know if these are available at Napa and what their part numbers might be?
 
When I find that I'm having to repeat myself around here, that means:

1. My explanation was not clear.

2. My explanation was not understood.

3. My explanation was ignored.

This is what I told you on Sunday. I repeated it yesterday by linking to it.


" Make sure you have voltage across the points, as in past the insulator on the side of the distributor. That is a very common failure point on sidemounts, along w/ the attached copper strip. It's hard to find a short there because it is usually an intermittent . So 'wiggle' the insulator & the copper strip a bit when you are doing your checking. If you find the short there, the Master Parts catalog lists everything you need on page 154. You can make the strip and you could also make the insulators as well. But, somethings are just easier & in the long run cheaper to buy. Get the strip, 12209, screw 350032-S, 12233 bushing & 12234 insulator & just replace it all. "


So, if you do not understand what I'm saying, or it isn't clear, just say so.

You have a short exactly where I told you on Sunday it would be.

Loosen the hold-down bolt on the distributor.

Remove the cap.

Take the distributor out of the engine.

Replace all of the components.

Do a continuity check to make sure it's assembled correctly.

Post back w/ for info on getting the distributor back in the engine.
50 Tips
 

OK, here's where I am right now. I can remove the brass screw. I removed the two screws holding the points plate on but it will not come out. Is there something else holding it? I was afraid to just pry on it.
 
Just because I've never seen these parts at NAPA or heard of anyone finding them there doesn't mean they aren't available. That being said, I'd just order them for this site or nnalert's.

Check the distributor bushings before you order the insulator parts.
 
(quoted from post at 16:12:11 02/22/12)
OK, here's where I am right now. I can remove the brass screw. I removed the two screws holding the points plate on but it will not come out. Is there something else holding it? I was afraid to just pry on it.
es, there is something else holding it in there.


Decades of rust & corrosion
 

Bruce,

I did check the shaft as soon as I got it cleaned up and it had about 1/16 side to side movement.

Rather than screw around with it, I just ordered a new one from this site. $208. I know the old one could probably be rebuilt, but for the amount of the new one, I know everything is good and won't have any worries for quite some time.

It comes complete with points and everything ready to just stick it in. I do appreciate all the help so far and hope I've not been to much of a PIA.

When the new one gets here I will need some help putting it in. Thanks guys.
 
(quoted from post at 17:19:22 02/22/12)
Bruce,

I did check the shaft as soon as I got it cleaned up and it had about 1/16 side to side movement.

Rather than screw around with it, I just ordered a new one from this site. $208. I know the old one could probably be rebuilt, but for the amount of the new one, I know everything is good and won't have any worries for quite some time.

It comes complete with points and everything ready to just stick it in. I do appreciate all the help so far and hope I've not been to much of a PIA.

When the new one gets here I will need some help putting it in. Thanks guys.
ast you told everyone, you were trying to get the breaker plate out of the distributor, not distributor out of engine........if you had said so, I would have advised you to mark location of rotor and body, so that you might not have such a hassle & need so much help when ready to re-install.
 
I did mark the old one with a black marker. Trouble is when I cleaned it up with brake cleaner the marks disappeared. :cry:

I know where the body was, I put a black mark on the inside of the body and a mark on the new coil right in back of it.

But my marks where the shaft was disappeared.
 
(quoted from post at 17:34:22 02/22/12) I did mark the old one with a black marker. Trouble is when I cleaned it up with brake cleaner the marks disappeared. :cry:

I know where the body was, I put a black mark on the inside of the body and a mark on the new coil right in back of it.

But my marks where the shaft was disappeared.
n that case, while you are waiting on UPS, you can get the engine rotated to TDC-compression stroke for #1 (next to radiator), and then when it arrives, you might be ready to install.
 
" When the new one gets here I will need some help putting it in. "

Not a problem.

Meanwhile, loosen the timing hole cover. Then, as JMOR said, pull the plugs out, put your thumb over #1 & spin the engine until you feel the compression stroke. That gets #1 close to TDC & you can see the timing marks. If you can't, use a screwdriver in the timing hole to turn the flywheel until you see the marks. Use chalk or white paint to mark 4*, 10* & 17*.

We'll talk you through the rest of it when the distributor gets there.

Put the plugs back in for now.
50 Tips
 

OK, here's what I did so far. I removed all the plugs and the timing mark cover. I jogged it over with the starter button until it just started to come up on compression.

Then I had a friend use a pipe wrench on the shaft that goes to the FEL pump to turn it over slowly clockwise. As you can see in the scan the first number to come up was the 20 then the 15 and so on. I went down past the 5 to about 4 degrees where it is at right now. Someone actually put a white mark on there. I'll just leave it there until I get the new dist. I'm still kind of wondering why mark 10 and 17 degrees?

Incidentally, I do have a good timing light.

timing.jpg
 
" I'm still kind of wondering why mark 10 and 17 degrees?"

So that you can check the timing advance.

10* at 1200 rpm & 17* at 2000 rpm.

And 4* at less than 500 rpm. (idle speed)

Put the plugs back in.
50 Tips
 
(quoted from post at 18:01:52 02/22/12) " I'm still kind of wondering why mark 10 and 17 degrees?"

So that you can check the timing advance.

10* at 1200 rpm & 17* at 2000 rpm.

And 4* at less than 500 rpm. (idle speed)

Put the plugs back in.
50 Tips

I did put the plugs back in finger tight for now.
 

We sell tractor parts! We have the parts you need to repair your tractor - the right parts. Our low prices and years of research make us your best choice when you need parts. Shop Online Today.

Back
Top