Thanks for help with 48 8N

SlimB

Member
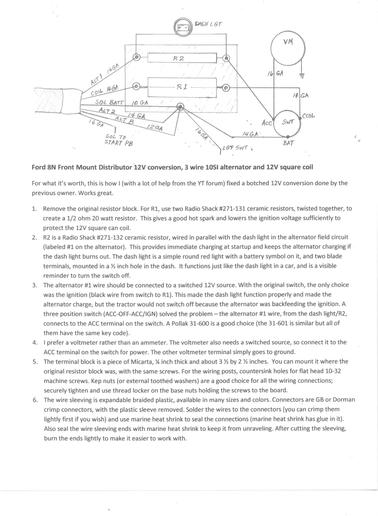
Thanks for all I have learned reading this forum. I bought a 48 8N last year and have worked through several issues (thermostat was upside down, distributor cam weight came off, fiber cam gear broke, had low oil pressure, governor was worn out, wiring was bad, wrong carburetor was installed, etc) to finally get it running pretty good. Couldn't have done it without your help. I was really sorry to hear that Dell passed away; he was very helpful to me. The best thing I learned from him was the double resistor (Radio Shack 271-131) trick for a 12V conversion on a front mount distributor 8N. It provides a good hot spark and protects the 12V square coil. The other resistor in the photo is in the alternator field circuit, along with a dash light. I'm told it provides immediate charging at startup and makes the alternator keep charging even if the dash light burns out. Everything is mounted on a 1/4 inch thick Micarta board. This setup seems to work great. The tractor starts instantly and the plugs run clean. I also used a 3 position ignition switch (Pollak 31-600) to provide another switched 12V source and prevent feedback to the ignition circuit when the tractor is switched off (it would keep running with the original switch).

This forum is great! Thanks again for all the great advice.
mvphoto17502.jpg
 
Copperhead, here's a crude drawing and a little more info. Hope this works for you.

SlimB
a269242.jpg
 
Here's a better version. Sorry, I'm not very good at this.

For what it?s worth, this is how I (with a lot of help from the YT forum) fixed a botched 12V conversion done by the previous owner. Works great.

1.Remove the original resistor block. For R1, use two Radio Shack #271-131 ceramic resistors, twisted together, to create a 1/2 ohm 20 watt resistor. This gives a good hot spark and lowers the ignition voltage sufficiently to protect the 12V square can coil.

2.R2 is a Radio Shack #271-132 ceramic resistor, wired in parallel with the dash light in the alternator field circuit (labeled #1 on the alternator). This provides immediate charging at startup and keeps the alternator charging if the dash light burns out. The dash light is a simple round red light with a battery symbol on it, and two blade terminals, mounted in a ? inch hole in the dash. It functions just like the dash light in a car, and is a visible reminder to turn the switch off.

3.The alternator #1 wire should be connected to a switched 12V source. With the original switch, the only choice was the ignition (black wire from switch to R1). This made the dash light function properly and made the alternator charge, but the tractor would not switch off because the alternator was backfeeding the ignition. A three position switch (ACC-OFF-ACC/IGN) solved the problem ? the alternator #1 wire, from the dash light/R2, connects to the ACC terminal on the switch. A Pollak 31-600 is a good choice (the 31-601 is similar but all of them have the same key code).

4.I prefer a voltmeter rather than an ammeter. The voltmeter also needs a switched source, so connect it to the ACC terminal on the switch for power. The other voltmeter terminal simply goes to ground.

5.The terminal block is a piece of Micarta, ? inch thick and about 3 ? by 2 ? inches. You can mount it where the original resistor block was, with the same screws. For the wiring posts, countersink holes for flat head 10-32 machine screws. Kep nuts (or external toothed washers) are a good choice for all the wiring connections; securely tighten and use thread locker on the base nuts holding the screws to the board.

6.The wire sleeving is expandable braided plastic, available in many sizes and colors. Connectors are GB or Dorman crimp connectors, with the plastic sleeve removed. Solder the wires to the connectors (you can crimp them lightly first if you wish) and use marine heat shrink to seal the connections (marine heat shrink has glue in it). Also seal the wire sleeving ends with marine heat shrink to keep it from unraveling. After cutting the sleeving, burn the ends lightly to make it easier to work with.

SlimB
a269249.jpg
 
Thank you, Slim! I will replicate your setup.

BTW, I did work for NASA. Your work and documentation is excellent. :)
 

We sell tractor parts! We have the parts you need to repair your tractor - the right parts. Our low prices and years of research make us your best choice when you need parts. Shop Online Today.

Back
Top