Pertronix ignition burned out with new alternator

Cpenn

Member
Hi everyone. The electrical system on my Ford had been working great for years. It is 12V with a Pertronix 1244A ignition and 12 V coil. A few days ago, my alternator (Delco 10-SI) failed after the
bearings went out, so I bought a new one, re manufactured. I simply removed and replaced the alternator, exactly how it was before. The wiring has only a single wire: the battery stud on the alternator to
the ammeter. The plug on the alternator (i.e. #1 and #2 pins) were not used.

Upon starting, I found that the new alternator was not charging the battery, even when I increased the RPMs (normally, I have to increase the RPMs to get it to start charging). After some research, I
decided to "excite" the alternator by jumping a wire from the #2 pin on the alternator to the battery stud on the alternator, without the motor running. This gave a very small spark. At that point, my plan
was to start it up, and then jumper the #1 pin to the same alternator battery stud. Problem is that it will not fire. The coil is fine (3 ohms), but the pertronix ignition is not working (no spark). I only
have 1.3 V at the coil when the coil is hooked up to the pertronix igntion. When I disconnect the pertronix ignition from the coil, I have 12 V at the coil again. So it seems that the pertronix ignition is
fried and I must purchase a new one. I did not leave the switch on.

Did I fry the pertronix ignition with the new alternator or the jumper wire? Please help, I just don't want to fry a brand new ignition! And now it is snowing and I need to plow.

Thanks!
Chad
 
To ad lib a poem from long ago..., "Electronics (frogs in the original) is funny, yes deh is; they sits around and says gee whiz." EI is a fine thing that produces a better spark and has less maintenance, but they don't cotton too well to voltage spikes which you did when you briefly shorted out your alternator. So you probably fried it. Hopefully you had the tractor running well onpoints before you installed the EI and kept your points plate as a back-up.
 
A buddy in my Model A club has EI in his 31 Coupe. Along w/ a hi-compression head, down draft carb, overdrive, etc. Car cruises nicely at 70 mph. One of the other guys in the club asked him how he planned to fix a burned up module 60 miles from home on Sunday afternoon. He said he wasn?t worried; the extra module he carried would get him home!
75 Tips
 
640. I realize this is the 8N forum, but since none of the electrical was original anyway and many 2 8 9N owners have the same 12 V conversion with EI, I figured I would post it here.

The EI was running fine with the new alternator, even though the alternator was not charging. The EI did not stop until I momentarily touched the #2 to the batt alt post, although it was not running at the time, and neither was the switch turned on when I did it. Could you get a voltage spike when the alternator is not running? Or perhaps that brief jumper was enough to change the polarity, and the the damage occurred when I tried to fire it up after that?
 
I'm getting a set of points as a back-up! They're not 90 dollars a shot. Still, I would like to figure this out.
Thanks
 
I called Pertronix. I asked them about reverse polarity; they said that would not be a problem. Not sure if I believe that. I explained to him that I have 12 V reaching the coil, but when the coil is hooked
up to the EI module, it is only 1.3 V. He claims that I really might not have 12 V reaching the coil, that there is excessive resistance somewhere, perhaps at the switch. Keep in mind that I did not touch
any of the wiring, I only changed the alternator out briefly tried to excite it. That said, the switch is very old.

He suggested bypassing the switch and most of the wiring by connecting a wire directly from the positive post on the battery to the positive side of the coil to see if that corrects it. He does not seem to
think that the EI module is bad, but it would be a crazy coincidence that it stopped working after I jumped that wire from #2 to alternator battery stud. I'll try the bypass test that he suggested this
evening.
Chad
 

EI hatters at there best they struggle diagnosing points ignition EI really throws them a curve ball...


STOP think about what he said... EI hatters pretend its a points system and go from there... Of course you don't need to write a book on chit that has nothing to do with information to start a strategy based diagnostics on the system...

You have been challenged give it a try I think you will find it EZ to eliminate the issue...
 
I do not for a moment believe that this is the cause of his problem: "...by jumping a wire from the #2 pin on the alternator to the battery stud on the alternator, without the motor running.".Why? Simply because #2 is the sense terminal of the internal VR in a standard 10SI and it would have been connected to the battery in a factory installation. I suppose (on a long shot) given that nothing is really impossible, that he could have some strange internal VR, where #2 is connected to something unknown?
 
On a Delco 10SI 3 wire alternator, #2 is the voltage sense input and often connects direct to the output, and a switched input through diode, lamp or resistor connects to #1 to excite the alternator to charge.

I had an 8N with self exciting alternator and #2 was looped to the output, but being self exciting there was no connection to #1. As I see it, you did not make an abnormal connection jumpering #2 to output.

With your switch turned off, and no wire from alternator #1 back to ignition connection at the switch there should be no path back to the ignition system so I fail to see where there would be a spike getting to the EI when you jumpered #2 to output.

#2 and output stud are both above ground potential so there would be no polarity reversal.

To excite a 3 wire you would have jumpered from output stud to #1

Not knowing what is inside your 1 wire regulator, that may open up other questions.
 
I would like to propose some troubleshooting steps;
1) Measure the DC voltage from the + terminal on the coil (red meter lead) to the - terminal on the battery (black meter lead) with the ignition on, and also while cranking for two or three seconds. Turn the ignition key back off as soon as you finish. You should read above 8 volts DC both ways. You stated that you had 1.3 volts at the coil, but you didn?t say how you measured this, or if you were cranking the engine at the time.
2) Disconnect the center high voltage lead from the distributor, and connect this to your spark tester. Ground the tester properly and crank the engine to test for spark. If you have spark now then the EI is working. Plugs, wires, rotor or distributor cap would be next in line.
3) If no spark in number 2, then leave your spark tester connected as described, remove the black wire from the EI unit at the - terminal on the coil, and attach a jumper to that terminal. Turn the ignition on, not cranking, just on, and momentarily touch the other end of the jumper to ground. As soon as you release it you should get a spark at your tester. If so, the replace the EI, or stick a set of points and a condenser in to get it running for now.
4) It is quite likely that your plugs are fouled after all of this testing, I would replace them, and clean the old ones.
5) Your new one wire alternator might just need to be run at a high rpm to energize, mine needs a few seconds at almost full throttle to start charging each time I start the tractor. Is the pulley the exact same diameter as the one you removed?

Please post back with what you find, and good luck!

Jerry
 
In my humble experience, those &^%* modules are not particularly robust, and can and do fail with little or no reason, typically at the worst possible time.


When they work, they are SWELL, when they drop dead you'd better have another at hand, or a crusty set of points to swap in to get the 'ol girl back to the shed!
 
Thanks Jerry, I am just reading this now in the a.m., but I did do some similar tests to what you described. I will perform the additional tests that you listed. But first, I want to answer your question about how I measured voltage at the coil, as I MAY NOT have done it right. With a jumper from the battery + to the +terminal on coil (that way I know for certain that the coil is getting full voltage), I place the red voltmeter (VM) lead on the +terminal of coil, and the black VM lead on the battery negative post. This gives 12 V (not cranking). Then I move the red VM lead to the other terminal on the coil, leaving the VM black lead on the battery negative post, and I only get around 1 volt (not cranking). Keep in mind that the EIM is hooked up as normal in test. Is that a correct way to test it? Should I have 12 volts on both sides? Okay, on the other hand, if I simply place the red VM lead on the one side of coil, and the other VM lead on the other side of coil, I get 12 V (not cranking). Which one is the proper test?

Second test I did last night before I read your post in order to try and test the EIM alone: I used a portable 12 V power source (basically a battery). Unhooked the EIM from the coil, but left the EIM physically in place in the distributor. Attached the positive lead of power source to EIM red wire, grounded the power source at the base of the the distributor (the EIM is grounded at a metal plate through distributor, i think), and then put the VM leads on: black lead on the EIM black wire and red lead on the red EIM wire. I got 12 volts. Then I cranked the motor to see if the EIM would would make the voltage flutter from 12 to 0 with the moving magnet around the EIM. It did. I need to get a test light and do this test again, as the VM might not respond as fast as a test light. Still, this result suggests that the EIM is working properly. Do you agree?

Third test I conducted before I read your post: similar to what you listed as test #2, except I do not have a spark plug tester, instead, I placed that high voltage center wire out of the distributor next to the block to see if it would arc when I cranked it. I saw nothing.

I will get a spark plug tester and a 12V tester light while I'm at it, and go through your tests this evening.

Regarding the alternator not charging, I am famililiar with what you describe. I have always increased the throttle for a few seconds to get it charging. That always worked until I put in the new alternator. I tried throttling it for many minutes. Nothing. The tractor ran for a good 20 minutes. I turned it off to do research for about an hour. Came back out to flash the alternator #2 terminal (with tractor not running), and it has never fired up since. Now I just want to get it started again! then I can deal with the alternator. Although I suspect that it needs a flash at the #1 terminal.

I'll do all those tests and get back with you.
Thanks
 
rvirgil, Thanks, this is helpful. It all makes good sense. I agree with you that my quick flash should not have done any damage.

However, I have a question for you: How do I know if my alternator is 1 or 3-wire? I know it sounds crazy, but I did a lot of searching on that simple question, and it only makes me more confused! Based on what I know at this point, I suspect that I have a 3-wire alternator that I am setting up to behave as a 1-wire. Is that right?
Thanks
 
JMOR, I agree. I am starting to suspect that it is simply a coincidence that tractor stopped firing after I did the brief flash at the #2 terminal. I described another test I did last night on the VR alone,
but still in place in the distributor (described in response to Jerry). It suggests the the VR might indeed be working. I'll work on it more this evening.
Thanks
 
(quoted from post at 09:56:20 01/16/18) JMOR, I agree. I am starting to suspect that it is simply a coincidence that tractor stopped firing after I did the brief flash at the #2 terminal. I described another test I did last night on the VR alone,
but still in place in the distributor (described in response to Jerry). It suggests the the VR might indeed be working. I'll work on it more this evening.
Thanks
aybe you already verified, but is magnet ring in place?
 
Did your new alternator specify that it was a one wire? Does it have a cover plug on #1 and 2 spades? If so, it should be a 1 wire.

On your new alternator is there a built in jumper across the bottom of #1 and 2 spades? If so it is a 1 wire.

All Delco 10SI and 12SI alternators I have seen, regardless if 1, 2 , or 3 wire regulator, have the #1 and 2 tabs and output stud. One wire usually has a dummy plug on 1 and 2 pins,and possibly an indentifying stamp or sticker somewhere on the case.

You may not be able to determine 1 or 3 wire with just a casual glance.

You can not operate a 3 wire as a 1 wire. Some 1 wire can be connected as a 3 wire.

When you get it running, if not charging and it does not have a jumper across #1 and 2 tabs, then with it running momentarily jumper from #1 to output stud. If that makes it charge you may need an exciter wire connection.
 
JMOR, no I did not verify that magnet ring is in place. I can say that I never removed it, and that the EIM worked for 8 years as it was.
CPenn
 
(quoted from post at 14:29:30 01/16/18) JMOR, no I did not verify that magnet ring is in place. I can say that I never removed it, and that the EIM worked for 8 years as it was.
CPenn
eason for asking, is that the plastic magnet ring has been known to come apart (heat/age/whatever reason?). If not intact & rotating, module will not switch.
 
rvirgil, the new alternator did not specify if it was a 1 or 3 wire. It only came with a "tech bulletin" that showed hooking up the plug for the terminal, which led to a lamp. I ignored that since it was for an automobile.

That said, there was no dummy plug covering the terminals #1 and 2. No jumpers. This is true for the one that was on the tractor and the new one I bought. I simply brought the dead alternator into the store, and to my surprise, the stamp on it was useless to them (I should have gone to NAPA). They only wanted to know the vehicle it came off of, which would obviously not help them. But he recognized that this was a Delco that was typical of Chevy trucks of the 70's, so he punched that into the computer, went back and brought it out. It looked exactly the same; same pulley size, same orientation, same electrical terminals. Not knowing anything of a 1 vs 3 wire, I bought it. it had a lifetime warranty and cost 40 bucks.

Being a remanufactured Delco, the indented stamp on it is wore out and impossible to read. I did find a sticker that had 7127 on it, perhaps a letter as well, but I am going off of memory here.

After I get it running again, I will try the jumper as you suggested.
Thanks
 
"the new alternator did not specify if it was a 1 or 3 wire. It only came with a "tech bulletin" that showed hooking up the plug for the terminal, which led to a lamp. I ignored that since it was for an automobile."

Odds are you have a 3 wire. Car or tractor it wires the same. Use the plug with the 2 wires. #2 can go to output stud, it senses battery charge level. #1 goes to coil side of ignition switch. It excites or jump starts the alternator to charge. You need to put a diode, indicator lamp, or a resistor in this line or the engine will likely continue to run when switch is turned off.
 
Chad,
First, I gave you some bad info, for the third test you run the jumper from the + on the coil to the + on the battery, I posted - and ground in error. I went down to the barn today and verified it with my tractor, Pertronix EI and 12 volt single wire alternator, negative ground.
My conversion uses this distributor cap with an extra terminal on it;
<img src =?http://photos.yesterdaystractors.com/gallery/uptest/a253960?>

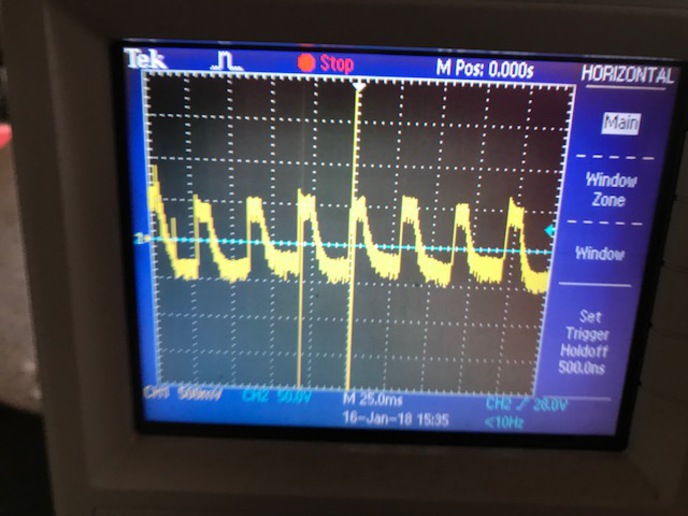
While I was there, I verified that the way I asked you to read the voltage at the coil is correct, you should get 12 volts static, and about 8 volts cranking. I hooked up my portable oscilloscope to show you what the signal looks like when the EI is working;
<img src =?http://photos.yesterdaystractors.com/gallery/uptest/a253961.jpg?>
This shows why some cheaper voltmeters have trouble, the voltage changes and there are lots of spikes visible. Compare this image with the next one;
<img src =?http://photos.yesterdaystractors.com/gallery/uptest/a253962.jpg?>
This second one is with the alternator charging, you can see the noise on the voltage pattern.
I use this spark tester, Thexton THE404 Spark Tester, thirteen bucks at Amazon, works well.
It sounds like your module is working, that?s good news, just keep at it, and you?ll get it running.

Jerry
a253962.jpg
 
Oops, maybe this time the phots will show up...
<image src="http://forums.yesterdaystractors.com/photos/mvphoto9204.jpg"/>

<image src="http://forums.yesterdaystractors.com/photos/mvphoto9205.jpg"/>

<image src="http://forums.yesterdaystractors.com/photos/mvphoto9206.jpg"/>
 

The EI will pull the coil down to about .5V I have never seen one pull it to 0V...

You can check for switching with a test light are use a 1157 bulb (about 2 amps) wire it in place of the coil one side to switch power and one to the EI (remove the coil the light is the coil) ... If you want to get real nasty a automotive head light (about 4 amps)...

The coil needs to come out of the circuit anyways WHY because we don't know its good. Replace it with a known good load source then do all your checks on a loaded circuit...

If it blinks the light bright The module are points as far as that goes is notcher problem... A test light is a quick check I prefer something that will pull about the same amperage as a coil with the coil removed from the circuit...

If you call Pertronix help line they are going to have you perform SIMPLE TEST on the circuit whodathunkit... The same test apply to a points system whodathunkit...
 
First, change title of post. Highly unlikely that alternator burned out the EI module........then we go from there.
 
I repeated the test on the Pertronix EIM, disconnected from the coil, but still physcially attached to distributor. Again, I used a separate 12V power source, but this time I used a test light to verify that the EIM was cutting on and off. Indeed it did. The light flashed regularly and consistently, much like the diagram the Jerry provided.

So the pertronix EIM is working properly. Next, I reattached the EIM to the coil, excluded all tractor wiring that went to the coil, and simply used a jumper from + battery to the + coil. I then attached my new spark tester in-line at the distributor outlet wire. I cranked it and it showed that it was producing juice. Note that last time I did this test, I did not have a spark tester, and instead I tried to arc that wire against the block (like I do for checking spark plugs). Apparently these spark testers work MUCH better than that!

Next, I kept the jumper from battery to coil, with all other tractor wiring excluded, and attempted to start it up. It started, but only 3 cylinders firing (appears to be the plug, as there is juice going to that cylinder). Next, I removed the jumper, and reattached the normal wire that goes to the coil (i.e. the rest of the tractor wiring) and attempted to start it again. It would not start. So it seems that there is a problem in the remaining wiring, perhaps a bad ground or something is not a good connection. I tested voltage at coil with this normal setup, and it was much less.

So that is good news. the 90 dollar EIM is fine, and the problem appears to be in the wiring somewhere. Apparently it was a coincidence that it quit starting immediately after I flashed the new alternator.

I did notice that the ammeter is no longer working. It does not show a draw when turning over the motor, nor does it show a draw then I turn the lights on (motor off). That might be another symptom of a poor connection in the system. I will take all the wires off of ammeter and test it alone to ensure that it is working properly.

I'm confident that I will get this wiring fixed up and running again, but then from there its back to the alternator, which is how this all started in the first place!
 
That is correct. It did not burn it out as I have verified that it is working I attempted to change the title of the post.
Thanks!
 
Dear Hobo, you were right. EIM is not burned out.
Thanks for your help. See earlier post today for update. Good learning experience. Not done yet, as I need to fix up whatever wiring is preventing full voltage from reaching coil, which should be easy.
Then back to the original problem of getting the alternator to start charging. Although it seems that the help that I got here will fix that problem easily as well.
 

Your original statement.

I only
have 1.3 V at the coil when the coil is hooked up to the pertronix igntion. When I disconnect the pertronix ignition from the coil, I have 12 V at the coil again

For the EI hatters that need to sit down and refine your diagnostic strategy. Read the post and get answers to the problem before they belch out a long post your diagnostics Chuck...

I only
have 1.3 V at the coil when the coil is hooked up to the distributor points ignition. When I disconnect the distributor points ignition from the coil, I have 12 V at the coil again.

EI and points suffer from the same basic issues. The first place to start is basic test that confirm the basics with a know good evaluation from the poster not wild arse guess and a post full of information that leads to no were other than to make you look smart...

Does anyone but me see why I add a load a know good one that I can actually see to the system but me... From that load I can evaluate the system in both directions power and ground. I am never checking the system in a open state, open state voltage checks lead you down the wrong path to no where...
 
rvirgil,

I agree, that makes good sense. Now that I can get it to start and run, I will utilize your suggestion. Hopefully this evening, if I can get a pigtail for the alternator today.
Thanks
 
(quoted from post at 19:43:45 01/17/18) Dear Hobo, you were right. EIM is not burned out.
Thanks for your help. See earlier post today for update. Good learning experience. Not done yet, as I need to fix up whatever wiring is preventing full voltage from reaching coil, which should be easy.
Then back to the original problem of getting the alternator to start charging. Although it seems that the help that I got here will fix that problem easily as well.

You gave info that was right there in front of all but NO the EI hatters had to get there rocks off.... They don't want to see a fix they had ratter beat you up over the EI... If you had put the points back in you would have had the same problem :shock:

When JMOR rings in stand up and pay attention he's very good at getting to the root cause of the issue... WHY because he ask questions that get to the root of the problem... My test may have holes in it if they do then I can take the criticism to refine them...
 
I got the new alternator to work. It seems this was more difficult to diagnose since several malfunctions all occurred at once,as everything ran fine, and then minutes later, several problems at once. Perhaps when the alternator burned out, it caused several problems, namely, faulty wires and for some odd reason, fouled spark plug.

Regardless, I replaced three wires, and now I am able to get the alternator to charge, and voltage to reach the coil upon ignition. However, it will require installation of a push-button switch to flash it, as increasing the rpms no longer excites it to charge like it did for the previous alternator. It requires the #1 and #2 terminals on the alternator be connected to each other, and then for a moment, receive battery voltage, which excites it. So I need to get a new switch for that purpose.

So to conclude, the alternator DID NOT BURN OUT THE PERTRONIX ELECTRONIC IGNITION. That was one part that was fine. In a previous post I described the test I did on the electronic ignition alone, isolated from all other wiring, using a test light.

Thanks to everyone for all of your help. Now I am ready to plow the driveway for the snow that is supposed to come this week. My neighbors are older and share the lane with me; this helps them tremendously. Thanks!
CPenn
 

[i:b2af499f82]"Now I am ready to plow the driveway for the snow that is supposed to come this week. My neighbors are older and share the lane with me; this helps them tremendously. Thanks!"[/i:b2af499f82]

a good neighbor is worth his or her weight in gold. u deserve thanks as well :)
 

We sell tractor parts! We have the parts you need to repair your tractor - the right parts. Our low prices and years of research make us your best choice when you need parts. Shop Online Today.

Back
Top