Carburetor identification

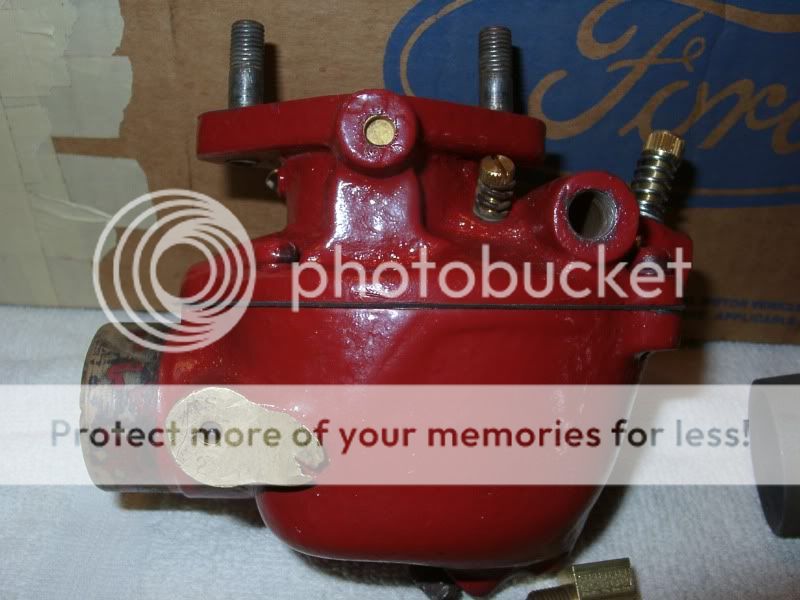
Leaks gas out the hole in the bottom, .. sticking float, who knows. Ain't pulled it yet.

If I do, I'm going to need gaskets and possibly internal parts.

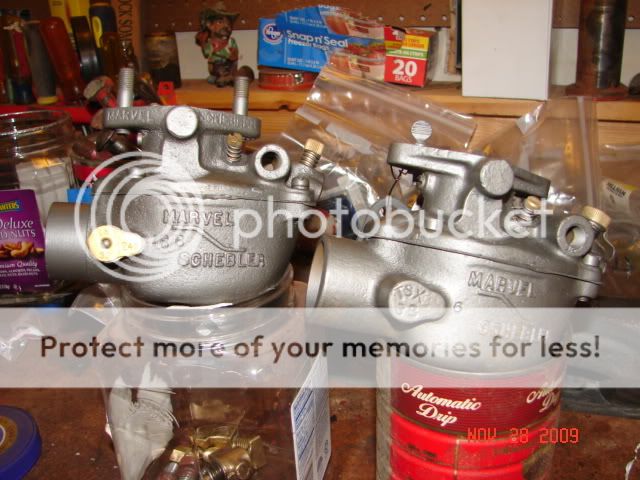
How do I determine it's model number for ordering parts? All I can see is the Marvel Schebler in the casting.

If I pull it off, I'll be needing at least one gasket.

If I clean off all that grease in search of a part number buried under it, I'll need to pull it apart to blow out all the solvent and stuff so I'll need more than just gaskets. I'm probably already in the tank for a float, needle, seat, etc.

2N, built in 1945.

48454.jpg


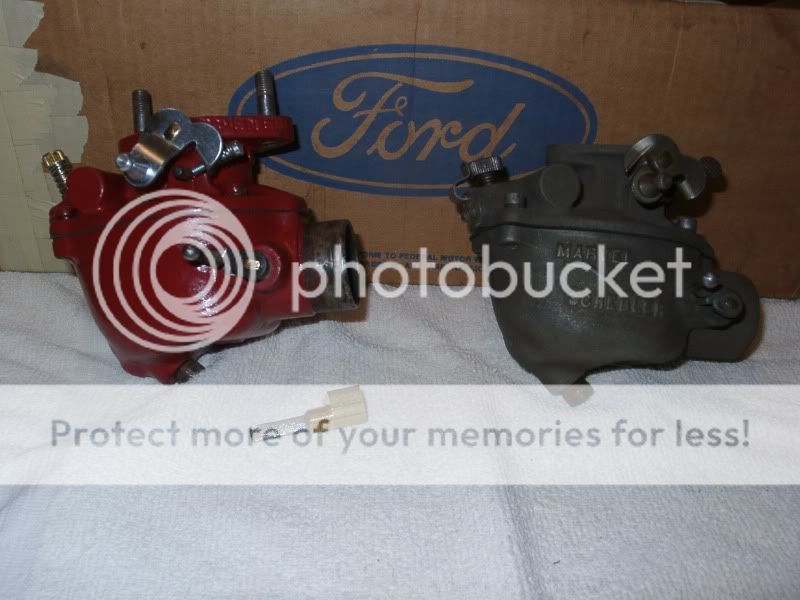
Pay no attention to the barbed fitting sticking out the side, it's for a temporary gas tank. That's not where it leaks from.

Any idea what model number or where to look for identifying marks?
 
Probably a 33 or 241 or 241A, 241B. The tag might be on the other side, on the side bottom half towards the rear when you take it off.
 
Look on the oblong raised portion where the choke rod is.
The number could be engraved or on a brass tag.
Its not uncommon for the brass tag to be missing.
[b:9a0fa44cdc]This[/b:9a0fa44cdc] kit that YT sells should work.


48455.jpg


48456.jpg
 
Actually it makes little difference. All N tractor crabs were eventually superseded by the TSX 241B, therefore all N tractor M/S crabs should be rebuilt to TSX241B specs, get that kit!
 

as far as i know, my tractor didn't come with any crabs. should i be concerned? ;)
 
HiYa Brian -Like Royse said, you have the Marvel-Schebler TSX-33 carburetor used on FORD 9N, 2N, and early 8N tractors. I can tell by the Main Jet Adjustment Needle Screw too in your picture. The little Ping-Pong paddle boss on the lower left in your picture by the air intake should have "TSX -33" in cast recessed characters. Later, a brass tag was riveted here and you may have one or the other. It had the M/S carb model number and a date code when it was manufactured at the factory so don't put anything further into that date code. Many suppliers of Ford Tractor parts sell the TISCO carb repair kit for M/S carbs. A cheap, basic kit, p/n BK45V is available but I'd suggest you get the complete kit B for a few dollars more as you get many more parts you might need. ALL new rebuild kits are supplied with the newer parts to supersede the old TSX-33 parts, MADE FOR THE TSX--241B CARB. Instructions say to discard old Main Jet and install new one from kit and also the new economizer jet -good advice. I wouldn't use any parts like a new venturi made out of plastic -use the original brass one. You get a little instruction sheet with the new kits but it really is useless. Get a copy of the Operator's Manual, the I&T F-04 Manual, and the 39-53 MPC to help you further understand all the parts and how they function and go together. There is a ton of info in the archives on how to set and adjust the carb once rebuilt and installed.

MARVEL-SCHEBLER TSX-241 SHOWN ON LEFT /TSX-33 ON RIGHT:
carbs007.jpg
(photo courtesy of Bruce(VA)
Marvel Schebler Carb Kit
 
Actually, those both look to be TSX-33s to me. One early, one late.
One has a brass tag, like the one '33 I pictured, but looks to have
a date code of 2-48 or 2-49. Can't tell for sure, my eyes are bad.

We linked the same carb kit, part number C546V.
$4 cheaper here on our hosts' site.
It will come with a new main needle, but it usually won't be the larger one.
The brass keeper can be adjusted in so it will hold the smaller one.

Here's the tag on a 241B. Model number on the bottom of the tag.

48486.jpg
 
What's the other jet, the one to the left of the fuel inlet hole in this pic?

carbs007.jpg


Yeah mine's the TSX 33. The numbers showed up when I cleaned it up.

Before:

48496.jpg


After:

48497.jpg
 
I cleaned out that rust in the bottom of the float chamber with a pencil eraser. I chucked it up in the hand drill.

It didn't get it perfect before the eraser wore out but it got rid of the loose stuff.

48498.jpg


I'm kinda thinking about just ordering a reman.


What's the advantage of using the different main jet in the rebuild kit?
 
"What's the other jet, the one to the left of the fuel inlet hole in this pic?"

The adjustment screws are not the jets.
The jets are brass parts inside the carb.
Those adjustment screws are how you adjust the flow.
The adjustment you are asking about is the idle air adjustment.
It adjusts air, not fuel, so in gives you a richer mixture at idle.
Out gives you a leaner mixture. Opposite of the main needle.

Your choice on ordering a re-man. If you do, I'll take your old one.
I rebuild them for folks here on the forum.
That was probably obvious from the pictures.

48499.jpg
 
The adjustment you are asking about is the idle air adjustment.
Y'all mentioned the newer parts kit "upgrades" it to the 241 ..

That would likely mean the jets/needles/adjustment screws, will be different?

So replacing them, I can't just simply count the turns when I remove the old ones and reverse it with the new ones, ... I'd have to actually tune it and stuff.

The only reason I pulled mine was it was leaking badly out that weep hole. I think my carb was adjusted perfectly. Maybe not the float though, it always dripped a little bit if I leave the tank valve on. Standard procedure was to drive it up to the barn, stop outside, shut off the tank valve, then drive it into the shop before it starves of gas. Due to the rust in the float bowl I might stop doing that and just shut the engine off first, then the tank valve. Running the carb dry is probably what allowed the rust. Draining old crappy gas from the bowl is easier than taking it apart to clean rust out.

I think I might just get the gasket set and a new fuel inlet elbow and be done with it.


I have an owners manual and a shop manual, ordered from here. They were in the house and I had a fire in 2014, .. everything that didn't go in the dumpster ended up in plastic bins stacked up in the barn and I believe those manuals are in one of those tubs. It would take a year to find them.


Question... how do you R&R the brass inlet elbow without bending it up so the female threads for the fuel line aren't round any more? There doesn't seem to be enough metal on there to apply the kind of torque to tighten it up. Just removing mine, I bent it a little. I have to look closely to see the bend but it's there. Probably enough to cause a leak if I re-use it.

I think I used a 14mm wrench on it.
 
"I'd have to actually tune it and stuff."

That's correct. You might have to do it several times to get
it dialed in just right.

"how do you R&R the brass inlet elbow without bending it up"

I screw the end off an old gas line into it so it doesn't bend.
1/4 inch brake line end fits the same and makes good gas line.
There is a screen on that elbow, so I replace them with new.
 
You say yours was 'set perfectly' but only leaked at the weep hole. Well, that could be a stuck or misaligned float. Once you replace the internal parts with new and the external parts with new -main jet, idle air, idle fuel screws, you are going to pre-set them to a starting point then fire up the engine and do the fine tuning. Pencil eraser??? hhhmmm. I know a guy who uses Pine Sol and swears it works great. Gotta soak carb halves in some good solvent like commercial carb cleaner, diesel fuel, mineral spirits, lacquer thinner, UATF...et al. How does one bend the brass elbow? It screws in and I use a small crescent wrench. ALL carb and fuel line fittings use the UNS thread of 7/16-24 -special thread used on brake lines and fuel lines. You're making this harder than it has to be. You have some options now- keep this one and rebuild it; keep this one and have someone like Royse or me rebuild it; or buy an original TSX-241 carb on fleabay and rebuild it. There are some already rebuilt but you'll pay a lot more.

I just finished a TSX-33 for a friend, received 3 more yesterday from another guy, and one will be for his war-time steel-wheel 2N. I am going to install a double throw choke lever on one as were the original M/S TSX-38 carbs for Ford Industrial and 2N wartime models only. I also have two TSX-241 carbs in queue, one will be a spare for my 8N and the other for a customer. I also have three more N carbs so badly caked with crud they have been soaking for almost 9 months now-better go check on them!

Tim *PloughNman* Daley(MI)
 
GOOD EYE ROYSE! Yep, they sure are. I got the pictures from Bruce, but just to be clear, here are my own:


MARVEL-SCHEBLER TSX-241 CARBURETOR, LEFT & TSX-33 CARBURETOR, RIGHT:
9N951003.jpg

TSX-241 CARB:
9N951004.jpg


...NOTE THE BRASS FUEL INLET ELBOW W/SCREEN...
 
"GOOD EYE ROYSE!"

Thanks Tim. So many parts interchange, including the bowls, that
it's almost impossible to tell from the exterior look, but notice
that your 241 doesn't have any M/S raised marking on the bowl?
That may have changed over the years too, but it makes me look.
 
I removed the idle air screw, main jet, replaced float, set it at 1/4", new float needle and seat.

Put it together, and on the tractor I simply got a piece of 1/4" brake line, sawed it off about 2" from the fitting, cleaned the cut end up with the belt sander, blew it clean and used it as a barbed fitting because I'm using a temporary gas tank strapped to one of the loader arms.

It won't start without either ether, or holding my hand over the intake on the carb. Choke has no effect, it needs total vaccum to start, even when warmed up.

After completely warming it up, it dies immediately when I try to put it under load. It made it out of the shop, then slightly downhill in 1st gear but then died when I stopped to put it in 2nd. Then it took about 30-40 restarts to get it backed into the shop.


I ran the main jet all the way in until it died, then out 1/4 turn, started it, and every time it died while applying load, I backed the main jet out until eventually it was completely out.

At that point, with the main jet completely removed from the carb, and in my pocket, it stayed running while I backed it slightly uphill the rest of the way into the shop and even stayed running when I dead-locked the loader tilt function.

I can't figure out why it's starving for fuel.

When I first turned on the inline gas valve on the temporary gas tank I'm using (borrowed from a riding mower) gas started rushing out the bottom of the carb pretty fast, and that's when I remembered I hadn't put the drain plug back in. So I know there's no restriction in gas delivery to the carb.

No leaks at all except a slow seepage on my improvised barbed fitting (1/4" fuel line over 1/4" brake line with a hose clamp).
 
(quoted from post at 21:00:36 05/05/17) If it will run without the main jet , I would say that a passageway in the carb is plugged.
Or it could be that I forgot to put the venturi back in.

Duhh...

48574.jpg


I guess we now know that one of these things will run just fine under no load, and even idle, with no venturi and no main jet.
 
How did that 27x27 pixel GIF get enlarged full screen like that? I can't delete it either. LMAO.


Anyway to answer a previous question about how I bent the brass inlet screen/elbow thing:

How does one bend the brass elbow? It screws in and I use a small crescent wrench.

I put the open end of a wrench on it, on the rear corner actually because I knew I'd bend it if I put it in the center or outer edge. But it bent it anyway.

You can see it's slightly out of round.

48575.jpg


But I got a short piece of 1/4" brake line so I could install the new one the way Royce suggested. I actually didn't even use a wrench, just the brake line.

Here's a photo of a 2" section of brake line being used as a temporary barbed fitting for the rubber hose:

48576.jpg


And my highly sophisticated PVC and bungee cord system for mounting the temporary gas tank until I'm satisfied with the machine enough to put the hood back on.

48577.jpg
 

We sell tractor parts! We have the parts you need to repair your tractor - the right parts. Our low prices and years of research make us your best choice when you need parts. Shop Online Today.

Back
Top