Kevinw8N

Member
My 1950 8N isn't running right. It's backfiring and seems to have little to no power other than at idle. I converted it to a 12V system, along with an electronic ignition/12v coil. The battery has been changed to 12v too.

I've tried to adjust the carb, but it doesn't seem to make a difference. All 4 plugs are firing. Once in a while, you can hear a "ticking" sound from the front. Could the electronic ignition be my issue?
TIA
 
Electronic ignition AND a 12v system.. and it wont run? "Inconthievable" ;)

First.. Verify fire order 1-2-4-3.. next..what does your spark look like.. if good.. move on to fuel. Does a tad bit of choke help any?
 

Hey now...I have electronic ignition and 12V and the only time mine doesn't run is because of something I have done wrong.


Did you happen to pull the distributor when you did the conversions? I know you say you have spark but it also needs to be at the right time. Backfiring can mean a timing issue. Is it backfiring through the intake or the exhaust?
 
(quoted from post at 16:13:04 02/20/17) My 1950 8N isn't running right. It's backfiring and seems to have little to no power other than at idle. I converted it to ......
TIA

Was it running good before the conversion ?
 
Ok, so I will try to answer everyone's questions. I just got back to the house and have been messing with it.

The firing order is correct. If I change any of them around, it doesn't hardly want to run at all. It seems to idle ok. And the distributor is located on the front.

Yes, it was running ok before, just had issues with it starting again after it had been running for a while. So decided to upgrade. It did run ok for a bit after the conversion, but I haven't ran it for a while either.

I pulled the wire off each cylinder one by one and you could tell a difference with how it ran each time.

Pulling the choke out a bit didn't seem to help any.

It has the autolite plugs in it at the moment. Those are relatively brand new. Changed them when did the conversion in the fall.

I did pull the plug on the bottom of the carb and there was a good stream of gas coming out. (with engine not running)

When it backfires, it comes out of the exhaust.

As if you couldn't tell, I'm far from a mechanic and has been years since I've worked on a "normal" engine without all the electronic crap on it! :)

With all that said, I didn't gain a whole lot! I just pulled the distributor/cap off and took some pics. I will attach them. (I hope...) Could it be the timing is off a little? When I put the EI in, the instructions showed to center the bolt/nut and that was it.

Again, I really appreciate all the help!
 
" Ok, so I will try to answer everyone's questions."

You missed a couple.

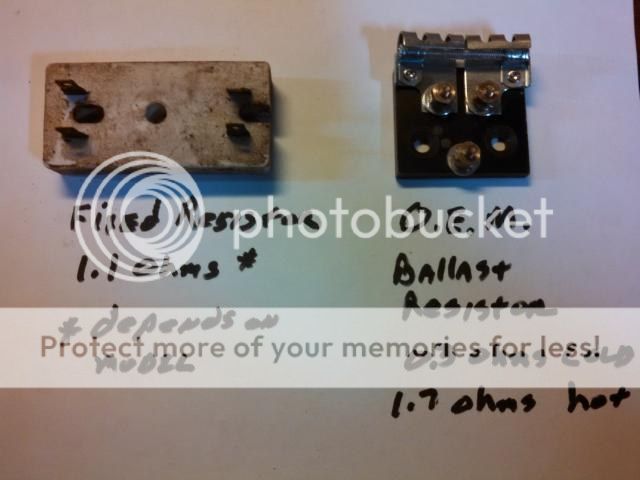
How many resistors are in the ignition circuit?

Did you put suppression plug wires on it?


" I pulled the wire off each cylinder one by one and you could tell a difference with how it ran each time. "

Not a good idea. That's a good way to get carbon tracks in the cap.

" Could it be the timing is off a little? "

Yes, but there is no way to adjust the timing w/ EI on a frontmount.

But timing isn't your likely problem.

The absence of suppression wires could be. Or too many resistors. Which is why I asked those questions.

Not a good idea. That will easily result in carbon tracks in the cap.
75 Tips
 
(quoted from post at 13:57:52 02/21/17) " Ok, so I will try to answer everyone's questions."

You missed a couple.

How many resistors are in the ignition circuit?

Did you put suppression plug wires on it?


" I pulled the wire off each cylinder one by one and you could tell a difference with how it ran each time. "

Not a good idea. That's a good way to get carbon tracks in the cap.

" Could it be the timing is off a little? "

Yes, but there is no way to adjust the timing w/ EI on a frontmount.

But timing isn't your likely problem.

The absence of suppression wires could be. Or too many resistors. Which is why I asked those questions.

Not a good idea. That will easily result in carbon tracks in the cap.
75 Tips

Bruce,

You are a wealth of knowledge. I was unaware that timing would not be adjustable on a e/I front mount.


I try not to touch plug wires/distrubitor cap with engines running after I got a nasty jolt from a running engine with a wire that was burned through. What made it worse was it on a MSD system with 45,000 volts. Made my arm go numb for a good half hour. So you won't be catching me piling plug wires off a running engine any time soon. Infrared thermometer or a bottle of water with a whole drilled in the top will tell me if I have a dead cylinder from now on.
 
I haven't found anyone who has the plug wires in stock yet. As for the resistors, there are 2. One new one that came with the kit, plus the old one. I tried it without the old one, but it wouldn't shut off then.
 
" I haven't found anyone who has the plug wires in stock yet. "

Pertronix does.

" I tried it without the old one, but it wouldn't shut off then. "

That's because you wired it wrong. Google "wiring diagrams JMOR" and find the diagram for your tractor.

All you need is the OEM ballast resistor with the 12 volt coil . You have too much resistance in the ignition circuit.(see tip # 30)

Remove the new ceramic resistor from the circuit.
ballast_Bruce_zpsboeikaki.jpg

75 Tips
 
(quoted from post at 04:49:17 02/22/17)
(quoted from post at 13:57:52 02/21/17) " Ok, so I will try to answer everyone's questions."

You missed a couple.

How many resistors are in the ignition circuit?

Did you put suppression plug wires on it?


" I pulled the wire off each cylinder one by one and you could tell a difference with how it ran each time. "

Not a good idea. That's a good way to get carbon tracks in the cap.

" Could it be the timing is off a little? "

Yes, but there is no way to adjust the timing w/ EI on a frontmount.

But timing isn't your likely problem.

The absence of suppression wires could be. Or too many resistors. Which is why I asked those questions.

Not a good idea. That will easily result in carbon tracks in the cap.
75 Tips

Bruce,

You are a wealth of knowledge. I was unaware that timing would not be adjustable on a e/I front mount.


I try not to touch plug wires/distrubitor cap with engines running after I got a nasty jolt from a running engine with a wire that was burned through. What made it worse was it on a MSD system with 45,000 volts. Made my arm go numb for a good half hour. So you won't be catching me piling plug wires off a running engine any time soon. Infrared thermometer or a bottle of water with a whole drilled in the top will tell me if I have a dead cylinder from now on.

Timing is adjustable you will need to find TDC mark the front crank pulley align the mark with the oil pan to block location and use a timing light. It does take knowledge of how the valves operate at TDC to hone in on TDC. I doubt its a timing issue but myself I could confirm that YMMV.

As far as checking for a misfire I doubt pulling a wire off is going to cause any issues with the cap are rotor in that short of time if it does I have fudged up thousands if it made a issue out of it I have not suffered from it. A DIS system is a different story the best way is to cut four 2" lengths if 3/16 vacuum tubing insert it on the top end of the plug then put the end of the plug wire on it. You then can use a test light grounded to the block then short each plug out with the probe of the light.

Yes vacuum tubing will conduct electricity you radiator hoses will also :shock:

As far as plug wire material I have not had a issue with copper but its possible. I rarely use copper myself because I never had a issue with other types even using 6V so I plead no contest on that subject.

No other help at this time other than I would answer the unknown and move on from there.
 
" Timing is adjustable"

Yep, I did exactly that w/ my frontmounts and 29 Ford so that I can check timing with a light. What I should have said was
" there is no way easy way to adjust the timing w/ EI on a frontmount"

" I have not had a issue with copper "

I would have never thought that would be a problem until I heard it directly from Pertronix myself. You'd think they'd be able to make a module that wasn't susceptible to RFI. Or, sell the wires along w/ the EI unit as a kit.

" You then can use a test light "

That's exactly how I was taught to do it 50 years ago, but with a timing light. My guess is that the guy doing the teaching must have burned up a distributor cap once & never tried it again!
 
sounds like you have some wiring mess-ups.

the not shutting off problem is a backfeed issue from the alternator to the ignition.

how about you draw us a schematic of how YOU have this machine wired.
 
SO, here is an update. I've been working on this thing all week. I went down to one resister, as seen on the schematic. No change. Put brand new plugs and suppression plug wires on, no change. Put new carburetor on and blew out the gas line back to the tank, no change. Any new suggestions? Everything seems to keep pointing to the distributor, or cap, or the EI. What am I missing? There isn't much to this thing! It's driving me nuts!!
 
(quoted from post at 11:30:03 02/24/17) Put brand new plugs and suppression plug wires on, no change.

just to clarify, the suppression wires won't make the tractor easier to start. their job is to protect the RI from damage once the tractor [i:8169be4ce3]does[/i:8169be4ce3] start.

the one resistor u left in the circuit is the OEM resistor, and not the ceramic one, right?
 
(quoted from post at 15:44:31 02/24/17) Correct. It is the old one. The tractor starts fine, and idles fine. It just has no power.
xperiment a little.......move the timing adjuster down (advance) most of travel and observe difference.
 

[b:f511975cc9]"It just has no power."[/b:f511975cc9]

ah, sorry. had been a while since i read your original post, memory isn't what it used to be :oops:
 
NEW UPDATE. New plugs, wires, carb, brand new distributor/cap with new points etc. I took the EI off and tried going back to standard points etc. Nothing has made a bit of difference. It still starts great, idles great, just loses power when you get to a certain RPM and backfires. (exhaust) Not anything left to switch out with new at this point. Is it a timing issue? I'm going to try experimenting later today when I get done working with the timing to see if it makes a difference.
 
(quoted from post at 12:11:26 03/03/17) NEW UPDATE. New plugs, wires, carb, brand new distributor/cap with new points etc. I took the EI off and tried going back to standard points etc. Nothing has made a bit of difference. It still starts great, idles great, just loses power when you get to a certain RPM and backfires. (exhaust) Not anything left to switch out with new at this point. Is it a timing issue? I'm going to try experimenting later today when I get done working with the timing to see if it makes a difference.

" Is it a timing issue?"

Could be. But refresh my memory: frontmount or side mount? 6v or 12v? What did you set the points at?
 
IT's a front mount, 12v system. The points were all preset. It's acting the same way it did when I had the EI on it. Thought I'd give it a shot going back to points, but didn't make any difference.
 
(quoted from post at 15:02:15 03/03/17) IT's a front mount, 12v system. The points were all preset. It's acting the same way it did when I had the EI on it. Thought I'd give it a shot going back to points, but didn't make any difference.

" The points were all preset."

No they aren't.

You need to set the gap, then the timing.

Do you know how to do that?
 

Well you should know then that you just don't put the points in with out adjusting them.


I'll be glad to help you set the points & the timing or you can read the instructions in the other discussions.

Your call.
 
If you have the instructions handy, that would be awesome. I think the instructions I've seen before are probably from you anyway! LOL

I purchased a brand new distributor/cap that had everything already installed. I asked the question before purchasing if everything was preset, they said it was. So just going off what I was told on that one. I know, buyer beware!
 

Well, maybe the gap is correct. But I doubt it.

The first thing you need to check is bushing wear. If the shaft has any sideways movement AT ALL, the bushings must be replaced. (see below)

Next, look at how the points & condenser are set in the distributor before you start pulling it down! Turn the tang & observe how the points open & close. If this is your first time doing it, draw a sketch! Make sure you are using quality points. I use only Wells, Blue Streak or Echlin brand points (* see below). Be careful not to ground the tip of the condenser wire to the body of the distributor when you replace the points. Do not break the little copper strip that go to the points. (If you do, make another out of the old set of points). Check the insulator w/ your meter. If it's bad, replace it with a Hillman Group square .375 license plate screw, Item # 138916, model #881189. Also, make sure the condenser wire does not go through the same opening in the distributor as the coil pig tail. The condenser wire goes through the opening on the top right.

Look at the old points; are they burned, pitted or misaligned? Check the point gap, .015 on all four lobes. Make sure the blade is at a perfect right angle to the points. You want to feel just the slightest bit of drag when you pull the blade through the points. Set the points on the high side of the cam and ensure they align correctly. Make sure you have the star washers under the screws on the points. If you need to replace the 8-32 X
.19 fillister head screws, ensure that the new screws do not interfere with the advance weights. Dress the points by running a piece of card stock or a brown paper bag through them. New points sometimes have an anti-corrosive dielectric coating on them & old points can corrode or pick up grease from a dirty feeler gauge or excessive cam lubricant. And, don’t forget to lube the rubbing block w/ cam lube; not Vaseline, not bearing grease, but cam lube . (** see below).

If you are using quality points and cannot get the gap to open to .015, chances are you need to replace the bushings.

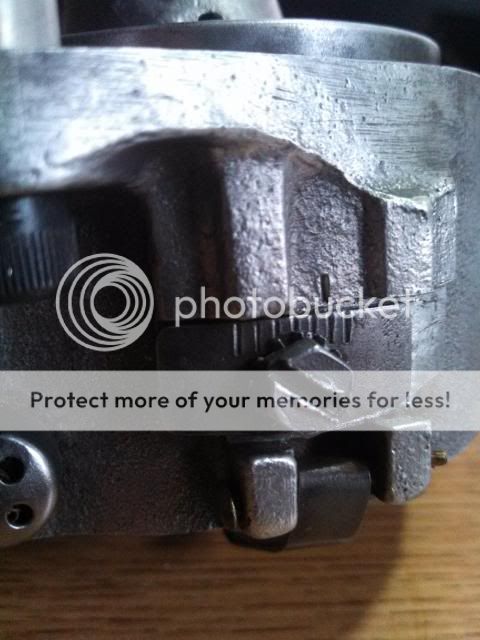
Now, set the timing. Get a meter or test light, a 21/64” drill bit (*** see below) & a metal straight edge. Put the distributor face down w/ the condenser on the left & the timing plate lock screw on the bottom. Look at the end of the shaft: it has a narrow side & a wide side. Make sure you can tell the difference. Now, place the drill bit in the bottom mounting hole (this will be your reference point for measuring). Next, place a straight edge on the wide side of the tang on the shaft as shown in fig. FO83 in the picture. Rotate the shaft CCW (as viewed from rotor side OR CW as viewed from back/tang side) until the straight edge is ¼" beyond the outside edge of the drill bit you stuck in the distributor mounting hole. At this distance, the distributor points should start to open (get your meter/light out now & check). If not, loosen the timing plate lock screw and turn to advance or retard the timing (move the plate down to advance timing, up to retard). Remember, each one of those little hash marks represents about 4° of timing. Keep adjusting until you get the proper ¼" setting. (if the plate won’t move, you might need to remove the big C clip to loosen it a bit) As you’re adjusting, eliminate backlash by turning the shaft backwards (CW as viewed from the front) and bring the shaft forward (CCW as viewed from the front) to measure your setting. This ¼" setting will get you static timing at top dead center.

As you can see from the picture, this particular distributor needed to have the timing advanced by about 8° (two hash marks) to achieve the ¼” measurement.

After you set the points & timing, do a continuity check before you put the distributor back on the tractor. Before you start, make sure your meter/light works.

With the distributor still off the tractor, follow these steps:

1. Coil off, cap off, points open. One probe on the brass screw & the other on both sides of the open points. On the side closest to the cam, you should have continuity. Not on the other side! If you do, you will also have continuity everywhere because the points are grounded.

2. Coil off, cap off, points open. One probe on the brass screw & the other anywhere on the body of the distributor. You should have no continuity! Now, rotate the tang on the distributor....as the points open & close, you have continuity (closed) and lose it when they open.

3. Put the coil on the distributor, cap off, points open. One probe on the lead on the top of the coil, the other on the cam side of the open points. You should have continuity!

4. Coil on, cap off, points open. One probe on the lead on the top of the coil, the other anywhere on the body of the distributor. You should have no continuity!

At this point, I just put the distributor, coil & cap all back on the tractor as a unit. The reason I do this is because it is real easy to get the cap or coil misaligned trying to put it back together, one piece at a time. The result is something gets broken or you get a ‘no spark’ problem.

It's possible to put it back on wrong & break it. Look at the slot on the end of the cam shaft. Whatever angle it happens to be, turn the distributor tang to match it. Make sure you can tell the wide side from the narrow side on both the cam & distributor! (close counts). Place the distributor on the front of the engine, gently push it in place & slowly turn the distributor body until you feel the tang slip into the slot. Rotate the distributor body until the bolt holes line up. Hand tighten the two bolts until the distributor body is flush with the timing gear cover.

Double-check your firing order & plug wires. It’s 1-2-4-3, counterclockwise. It’s very easy to cross 3 & 4.

And finally, do not forget to remove the distributor on an annual basis (more often, depending on use) to check the point gap and re-lube the cam.

* NAPA part numbers:

· Points: FD-6769X

· Condenser: FD-71

· Rotor: FD-104

· Cap: FD-126

** Distributor cam lube:

http://www.napaonline.com/Catalog/Result.aspx?Ntt=ECH+ML1
<http://www.napaonline.com/Catalog/Result.aspx?Ntt=ECH+ML1&Ntk=Keyword&Nty=1
&Dn=0&D=ECH+ML1&Dk=1&Dp=3&N=0>
&Ntk=Keyword&Nty=1&Dn=0&D=ECH+ML1&Dk=1&Dp=3&N=0

** Distributor cam lube

http://www.carquest.com/webapp/wcs/stores/servlet/subcategory__10151_-1_1065
1_11340

*** Rather than the drill bit, a jig made by Dan Allen (The Old Hokie) will make this task quicker & more accurate.

http://windyridgefarm.us/


**** Unscrew the plate hold down screw & remove the C clip to get the plate out. Remove the shaft & weights. The weights should freely move.

There are three ways to replace the bushings in a front distributor:

1. Buy new bushings (part numbers 9N12120 front & 18-12132 rear). Press out the old ones, press in the new ones and ream to fit. CAUTION: do not try this unless you have a press & know how to use it. If you break the base, a new one costs $130. If you bend the tower which holds the front bushing, a new plate will cost you $30.

2. Take the new bushings and distributor to your local machine shop.

3. Send the distributor out for bushing replacement if you do not have a local machine shop.

Make sure your distributor isn’t worn out; check the wear parts with a micrometer and compare what you have to the factory specs

(below).


Factory Specs:

Shaft top .4367 / .4370

Shaft Bottom .8625 / .8630

Cam Flats .789 / .791

Cam Lobes .869 / .871

Base Tang .177 / .178
 
Here is the picture that didn't attach to my previous post.

I recall asking you what resistors you had in the ignition circuit; if you answered, I can't find it.

Do you have the OEM ballast resistor in the ignition circuit? Any other resistors?
IMG_20140212_144953_385_zpsd84210ac.jpg

75 Tips
 
Well, after 3 bandaides, 6 new cuss words, about $200 I probably didn't need to spend....SUCCESS!!!!! It still needs a little tweaking, but it runs 10x's better than it was! No idea how the timing got so out of whack. It's amazing how such little increments makes such huge difference.

I can't thank you all enough for all the help and suggestions, especially Bruce! Thanks! No offense to anyone, but I hope I don't "need" to get on here any time soon! LOL I've learned a WHOLE lot about this. And seem to have a lot of extra parts now! LOL
 
(quoted from post at 18:00:06 03/03/17) Well, after 3 bandaides, 6 new cuss words, about $200 I probably didn't need to spend....SUCCESS!!!!! It still needs a little tweaking, but it runs 10x's better than it was! No idea how the timing got so out of whack. It's amazing how such little increments makes such huge difference.

I can't thank you all enough for all the help and suggestions, especially Bruce! Thanks! No offense to anyone, but I hope I don't "need" to get on here any time soon! LOL I've learned a WHOLE lot about this. And seem to have a lot of extra parts now! LOL

You're welcome. Glad to help. Tnx for the follow-up.

Do you have the OEM ballast resistor in the ignition circuit? Any other resistors? 12 volt coil?
 

We sell tractor parts! We have the parts you need to repair your tractor - the right parts. Our low prices and years of research make us your best choice when you need parts. Shop Online Today.

Back
Top