Finding a vid on bailer wire tie mech

Farmallb

Well-known Member
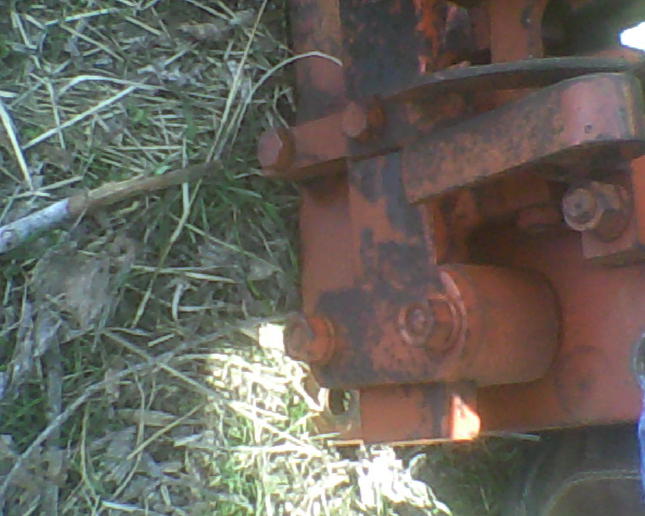
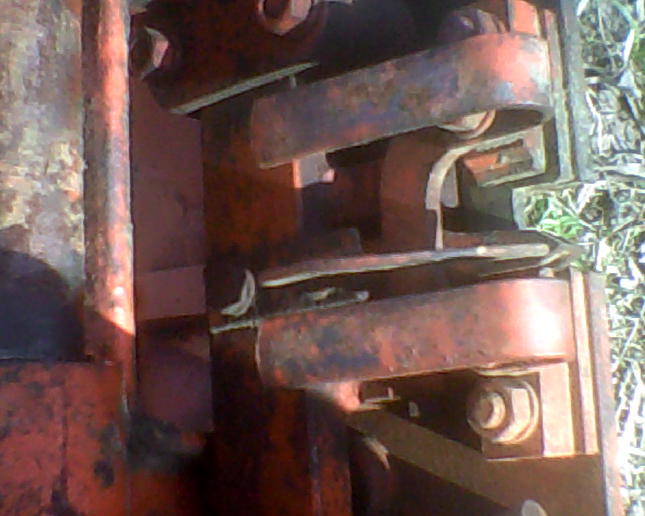
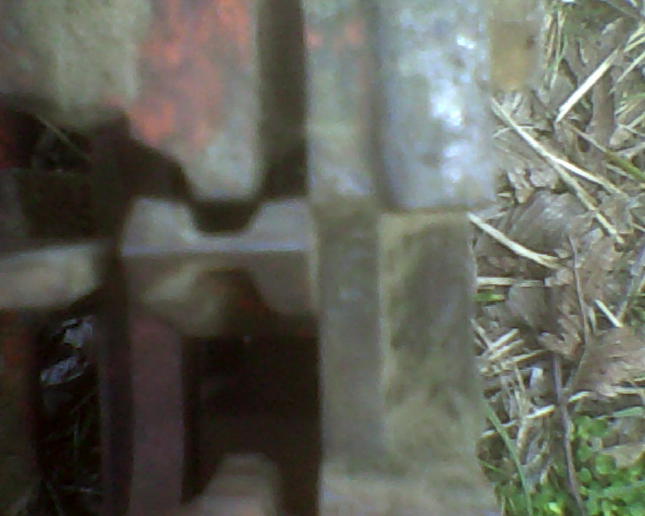
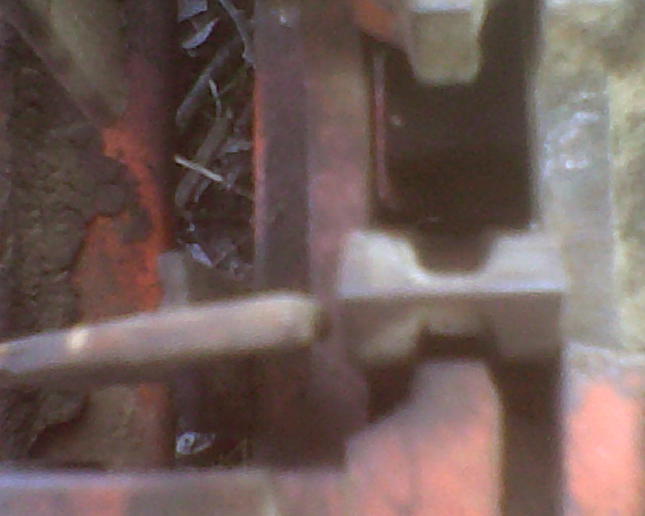
Anybody know where I can see a vid on a hay bailers wire tying mech in operation. Preferably Case 140 W, and preferably SLOW lol. But, at this stage, I aint picky.
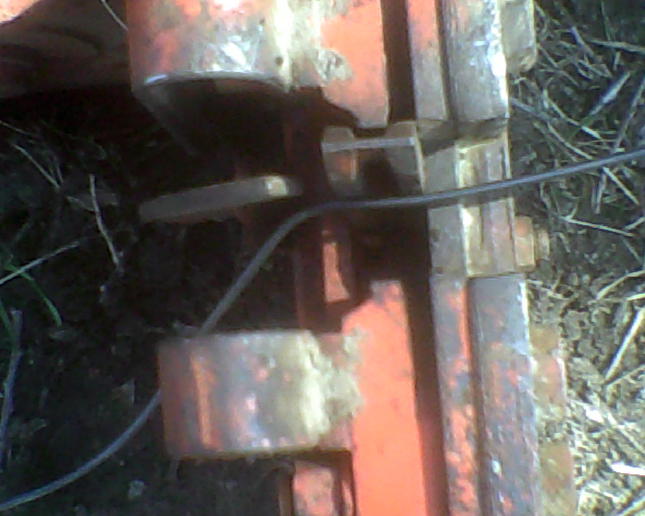
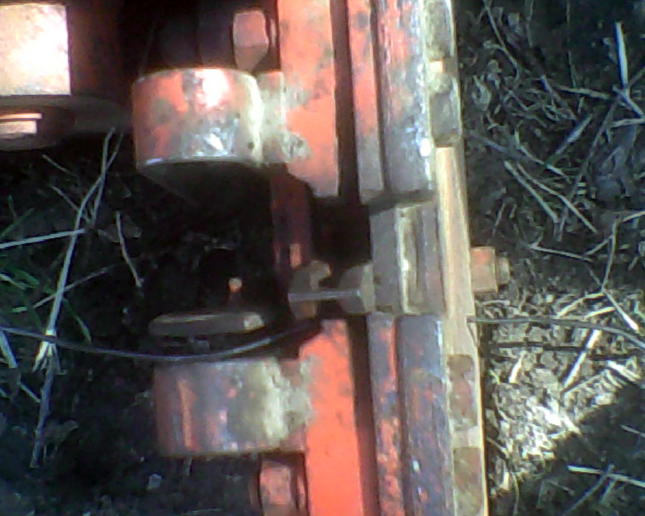
As I envision it in my mind, the needle brings in the wire to the tying mech and backs out leaving it there in a U shape. one leg of that U is in the knives which cut it so that its in a I on one side and a J on the other.
I read once that in operating the 140 W Bailer (That if you are going to bale with the 140, put the hay to it). Or something like that. That tells me, that Case intended, as part of the tie operation that the wires should be continually moving downwards in the chamber with the bale. I cant imagine or figger that one out in my mind just setting here and trying to figure out why it wont tie, and why it keeps wrapping the wire around the shafts holding the fingers, just hand cycling it without no hay in the chamber.
Any help will be GREATLY appreciated.
 

You're partially correct as when needle brings wire up from the bottom the end of the wire with the "u shape" that has been cut by the knife is held in gripper not the knife.

Is you baler experiencing wire tying problems? If so what type of problem?
 
You have to have hay in it to properly tie. Or,pull a loop of wire ,hold it secure with a bar across the chamber.It will not tie without hay or something to create a loop in the wire.It has to have something to tie around.Did you check the knives/anvils? The wire must be crisply cut.If not it tears,wraps,balls up.......... Look up Wire tie knotters(twisters);wire tie baler,or something like that on Utube.Utube is full of such videos.
 
The wire wraps around the twister finger rod. Im getting a repair book Mon hopefully. I need to know where the twister fingers are supposed to rest. I need to know where the rod below the twister finger rod is supposed to be set.
I can feel grooves on a block of metel that is, or is part of the cutting system.
 
I went 20 pages on U Tubes looking for something to do with the wire tie mech. I typed in as a heading (Wire tie mech repair on hay bailers.) 90% had to do with twine knotters, other than stationery bailers that used wire.
I felt the top of a block of steel that had grooves in it, that was on the cutting side of things.
 
That could be your problem. the groove lets the wire fall 'away' from the knife. the knife may be grooved,too. In that case,the wire is getting 'smeared',not cleanly cut.In my experiences,the wire not getting cleanly cut is 90% of the wire tying problems.The twister/hook may be also grooved. Grooveing is NOT your friend.
 

IIRC JI Case wire sq balers have an adjustable rod next to twister shaft similar to NH wire balers. I personally don't know the correct method for setting this rod but I would guess similar to NH wire balers.

Ditto groove on twister hook or twister shaft can hang wire. The point of twister hook on JD wire balers should be directly under gripper arm pivot bolt when in home position. But if wire is hanging I have backed hook up a little to the RH side of tying system.

IMHO the baling wire made today isn't near as oily as it was back in the 60's-80's so I always pour oil on the wire in the boxes
 
I don't know what a gripper arm pivot bolt is. I pour a qt of oil 1/2 over each box each year.
 

Blue arrow points to gripper pivot bolt hole.

mvphoto12463.png
 
I have the rod that holds the twister hook, and the hook,. My hook ends up at a point. but that's it.
 

I couldn't locate the JI Case 140 parts catalog so I posted NH parts but all small sq balers are similar. Key 9 in my photo is the gripper arm that moves from side to side that gripper/knife(key 8) attaches to. Point of twister hook(key 17) should set under hole with blue arrow pointing at it when tying system is in home position

photo from JD parts catalog
mvphoto12464.png
 
Don't see a Key 8 or 9, NOR no blue arrow. I have something called an anvil, which I believe grips the wire. What it grips the wire against, I don't know. I may have to take the anvil s out and have them welded in and smoothed out again as they have grooves in them.
 
Viewed them perfectly. There was NO #8 OR 9. I didn't see an arrow, blue or otherwise, as all was in black.
 
Can any you iron out the wrinkle Im having understanding this part?
NOTE: If the knives cut the wires before or after twister hooks have rotated 1-5/8 to 1-3/4 max turns, fine adjustment must be made by loosening the 3 bolts on the cam drive sprocket and rotating the cam. Rotate the cam clockwise to advance the cutting or counter-clockwise to retard the cutting of the wire. Tighten the three cam drive sprocket adjusting bolts after obtaining the proper adjustment.
Does that mean the wires have to cut EXACTLY at those mesurments?
 

On all small wire tie square(rectangular) balers I've repaired or operated the wire was cut(providing the gripping/cutting parts weren't worn out) at basically the same time then the twister hooks twisted the wires together IE wire is gripped/cut before twister hooks began moving. At pto speed this happens before naked eye can comprehend what's transpiring.
HTH's,Jim .
 

I took off the cutting mech. Ran 4 wires through each of the cutting systems. All worked/cut flawlessly.
Think Ive got the twister hooks in the right position. Tomorrow, ill try to time them up together after putting the cutting mech back on.
a261007.jpg

a261009.jpg

a261010.jpg

a261011.jpg

a261012.jpg

a261013.jpg

a261014.jpg

a261015.jpg
 
At 70, my mind forgets some things. I KNOW, that when the wire needles bring in the wire, they leave it there in a U. It gets cut, which kinda/sorta makes it into 2 pieces, a J and a I. I know that one of those pieces is held in the anvil/Grip/vice/whatever, and that wire forms the front part of the bale. What happens to the other piece???
ALSO, IF Im right, I have to trip the tie mech before I start bailing, so as to have 2 pieces in place as the bale is pushed down the chamber. Right?. Don't laugh. As dad said to me several times, Youll find out when you get there LOL.
 

Actually on a baler that has no hay already in chamber & I install new boxes of wire I prefer just to let tying system cycle normally so 1st hay with wire around it will be a bale that should be tied correctly & hopefully dense enough for bale to remain tied together.

The wire the needles bring up to tying system with the "U" is then held in the gripper then as hay is fed into chamber the hay pushes this wire back & around the forming bale then at set bale length needle brings wire from bottom of chamber to tying system. The straight end of "U" IE other end of wire around bale after knife cuts it.
HTH's,Jim

I'll ask once again to please call me on the phone as I can talk much better/easier than I can type. That is the reason I emailed you my phone #. PS: I'm not laughing at you just trying to help you understand how a sq baler utilizing wire operates.
 
Jim, My problem is, im 70. I was in a 105 Artillery battery in Nam in 68, and I cant hear on phones much anymore. Sorry.
 
The Bailer book I got says (Check crimp in each wire. Loosen or tighten top set screw above each knife, IF NECESSARY to adjust wire crimp)
(Repeat process in upper position on both knives. Use bottom set screws to adjust wire crimp)
Rotate the camshaft clockwise until both wires have been crimped and released.).
WELL
I tried it to check the crimp. It didn't crimp the wires, it didn't release the wires until it had cut them.
SO
In this situation, How do I adjust the set screws?
 
(quoted from post at 09:42:16 03/13/18) Jim, My problem is, im 70. I was in a 105 Artillery battery in Nam in 68, and I cant hear on phones much anymore. Sorry.

I understand not hearing very well as I'm 73. Thank You for your military service.

The wire is supposed to be gripped simultaneously as it's cut & not released until next bale is formed. My knowledge on adjusting those screws on the grippers isn't very much good because JD sq balers that I recieved my sq baler training on has springs not screws.
 
I should point out that the wire never bent at all. it just cut with the wire remaining straight.
 
If youll look at the pics of the wire cutter, youll notice that its mounted on a steel plate. I took part of the cutter system off and noticed 2 notches in the plate, and one side of each notch was grooved.
I don't know if the platre was put there to hold the cutter mech, OR it was notched cause they needed the extra room to get the wire through.
OR BOTH lol.
Im going to have it welded up, level and the same distance in the gap, and go from there. Id like to have it welded with an Adams hard Face rod, but I doubt if that will happen. Anyway its done, I imagine that the weld will last ME what ive got yet to do on 6 acres, once a year.
 

We sell tractor parts! We have the parts you need to repair your tractor - the right parts. Our low prices and years of research make us your best choice when you need parts. Shop Online Today.

Back
Top