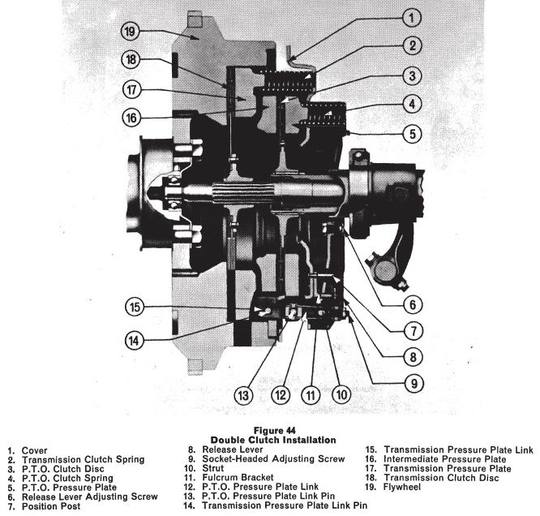
Trying to adjust a new clutch in the 3 cylinder diesel 3000 with dual clutch. Following the IT manual had no problem setting the "G" dimension for the PTO clutch. Setting the release fingers to the 2.110" dimension from the PTO hub face to the release finger adjusting bolts is not going well. I had to move the jam nuts from the back to the face of the fingers because I had no thread protruding from the back for them to thread on to. My concern is if I have enough thread engagement on the adjusting bolts. It is a new clutch assembly purchased from this site. Also the clutch disc that came out of the tractor had the long side of the splined hub towards the flywheel as is stamped on the face of the hub. The new disc is not stamped and the manual says to assemble with the long hub toward pressure plate except on the 4000 model,sort of confusing in that this same clutch assembly is listed for the 4000 as well as 3000. I am using a verneer caliper to measure the release finger dimension, anyone know a better way and how critical is this dimension? Any 1deas?
- Thread starter JWA
- Start date
Similar threads
We sell tractor parts! We have the parts you need to repair your tractor - the right parts. Our low prices and years of research make us your best choice when you need parts. Shop Online Today.
Copyright © 1997-2024 Yesterday's Tractor Co.
All Rights Reserved. Reproduction of any part of this website, including design and content, without written permission is strictly prohibited. Trade Marks and Trade Names contained and used in this Website are those of others, and are used in this Website in a descriptive sense to refer to the products of others. Use of this Web site constitutes acceptance of our User Agreement and Privacy Policy TRADEMARK DISCLAIMER: Tradenames and Trademarks referred to within Yesterday's Tractor Co. products and within the Yesterday's Tractor Co. websites are the property of their respective trademark holders. None of these trademark holders are affiliated with Yesterday's Tractor Co., our products, or our website nor are we sponsored by them. John Deere and its logos are the registered trademarks of the John Deere Corporation. Agco, Agco Allis, White, Massey Ferguson and their logos are the registered trademarks of AGCO Corporation. Case, Case-IH, Farmall, International Harvester, New Holland and their logos are registered trademarks of CNH Global N.V.
Yesterday's Tractors - Antique Tractor Headquarters
Website Accessibility Policy


