Ford 3000 double clutch installation problem

The clutch would not disengage on my 1966 Ford
3000 Tractor so I purchased a new dual clutch kit
1112-6061 on YT. I replaced the rear main seal,
pilot bearing, and throw-out bearing. After
installation, the clutch will not
release/disengage. The throw-out bearing seems to
travel the proper distance with little resistance
but abruptly stops when it seems to contact the
pressure plate fingers. I have adjusted the finger
bolts all the way out. I also tried the clutch
disc with the flange facing the flywheel and then
reversed it so it faces the pressure plate but had
the same result. The alignment tool will not sink
all the way in with the clutch flange facing the
pressure plate so I believe it should face the
flywheel.
When I tighten the 6 pressure plate bolts onto the
flywheel, the pressure plate fingers seem to
collapse all the way down so that they are almost
recessed. It seems to me that the fingers should
stick out. I read a few other posts where other
people had this issue but did not see a
resolution. Could I have the wrong clutch disc? Is
it possible that the pressure plate needs shims?
Any expert advice would be much appreciated.
 
Wasn't the disc marked "flywheel side"? If it doesn't, find a repair manual for that thing and look up the info rather than guessing. I *think* the hub faces the flywheel on that model, however it's been too many years since I worked on one to be certain of that, so don't run with my advice here.

Are you using the correct alignment tool? It should have 3 steps on it, one for the pilot bearing, and one each for the two discs.
 
By the book..

Button clutch longer hub must face the flywheel

Organic clutch longer hub must face the double clutch assy.

I have took quite a few doubles clutches off and re-installed them but only replace one worn unit... I could not see were it made a difference which way the disc was installed it would work either way..

I have done a zillion other clutch jobs this is my rule...

If theirs no interference with the clutch hub in relationship to flywheel crank are crank bolts the clutch disc can got either way...
 
Hmmmmmmmmmmm. Lets stop and think about this. The clutch wouldn't release... so you replaced the clutch and pressure plate... and it still won't release. Mabey the clutch/PP wasn't the problem?
Did you check the pinch bolt in the release lever where it's fixed to the cross shaft? Sometimes they break or twist off in the hole... so it moves the fork a bit but when the real strain comes on... it won't disengage the clutch. Otherwise I'd say you've got something installed wrong.

Rod
 
I also normally put the hub to the flywheel... my rule is that if it fits.. it goes in the pot.

Rod
 
Good point and I have considered that possibility especially now that I bolted up the old clutch/PP and it is doing the same thing.

A little background - after splitting the tractor, I saw that the clutch was stuck to the flywheel but since I already had it apart I decided to go ahead and replace it. Assuming something were out of alignment with the release lever or hub with the throw-out bearing, how would I check that? Note that the throw-out bearing seems to operate flawlessly by hand with the tractor split.
 
(quoted from post at 23:16:36 07/01/13) Wasn't the disc marked "flywheel side"? If it doesn't, find a repair manual for that thing and look up the info rather than guessing. I *think* the hub faces the flywheel on that model, however it's been too many years since I worked on one to be certain of that, so don't run with my advice here.

Are you using the correct alignment tool? It should have 3 steps on it, one for the pilot bearing, and one each for the two discs.

No, the clutch disc has no markings and looks a little different from the old one in terms of the hub. I am using the alignment tool that came with the clutch kit and the tractor slides back together just fine. I am becoming quite good at that part...
mvphoto18773.jpg


mvphoto18774.jpg


mvphoto18775.jpg


mvphoto18777.jpg


mvphoto18778.jpg

mvphoto18782.jpg
 

You can see from the flywheel where the old clutch was stuck to the pressure plate. It belonged to my grandfather and has been sitting for about the last ten years although the clutch wasn't working right when it was last used - it would grind going in gear. After splitting and pulling this thing together for the 4th time, I'm hoping to figure this out. Thanks in advance for all of the help.

mvphoto18783.jpg


mvphoto18784.jpg
 
It's just a matter of checking that bolt that retains the fork on the cross shaft... Take it out and check it.

Rod
 
Gotta be careful with that rule Rod. I've seen clutches that will go either way and appear to work fine. Problem is, if it's supposed to go with the hub towards the rear, and you install it backwards, you'll only be grabbing about half the length of the splines on the hub and shaft, and it will fail early.
 
(quoted from post at 03:29:18 07/02/13) It's just a matter of checking that bolt that retains the fork on the cross shaft... Take it out and check it.
Rod

Sorry if this is a dumb question but what am I looking for when I get the bolt out? I originally thought I needed to remove it to slide the hub off so I could replace the throw-out bearing but turned out it was just the spring. The bolt just slides back in and seems to only fit one way.
 
(quoted from post at 03:50:37 07/02/13) Has the flywheel been turn down,this happened on my 9700 and i had to buy a new one,best of luck jr

No, I haven't turned the flywheel although I saw one post where someone said they used flat washers on the 6 PP bolts to shim up farther away from the flywheel. I have assumed to this point that normal wear of the flywheel wouldn't cause this issue.
 
That's quite true.
This may be one of those discs too...
In lieu of better information it requires careful observation and consideration...

Rod
 
You just make sure the bolt is not broken or sloppy in the hole. It needs to fit snug. If the hole is half worn out or the fork loose on the shaft the linkage has to take up that slack. If you haven't cleaned that rust off the flywheel I suggest you go that. I sometimes do that with some emery sheets on a sanding pad if the flywheel is not too bad. Otherwise, take the flywheel off and get it machined or ground. Just take it to someone who knows what they're doing... and remember that as much as they remove from the clutch mating surface of the flywheel... they need to remove an equal amount from where the pressure plate mounts. You notice that this is also a machined surface...

Rod
 
(quoted from post at 05:36:14 07/02/13) You just make sure the bolt is not broken or sloppy in the hole. It needs to fit snug. If the hole is half worn out or the fork loose on the shaft the linkage has to take up that slack. If you haven't cleaned that rust off the flywheel I suggest you go that. I sometimes do that with some emery sheets on a sanding pad if the flywheel is not too bad. Otherwise, take the flywheel off and get it machined or ground. Just take it to someone who knows what they're doing... and remember that as much as they remove from the clutch mating surface of the flywheel... they need to remove an equal amount from where the pressure plate mounts. You notice that this is also a machined surface...
Rod

I checked the bolt through the shaft and it is tight and snug. I did knock the rust off of the flywheel with a drill and a wire wheel. I went downstairs and pulled it apart again and snapped a few more pictures in case those might help point to something.

One suggestion I got from someone I emailed with this issue was to back off of the PP bolts but that seems dangerous to me if the bolts were to vibrate out. However, when I loosen the PP bolts the fingers do come out to the height I would think they should be. I saw another post where someone used flat washers to shim the PP away from the flywheel to create space and lift the PP fingers. Does that sounds reasonable or would this be fixing the symptoms?

mvphoto18792.jpg


mvphoto18793.jpg


mvphoto18794.jpg


mvphoto18795.jpg


mvphoto18796.jpg


mvphoto18797.jpg


mvphoto18798.jpg


mvphoto18799.jpg


mvphoto18800.jpg


mvphoto18817.jpg


mvphoto18818.jpg
 
In the picture that includes the lady's bare foot...it would appear to me that you have some rather thick shims between the cover and flywheel? It's been many years since I worked on those pressure plates, however I am 99% certain that there should be NO shims in that location.

Of course, removing said shims is going to compound your problem. If the lever heights are not where they need to be, then it can only be internal wear of the various linkage parts of the 3 lever assemblies. If the pressure plate was "rebuilt" by el cheapo rebuild Co., it's possible that they only surfaced the plates and threw a new PTO disc in it.

If you grab any of the 3 levers, how much can you move it back and forth? I'd say much more than about 1/4" indicates excessive wear of the internal parts.

If you lived near me, I'd have you take the pressure plate with me to the local dealer and I would throw it on the jig for you to help solve the problem. I've rebuilt literally dozens of those pressure plates back in the day. With the factory jig, the process is easy, and pretty much guarantees that everything will be correct. The only other wild card in this is the depth of the flywheel pot. This would only be off if it were incorrectly machined at one time.
 
One other stupid question... Have you take the disc and made certain that it will fully slide up the input shaft spline? Make sure it's not binding... and if it is binding up... make sure it didn't bend the hub. That happens sometimes. Beyond that... I assume you haven't removed any shims that were under the pressure plate on the old clutch? Whatever was there needs to go back. Otherwise... I'm thinking much along the same line as Bern... that there is something wrong with the 'new' pressure plate. Either internal wear or simply adjusted incorrectly. It happens. Moreso when you get them from cheap, cheap sources. When I buy reman's they ONLY come from Hy-Capacity... and even then I'll most often use a genuine new CNH disc supplied by Luk.

Rod
 
(quoted from post at 14:51:12 07/02/13) In the picture that includes the lady's bare foot...it would appear to me that you have some rather thick shims between the cover and flywheel? It's been many years since I worked on those pressure plates, however I am 99% certain that there should be NO shims in that location.

Of course, removing said shims is going to compound your problem. If the lever heights are not where they need to be, then it can only be internal wear of the various linkage parts of the 3 lever assemblies. If the pressure plate was "rebuilt" by el cheapo rebuild Co., it's possible that they only surfaced the plates and threw a new PTO disc in it.

If you grab any of the 3 levers, how much can you move it back and forth? I'd say much more than about 1/4" indicates excessive wear of the internal parts.

If you lived near me, I'd have you take the pressure plate with me to the local dealer and I would throw it on the jig for you to help solve the problem. I've rebuilt literally dozens of those pressure plates back in the day. With the factory jig, the process is easy, and pretty much guarantees that everything will be correct. The only other wild card in this is the depth of the flywheel pot. This would only be off if it were incorrectly machined at one time.

There are no shims. Those are part of the internal plate that meshes against the TPO clutch disc I assume. Both the old and new PP had them.

The three fingers feel sloppy to me but these are new parts so it does not make sense. I can pull up on them but can't push them down. They also look like they would bottom out quickly when pushed down.

I am just outside of Atlanta and my local New Holland dealer says it could be several things and they would need the tractor in their shop to diagnose it.
 
Upon further review, you're right, what I thought was a really thick shim is in reality the intermediate plate that is sandwiched between the flywheel and pressure plate cover. Kinda hard to tell sometime with just pictures.

You say that the levers are new - how do you know that? They could have simply been sandblasted and cleaned, egged out holes and all.

You say you can pull the fingers towards you. How much? I'd say anything over 1/4" is excessive, and indicates too much wear.

Your local dealer should not need the entire tractor. If they have the proper jig, they can check just the pressure plate without you having to drag the entire machine in.

If they can't help you, let me know. If you have the time, and would like to ship the clutch to the west coast, I'd be more than happy to take a look. I can take it to my local dealer where I used to work and check it there on a jig.
 
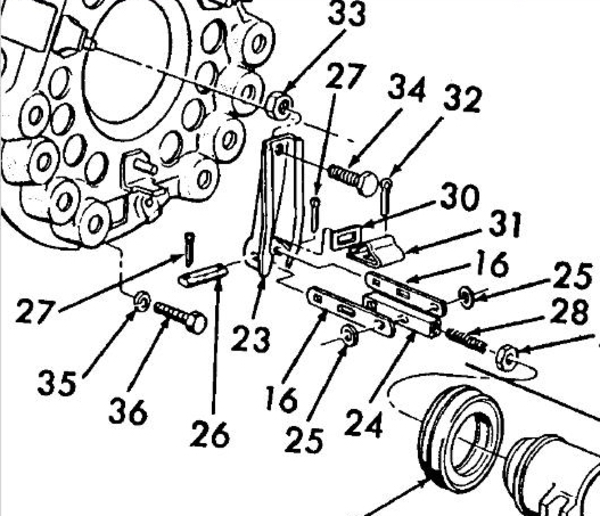
Remove cotter pin #27 and pull out pin #26. Take a close look at the #26 pin for wear. The pin is somewhat oval shape when new, but you should be able to tell by looking at the overall length, as it should be smooth all the way across. The sectional area on the very end of the pin, outside the cotter pin hole, will tell you what a new one should look like.

Also check the corresponding hole in lever #23. These don't wear out as often as the pins do.

In my experience, the major wear items are pins #26, struts # 16, and link #24.

Again, just because the plate is/was "rebuilt" does not mean any of these normal wear items were replaced.
a120664.jpg
 
I don't want to lead you away from Bern so this is just a thought..

I suppose the old clutch assy would work if cleaned up,,, Bolt up the old and measure then bolt up the new one and check the mesurments...

It would be interesting to know if the old one would release...

BTW I read you said the assy was new :?:
 
(quoted from post at 21:36:15 07/02/13) I don't want to lead you away from Bern so this is just a thought..

I suppose the old clutch assy would work if cleaned up,,, Bolt up the old and measure then bolt up the new one and check the mesurments...

It would be interesting to know if the old one would release...

BTW I read you said the assy was new :?:

According to YT (URL link below), the parts are supposed to be new. However, the pressure plate does seem a little greasy. I will check out those pins that Bern pointed out when I get home from work.

Dual Clutch Kit with 15 spline Spring disc - part no. 1112-6061

By the way, I did try bolting in the old clutch and PP yesterday with the same result but it was not working before I split it. I didn't take any measurements but I can do that if that would be useful. I'm wondering if a worn flywheel would cause this issue. I do know this old clutch worked at one time before it stopped releasing.
 
I don't take away from that add that ALL the parts are new.

I just had a thought: If I were you, I'd take the flywheel off and lay it on a bench. Then install the disc and pressure plate assembly like you otherwise would. The put the whole thing into a press. Use the throwout bearing assy against the fingers, and then press down on it with a very moderate amount of force. Ideally, a hand powered press (I forget what they're called) would be best so you have a good feel.

I believe that the holes in the flywheel would allow you to see whether or not the discs are releasing properly. You could also watch the linkage action this way. It would essentially take the place of the jig I was talking about. I've never tried this, but I would try this if I were you.

As for the flywheel, there is a specific dimension called out for the distance between the friction and mounting surface, but I think it's a pretty obscure spec that may be hard to find. I really doubt that's your problem though.
 
If this is an A&I pressure plate... then all legitimate bets are OFF.
I'd second Bern's idea of setting it up in a press so you can watch the release mechanism work...

Rod
 
I would have had it in a press along time ago also... I was thinking that but did not know if you could see the disc,,, the disc needs .050 clearance when depressed to fully release..

Most every clutch issue I have ever ran into I have found the release bearing moves up to 1" are LESS most LESS... It takes very little to release the clutch... Think of it this way the release bearing is the slave it only does what its told to do,, the pedal is the master the linkage is the communication link between the master and the slave... Confirm the communication link can command the orders of the master to the slave...

Nutter question,,, if the original disc was stuck to the flywheel how hard was it to pry it loose...

Another thought if the flywheel was worn that bad releasing would not be a issue...

I have done one 3000 and used a tisco set it works great,,, wish i had took the time to measure it up are make a tool to check others again it...
 
(quoted from post at 00:46:17 07/03/13) I don't take away from that add that ALL the parts are new.

I just had a thought: If I were you, I'd take the flywheel off and lay it on a bench. Then install the disc and pressure plate assembly like you otherwise would. The put the whole thing into a press. Use the throwout bearing assy against the fingers, and then press down on it with a very moderate amount of force. Ideally, a hand powered press (I forget what they're called) would be best so you have a good feel.

I believe that the holes in the flywheel would allow you to see whether or not the discs are releasing properly. You could also watch the linkage action this way. It would essentially take the place of the jig I was talking about. I've never tried this, but I would try this if I were you.

As for the flywheel, there is a specific dimension called out for the distance between the friction and mounting surface, but I think it's a pretty obscure spec that may be hard to find. I really doubt that's your problem though.

Unfortunately, I don't have access to a press. I did pull that cotter pin and slid out the #26 pin and it does not look worn at all. I will attach a couple of pictures.

I just found an old post from 2001 where a guy had the exact same issue and used flat washers as spacers. He says it solved the problem after trying everything else.

http://search.yesterdaystractors.com/cgi-bin/viewit.cgi?bd=ford&th=38056

So maybe I have a clutch disk that is too thick, an el cheapo clutch kit, or some combination and the old PP and clutch are just slap worn out? Come to think of it, the clutch disc was not welded onto the PP but I assumed it was stuck due to the rust marks / impression on the flywheel.

The only thing I found in reference to the clutch kit manufacturer was a label on the box that says "Quality Tractor Parts". I guess I could call YT and ask them if it is a A&I.

My question now is should I try the washers or is that even advisable, a hack as we software engineers call it? Or should I ship this clutch back to YT and buy an OEM unit from the local New Holland dealer for about twice the price?

More pictures below.

Old PP pivot finger adjustment:
mvphoto18839.jpg


New PP pivot finger adjustment:
mvphoto18840.jpg


Clutch kit box label:
mvphoto18841.jpg


PP hardware item #26
mvphoto18842.jpg

mvphoto18843.jpg


Clutch disc comparison - new disc on the right
mvphoto18844.jpg

Clutch disc comparison - new disc on the right
mvphoto18845.jpg


Old PP uncompressed height:
mvphoto18846.jpg


New PP uncompressed height:
mvphoto18847.jpg
 
Derek,

If you don't have a real press, how about a drill press? You should be able to generate enough force with the lever handle to depress the levers down.

I guess I should have been more thorough in explaining how to measure the lever free play. First, it was to be measured where the throwout bearing contacts the adjustment screws, not where you pictured the dial indicators. Any wear in the pivot points will be magnified by the long lever, which is why I said about 1/4" or so. Second, it needs to be done with the pressure plate installed and fully bolted up to the flywheel.

I think if I were you, I'd call the local dealer back and ask them if they have the jig for that clutch, and more importantly, if they have someone there who knows how to use it. If you can score on both counts there, you might be able to come up with some answers by just bringing the pressure plate over to their shop.

As for the washer idea in that older post, I am not sure to be honest with you. I guess you don't have a lot to lose at this point.
 

I have found that taking measurements off the mating surfaces can help figure out a clutch throw problem. You measure how far the flywheel surface is from the mating surface on the back of the motor, and the distance of the release bearing from the bell housing surface. This kind of enables you to "see through" the bell housing.
 
(quoted from post at 23:26:43 07/02/13)

So maybe I have a clutch disk that is too thick, an el cheapo clutch kit, or some combination and the old PP and clutch are just slap worn out? Come to think of it, the clutch disc was not welded onto the PP but I assumed it was stuck due to the rust marks / impression on the flywheel.

More pictures below.

Clutch disc comparison - new disc on the right
mvphoto18844.jpg

Clutch disc comparison - new disc on the right
mvphoto18845.jpg


Old PP uncompressed height:
mvphoto18846.jpg


New PP uncompressed height:
mvphoto18847.jpg

The clutch discs do not look the same to me. In your pictures of the old and new, they look to be different heights. The pressure plates look the same.

Just wondering if you have the wrong clutch discs? Would be curious to bolt up the new pp with the old discs and see what happens.

I have never done one of these dual clutches, so take my thoughts with a grain of salt. However I have seen where "aftermarket" parts are not always a perfect match to to what you need. In other words, wondering if this clutch kit was generic in nature and does not contain the proper discs, even though the label says it does.

Chris
 
Derek
It has been a while since I split my 3000, but here are some things you should check.
Do you get full stoke on the clutch pedal?
The long end of that cross shaft bolt, does it hit before the release bearing is fully forward?
To me that original clutch does not appear so far gone to cause failure, which makes me wonder what could be wrong in the linkage.
Please note; I do not have the knowledge of some of the great posters you have helping, just trying to get you to carefully look to see what you might have overlooked!
All the best
Brian
 
(quoted from post at 15:38:56 07/03/13) Derek
It has been a while since I split my 3000, but here are some things you should check.
Do you get full stoke on the clutch pedal?
The long end of that cross shaft bolt, does it hit before the release bearing is fully forward?
To me that original clutch does not appear so far gone to cause failure, which makes me wonder what could be wrong in the linkage.
Please note; I do not have the knowledge of some of the great posters you have helping, just trying to get you to carefully look to see what you might have overlooked!
All the best
Brian

Yes, I do get a full stroke with the hub/throw-out bearing with the tractor split. I can operate it with a pull bar and it works perfectly, no binding, and the bolt does not bind against anything. With the clutch installed and pulled back together, I get about a half stroke before the pull bar abruptly stops and I can't budge it. I assume it is hitting the PP fingers at that point and something is just not right with the PP. I think I will try some spacers next and finally I will remove the steering column so I can see what is happening as a last resort. I will probably tackle that this weekend.

Thanks for the feedback.
 
(quoted from post at 13:40:55 07/03/13)

The clutch discs do not look the same to me. In your pictures of the old and new, they look to be different heights. The pressure plates look the same.

Just wondering if you have the wrong clutch discs? Would be curious to bolt up the new pp with the old discs and see what happens.

I have never done one of these dual clutches, so take my thoughts with a grain of salt. However I have seen where "aftermarket" parts are not always a perfect match to to what you need. In other words, wondering if this clutch kit was generic in nature and does not contain the proper discs, even though the label says it does.

Chris

The clutch discs are slightly different in terms of thickness when it comes to the hub. However, the new clutch clears the flywheel bolts when the hub faces the flywheel and it clears the PP when facing the transmission (I have tried both ways). I have also tried the old clutch disc with the new PP with the same result as well as the old clutch and PP also with the same result. I don't know how the fork/hub/cross-shaft could be binding since it works flawlessly with the tractor split. At this point, anything is suspect. I have no idea why the old clutch stopped releasing or why the new clutch won't release but the short stroke and binding of the inner linkage is a new issue. I simply thought replacing the clutch would solve the issue and it is all mechanical so how hard could it be? Little did I know.
 
Derek I like the way you think... Could you post a few pix of the external clutch linkage ...

Have you checked the crank for excessive end play....

Can you rig something up to depress the PP while its split to see if you can make it release the clutch disc...

The other thing I am thinking is can you block the release bearing and work the clutch pedal...

If someone comes by tomorrow I will have then push the clutch pedal (master) on mine and tell you the distance the leaver swings on the clutch shaft (external/slave)
 
I've been following this thread, I just did a clutch on my 3000. Used both the IT manual and factory manual. I second the advice to measure the heights of the release bearing and the 3 finger bolts so you can get set in the ballpark. You should have about 1/4" to 3/8" clearance before bolting halves together. This measurement is done with clutch linkage and spring hooked up. Have you verified that you have free play in the pedal? With no free play your clutch might be half way depressed when you draw the two halves together. You could put the tractor in gear and turn the engine some to verify this. When you put a new clutch in you have to back off the linkage a lot. I have a photo tutorial that I made, if you PM me I can send it to you. Click on email link at bottom of my post. One more thing, your photo with the dial indicator is not the correct place to set the finger bolts. In your photo that setting is done by setting a .054" gap under the allen screw, using a drill bit or piece of wire. The IT manual says the finger bolts are set to 2.110" above the PTO disc hub (with pressure plate installed on tractor and finger slack pressed in)
 
(quoted from post at 02:21:30 07/04/13)
Derek, is that your girlfriend or fiance? I know that it is not your wife! LOL.

Yeah, she's pretty awesome isn't she. She likes to turn wrenches and she baits her own hook too. :eek:
 
(quoted from post at 02:41:35 07/04/13) Derek I like the way you think... Could you post a few pix of the external clutch linkage ...

Have you checked the crank for excessive end play....

Can you rig something up to depress the PP while its split to see if you can make it release the clutch disc...

The other thing I am thinking is can you block the release bearing and work the clutch pedal...

If someone comes by tomorrow I will have then push the clutch pedal (master) on mine and tell you the distance the leaver swings on the clutch shaft (external/slave)

The crank seems fine.

When I block the release bearing and work the pedal it creates resistance but still seems to operate normally.

More pictures below.

mvphoto18882.jpg


mvphoto18883.jpg


Clutch pedal in/pressed:
mvphoto18884.jpg


mvphoto18885.jpg


Clutch pedal out:
mvphoto18886.jpg


Cluctch pedal in/pressed:
mvphoto18887.jpg


Distance from transmission to top of throw-out bearing with clutch pedal out:
mvphoto18888.jpg


Distance from transmission to top of throw-out bearing with clutch pedal in/pressed:
mvphoto18889.jpg


Distance from top of throw-out bearing to crank with clutch pedal out:
mvphoto18890.jpg


Distance from top of throw-out bearing to crank with clutch pedal in/pressed:
mvphoto18891.jpg


Clutch pedal travel (about 11.5 inches):
mvphoto18892.jpg
 
(quoted from post at 11:16:58 07/04/13) I've been following this thread, I just did a clutch on my 3000. Used both the IT manual and factory manual. I second the advice to measure the heights of the release bearing and the 3 finger bolts so you can get set in the ballpark. You should have about 1/4" to 3/8" clearance before bolting halves together. This measurement is done with clutch linkage and spring hooked up. Have you verified that you have free play in the pedal? With no free play your clutch might be half way depressed when you draw the two halves together. You could put the tractor in gear and turn the engine some to verify this. When you put a new clutch in you have to back off the linkage a lot. I have a photo tutorial that I made, if you PM me I can send it to you. Click on email link at bottom of my post. One more thing, your photo with the dial indicator is not the correct place to set the finger bolts. In your photo that setting is done by setting a .054" gap under the allen screw, using a drill bit or piece of wire. The IT manual says the finger bolts are set to 2.110" above the PTO disc hub (with pressure plate installed on tractor and finger slack pressed in)

PM sent, thanks. I have taken some measurements and posted them. I have also posted a video on youtube of me working the clutch linkage with the tractor split to see if anything seems abnormal to anyone.

Ford 3000 clutch linkage operation video
 
I was hoping when you blocked/locked the release bearing you would have a solid pedal (as in you can not move it) Confirm that.

On the external leaver your clutch rod is hooked to..

Sometimes it can slip are have a crack in it anywhere, it will have the same feel to it as if it were OK but not turn the cross shaft that goes thru the housing... Next the leaver is somehow mated to the cross shaft it can slip their... I looked at my 69 and its welded your looks like its braided... I would block/lock the release bearing and confirm their no slippage are crack in the leave/cross-shaft. It needs to be checked under load not under a no load situation as you posted...

For the record clutch pedal height is adjusted more so for the comfort of the driver it dose not have much to do with adjusting the clearance of the release bearing unless you shorten the link to much :shock:

Always check that the leaver at the cross shaft has free-play after you adjust the pedal to your like'n...

If all this checks out something is wrong with your PP are clutch combination... I would not be satisfied till i sourced another from a different manufacturer...
 
Problem solved and we finally got the old Ford back together this weekend. For anyone interested, I used two flat washers on each bolt on the PP to shim it away from the flywheel (between the inner PTO plate and outer PP surface) and the clutch is releasing perfectly now. I really appreciate everyone that offered expertise and advice. Thanks!

Derek
 
(quoted from post at 09:51:50 07/08/13) Problem solved and we finally got the old Ford back together this weekend. For anyone interested, I used two flat washers on each bolt on the PP to shim it away from the flywheel (between the inner PTO plate and outer PP surface) and the clutch is releasing perfectly now. I really appreciate everyone that offered expertise and advice. Thanks!

Derek

If its working for ya that all that counts..

In all my clutch'n I never once went there (probably should have on a few chevy's that were nightmares)... I would have to be hard pressed to go there like in nuttin else worked even a OEM assy...

It was a pleasure and you were great with your input... I would have tried another clutch assy if it broke me....
 
(quoted from post at 22:09:27 07/08/13)
If its working for ya that all that counts..

In all my clutch'n I never once went there (probably should have on a few chevy's that were nightmares)... I would have to be hard pressed to go there like in nuttin else worked even a OEM assy...

It was a pleasure and you were great with your input... I would have tried another clutch assy if it broke me....

Agreed. That is why I decided to go back with the OEM (Borg & Beck) clutch which was actually still in pretty good condition as someone pointed out a few posts back. I will be shipping this no-name brand clutch back to YT minus bearings and alignment tool this week. If clutch troubles bites again then I will be paying top dollar for a new unit from my local New Holland dealer. :D

Thanks again for all of your great input. I probably would have put it out to the pasture without the encouragement and expertise.
 
(quoted from post at 03:16:58 07/04/13) I have a photo tutorial that I made, if you PM me I can send it to you. Click on email link at bottom of my post. One more thing, your photo with the dial indicator is not the correct place to set the finger bolts. In your photo that setting is done by setting a .054" gap under the allen screw, using a drill bit or piece of wire. The IT manual says the finger bolts are set to 2.110" above the PTO disc hub (with pressure plate installed on tractor and finger slack pressed in)

Laneman, I have a similar need and would like to see your photo go-by if you don't mind. Tried to PM you but system told me "PM is disabled, reply instead." If you'd rather, PM me and I'll get you my email address.

Much appreciated.
 

We sell tractor parts! We have the parts you need to repair your tractor - the right parts. Our low prices and years of research make us your best choice when you need parts. Shop Online Today.

Back
Top