Farmall M No spark Trouble shooting guide

Didn't someone have a trouble shooting diagram for these old farmalls, I cant seem to find it in the archives.

Heres the deal. Bought a M last fall, motor was stuck, deal was too good I couldn't pass it up. When I got it home I put some atf/acetone mix in and and drained the oil and water(rain) out, it broke free the next day.

After sitting all winter I started working on it yesterday, new oil and filter, new fuel line, cleaned carb, took the valve cover off, all valves are working.

It will turn over but no spark at the points and doesn't seem to be wetting the plugs even with full choke and gas running out of the carb.

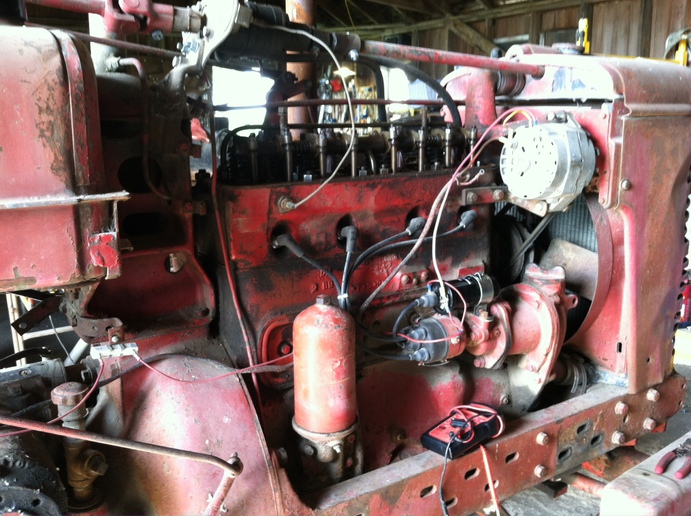
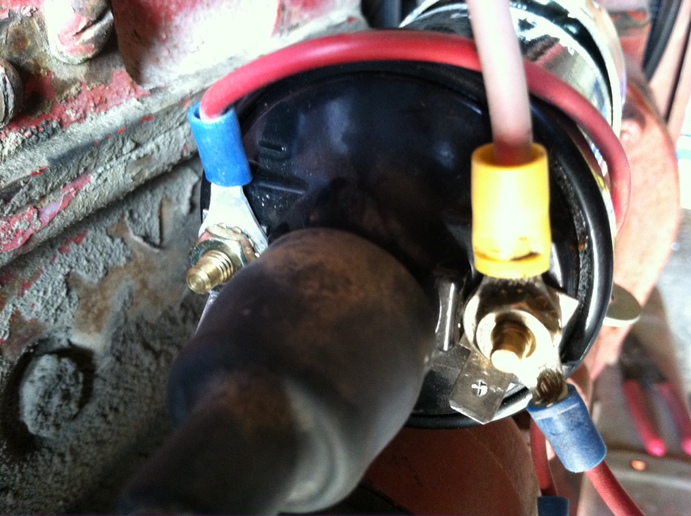
I have a wire coming from ing. switch to resistor with (switch in the on pos.) 11.4 volts before and 4.0v after the resistor and very little voltage on the neg. side. Battery shows 12.3 volts and turns the engine fast enough. Look at the pictures and see if its wired up correct, the battery is 12v neg ground. Points are old gap is .02, wife is bringing home a new set of points.

Thanks for any ideas.
Nate
a119176.jpg

a119177.jpg
 
Im in a hurry, hard to tell from pic if its all correct or not. If its a 12 volt Neg ground tractor using a 6 volt coil and external ballast, power comes from ign switch,,,,,,,to and through ballast to + side of coil,,,,,,,,out - side of coil to distributor. With ign on and points closed not running Id expect 12 volts out of switch,,,,,,,,12 to high input side of ballast,,,,,,,,,around 5 to 7 on output of ballast and coils + input,,,,,,,,near zero on coils output to distributor since the points are closed. The ballast needs to be the correct ohms so it doesnt drop too much voltage (around 5 or 6 volts) and weaken the spark

Below is my troubleshooting procedure, gotta run I will check back later

John T
John Ts Ignition Troubleshooting
 
I don't see a ballast. That should be a 6 volt battery, positive ground system.
If you just cleaned the carb and fuel runs out of it you didn't get the float and needle valve back in there correctly.
 
Just a simple thought - make sure the rotor turns. If someone has put too long a bolt in the condenser or points in the past it could have broken the pin inside. Feel free to ask me why I would check that.
 
9/10 volt drop from battery to resistor could indicate a corroded ignition switch or bad wiring.

The coil appears to be new. Are there markings on it such as "12 volt external resistor required" indicating that it needs the resistor or could it be a true 12 volt coil that needs no resistor? I've also seen 12 volt conversion kits with a resistor with too much resistance. It should be about 1 1/2 ohms

Output of coil to distributor should read near battery voltage with points open, near zero with points closed.

It also appears to me that the wires on top edge of alternator may be reversed. #2 on right should loop down to big output stud. #1 on left should connect to the ignition switch with a diode in the line to prevent engine continuing to run with switch turned off?

One check would be to disconnect wire from + side of coil and run temporary wire direct from battery + and see if you get spark. This will bypass switch, resistor and that section of wiring.
 
Update for John T

I have new points and condensor installed. No spark at the points. No spark jumping from coil wire that goes to distributor cap when held 1/8in from block.

I have 6v on the meter when I go across the - to + coil.

Test light on the neg wire from the coil (unhooked from dist.) lights bright when the key is on and when cranking it just dims, it doesn't flash on and off.

Test light on the neg wire from the coil (hooked to dist.) doesn't light up at all when cranked.

GordoSD the ballast is under the gas tank.

Thanks
Nate
 
If alllllllllll is well and you place a test lamp on the coils + input and turn IGN ON it should always be lit and a voltmeter should read around 6 volts if points are good and closed cuz the ballast drops the other 6 volts......or 6 volts across coil itself + to -

Now place test lamp over on the coils - side (other lead to grolund) with it still wired to distributor and turn on ign and slowlyyyyyyyy turn the engine over.

LIGHT SHOULD FLASH ON WHEN POINTS OPEN

LIGHT SHOULD GO OFF WHEN POINTS ARE CLOSED

IF ITS SLOWLY CRANKED LIGHT MUST FLASH ON (points open) AND OFF (points closed)


If the wire to distributor isnt connected a test lamp on coils - output should always lite as 12 volts is present

If you work through my troubleshooting procedure the cause can be determined.... Points must close and open to first conduct coil current to ground then open to stop current flow so coil fires.

If the light never goes out (should when points close) the points are bad or not closing or a wires bad/open......If the light on coils - never comes on,,,,,Points may not be opening or condensor is shorted out or theres a short or the coils LV primary is bad/open

John T
 
(quoted from post at 22:19:42 06/19/13) You need more than 4v into the coil how many volts when cranking

If the wire from the coil to the alternator is going to the #1 terminal on the alternator he is only getting 4 volts into the coil because the exciter wire to the alternator is also connected to the coil. The resistance of the coil in the alternator rotor is added to the resistance of the coil resulting in about twice the resistance of the ballast resistor. The end result is the ballast resistor is dropping the the voltage 8 volts instead of 6. The battery at 12.3 volts is half discharged already and with the additional voltage drop while cranking the voltage is probably only about 3 volts.

On the other hand if he were to pull it to start it, it should start and run since 4 volts should be enough to energize the alternator if it spins fast enough. Once the alternator starts to charge it will send about 14 volts back down the wire to the coil so it should have plenty of spark then. Unfortunately this power source will also keep the engine from stopping when the switch is turned off.

On the other hand if the wire is connected to the #2 terminal on the alternator expect to see about 18 to 20 volts coming out of the alternator.

The solution is to remove the wire that comes from the alternator from the coil and connect it to the ignition switch side of the ballast resister. He will also need to add another resistor or a diode in this wire to drop the voltage enough so the engine may be shut off.
 
Here's a link to a John Deere book on ignition systems. It's OK, thought, it's on an IH collectors site!

http://www.cleancomputes.com/Cub/Blue%20Ribbon%20Service%20Manuals/FOS-20%20Chapter%206-Ignition%20Circuits/index.html
FOS 20
 
John T and others

I am an electrical idiot but willing to learn. I set my meter to 200 ohms and tested the ballast resistor, the meter reads 3.0. Voltage ahead of the ballast is 12.8, after ballast is 4.0. The voltage readings vary everytime I check. I bypassed the ballast and am only getting 10 volts to the + terminal on the coil????

The alternator is wired correctly I think, #2 wire goes to + terminal on the coil and when removed it doesnt effect any readings.

The coil is 12v w/o resistor so, the way I understand it, it needs to have a resistor ahead of it.

I am only getting 4 volts to the coil today and had 6v last night.

The points are opening and closing as they should. Test light shows power to the coil + terminal. No power to the - terminal or the high power wire to the dist. cap.

Thanks for putting up with my ignorance.
Nate
 
(quoted from post at 12:17:59 06/20/13) John T and others

I am an electrical idiot but willing to learn. I set my meter to 200 ohms and tested the ballast resistor, the meter reads 3.0. Voltage ahead of the ballast is 12.8, after ballast is 4.0. The voltage readings vary everytime I check. I bypassed the ballast and am only getting 10 volts to the + terminal on the coil????

The alternator is wired correctly I think, #2 wire goes to + terminal on the coil and when removed it doesnt effect any readings.

The coil is 12v w/o resistor so, the way I understand it, it needs to have a resistor ahead of it.

I am only getting 4 volts to the coil today and had 6v last night.

The points are opening and closing as they should. Test light shows power to the coil + terminal. No power to the - terminal or the high power wire to the dist. cap.

Thanks for putting up with my ignorance.
Nate

The wire from the coil to the alternator will need to be switched at the alternator. If that wire is on the #2 terminal then the #1 terminal is connected to the battery post and will be live all the time. That will keep the alternator energized all the time and will drain the battery when the engine is not running. Terminal #2 is the voltage sense wire. The regulator monitors the voltage on this terminal and regulates the alternator voltage to maintain the set voltage on this terminal. Power to this terminal is coming from the ignition switch through the resistor and then to the coil. The readings you are getting on that side of the resistor are 4-6 volts. The alternator will boost the output voltage until it sees 14.2 - 14.8 volts on terminal #2. That is why I said that the alternator was going to be putting out at least 18 volts and probably quite a bit more. For now just remove the wire between the coil and the alternator and unplug the other small wire that is currently connected to the #1 terminal. Just leave them off until we get the other problems sorted out.

You said you had a reading of 3 ohms on the resistor. That may be correct, if it is it is probably a bit high. I would expect to see it in the range of 1.2 to 1.8 ohms. Short the leads of you test meter together after you switch it to the 200 ohms scale and make sure that it reads 0. If it is more than 0 then subtract that value from the reading of the resistor. Then remove one wire from the coil and take a resistance reading of the coil. The resistance of the coil should be close to the resistance of the ballast resistor. If you have about 3 ohms resistance across the primary leads of the coil you have a 12 volt coil for use without an external resistor. If the resistance of the coil is somewhere around 1.5 to 2 ohms you have a 6 volt coils and will need the external resistor. Electricity will see the coil is a resistor just like the ballast resistor. Since you want to reduce the voltage by 1/2 you want each resistor to use half of the voltage.

You can also check the points with your meter. With the points closed you should see zero resistance from the wire on the coil side of the distributor to chassis ground. When the points open you should see infinite or a #1 on your meter.
 
Hang in there...willing to learn is the important part. Learning is often impatient and frustrating.

"The coil is 12v w/o resistor so, the way I understand it, it needs to have a resistor ahead of it."

What exactly does it say on the coil? The terminology "12 volt w/o resistor" sounds like it could be saying "12 volt no resistor required"

A coil is actually a transformer with one side of the primary and one side of the secondary tied together. A direct 12 volt coil does not have a resistor inside of it. The difference between a 6 volt and a direct 12 volt coil is in the number and ratio of turns of wire.

Also check resistance to ground from the -- (negative) post on the coil to distributor with the points open. If this shows a low resistance check for shorted feed through on side of distributor, short in points connection or a shorted concenser. Also check resistance from + to -- posts on the coil. Should be either about 1.5 ohms (6 volt) or about 3 ohms (12 volt). Either + or -- to the center post of coil should be several thousand ohms.

Owen is "right on" about the alternator. Disconnect alternator as he instructs and get it running before you worry about the charging system. Keep battery charged with external charger.
 
We had the same low-voltage at the coil problem on Dad's W400 when we converted it to 12V back in the early spring.

Went to a true 12V coil, got rid of the resistor. Fired right up.
 

We sell tractor parts! We have the parts you need to repair your tractor - the right parts. Our low prices and years of research make us your best choice when you need parts. Shop Online Today.

Back
Top