
Rick, thanks again for the feedback. I was looking at the wiring on the gen. and it is dirrerent than the picture you sent. In the picture the 2nd wire on top to the right jumps to the terminal on the back of gen. On mine 2 wires coming out, one goes to + terminal on the coil and the 2nd wire goes to ign switch as far as I can tell. I was trying to follow the wires to the inst panel, but didn't have much luck. The wires under the panel are welded togather from the short and couldn't follow them thru to the gages. I was just curious as to my wires on the alt. doesn,t run the same way. Didn't get much time on it today. I took the hood off so that I could get to the underside of inst panel. I did find a used tractor parts place that makes up wiring harness for old tractors in Fredericktown MO. They were asking $135, thats a lot cheaper than the $450 I was quoted earlier, but I can build it myself a lot cheaper. Larry
You are using an out of date browser. It may not display this or other websites correctly.
You should upgrade or use an alternative browser.
You should upgrade or use an alternative browser.
- Thread starter ldb
- Start date
OK for what you are doing eliminate the ign wire from the generator/VR. Run a separate wire from the ignition switch to the coil. That takes care of the ignition. Then the big wire to the amp meter to the battery terminal on the starter. Then the little wire to the ignition switch.....not to the terminal that connects the ign wire. After that you can follow the wiring diagram for the rest, just ignore the charging and ignition system on the diagram.
Even if you replace all the wiring with different color wires, solder and shrink tube the connections it should cost under 50 bucks to rewire that tractor. If you do it yourself print out the wiring diagram and mark it with the color wires you use for future reference.
Rick
Even if you replace all the wiring with different color wires, solder and shrink tube the connections it should cost under 50 bucks to rewire that tractor. If you do it yourself print out the wiring diagram and mark it with the color wires you use for future reference.
Rick
the tractor vet
Well-known Member
I have Farmall 460 to wire here in a couple days and we will se how long this takes . There really is not that much to them , Three wires out to the engine two for the gen. and one for the coil and if it came with a horn then a forth wire . Then from the voltage reg. ya have two wires coming up from there , one wire to the amp. meter and one to the lightswitch . Pull power from the amp meter to the Key switch . Your not wiring a 747 here . Ya want to do it in the correct colors then give me a couple days and i will dig out my computer disk and bring them up as i have them on a computer disk.
(quoted from post at 21:41:51 01/14/13) I have Farmall 460 to wire here in a couple days and we will se how long this takes . There really is not that much to them , Three wires out to the engine two for the gen. and one for the coil and if it came with a horn then a forth wire . Then from the voltage reg. ya have two wires coming up from there , one wire to the amp. meter and one to the lightswitch . Pull power from the amp meter to the Key switch . Your not wiring a 747 here . Ya want to do it in the correct colors then give me a couple days and i will dig out my computer disk and bring them up as i have them on a computer disk.
LOL how true. When I did my BIL's 560D I had no diagram and it was well before the day of the puter. The harness had fried and he had been starting it with a screwdriver across the starter terminals for[b:f160299801] [i:f160299801][u:f160299801]2 years[/u:f160299801][/i:f160299801][/b:f160299801]. Lucky for me that the wires had not burned apart and with the melted plastic they were just stuck together. I seperated them and replaced them one by one. Then wrapped the wires together with tape. looked pretty good and my BIL says "that was easy, I could have done that"!!!!
I did do a 12 volt comversion to a Ford 8N this past spring along with an IE conversion, engine overhaul and rewire. I added 2 rear work lights, flashing lights and a power outlet to the rear to power an electric sprayer.
Rick
farmallboy15
Member
When I did a 560 a few days ago it was a major pain... I also used shrink tube on all the connectors.. There is more than you think. Took about 5 hours.
(quoted from post at 06:39:41 01/15/13) When I did a 560 a few days ago it was a major pain... I also used shrink tube on all the connectors.. There is more than you think. Took about 5 hours.
When I did my BIL's he didn't have shrink tubing. All it got was crimp on connecters. Didn't take long at all and I wasn't working fast. Plus wiring to me is pretty simple stuff.
When I did my 8N it was a 12 volt conversion, added rear work lights and flashing lights on the fenders, solder and shrink tubing. That took about 4 hours or so and again I wasn't working like I was on the clock for a customer. Don't think it took me over 3 hours on an M I did for my son in law last year along with a 12 volt conversion.
Rick
gene bender
Well-known Member
I got some wire covering that expands when you push it then after all wires ar in place you pull and it will shrink down and sure looks factory. I got 50ft with shipping 30some bucks and along with shring tubing looks very good when done its iberglass stuff so it wont get stiff. Takes paint well when done. Have made several harnesses for the As and Bs and still have some left also wired a SC with alt converted to 12v
the tractor vet
Well-known Member
Not really , this is not my first rodeo on building wiring harnesses . I have done many , just how well do you want one one the works and looks ok or do you want a factory one as i can do both . I use extra heavy duty ends not the cheap stuff ya get a the car parts stores , i have the compound crimpers to do the crimpimg and they get the heat shrink . I have the Delco 56 plug ins and the plastic male female connectors . I build the harness off the tractor on a lay out board and i use a 2 x8 foot of 3/4 plywood and finish nails as terminal posts . Use a piece of 1/2 conduit for the rolls of wire and place the color correct and ga. size on it . Blue wire in a 10 Ga. (yea i know the book calls for 12Ga. ) for the hot lead off the gen to the reg. a 14 Ga. in yellow to the field from the gen to the reg. and so on . Now i will admit that if the certain wire color originally had a color tracer added that i do not have as i am to cheap to lay out that much extra to get a special order in the amount they will do this . But i do have ever color of wire that you can buy in 16 gauge thru 10 ga. and for alt. equiped i have the blue in 8 Ga. along with red black and white Oh and orange.
the tractor vet
Well-known Member
Well from what My friend told me that for a Farmall it was 200 thru Case I H and IF it was a international it was 8 something. So he opted to have me make one . . We will see how long it takes and how much it cost in wire and supplys .
the tractor vet
Well-known Member
Yep I get all my wiring supplys from Terminal Supply .They have the heavy duty terminals along with the Delco 56 male female ends and they HAVE THE plastic plugs for the 56 Delco.
Janicholson
Well-known Member
The following is (I think) what you need.
Using a Delco 10SI alternator. To wire a Delco 10SI First remove the generator and both wires going to it from the regulator. Looking at the regulator there will be either one or two wires remaining. If two, one will be from a terminal with BAT on it. The other will have an L on it. The BAT terminal connects to the amp gauge output terminal. It is going to be replaced, so take it off. The L terminal will connect to the Light switch through a fuse. It will be shortened and connected to the amp meter where the BAT wire was hooked. If the regulator only has a BAT connection, it will be connected to the Amp gauge output terminal. A diode, or a marker lamp bulb, or a 10 ohm resistor is the only other thing needed, Use insulated spade terminals for the small connections, or put shrink tubing over them to keep them separate. The diode, Radio shack part #276-1661, or bulb, or resistor, goes in series with a wire from #1 spade terminal on the Delco to the ignition (before the ballast resistor, if it has one, with the band on the diode toward the alternator. The diode can be placed anywhere as long as it is not going to rub on metal, and should be taped up or protected with big shrink tubing.
The #2 Alt terminal should be connected with a short 12ga.wire to the Big output terminal on the alt. A new heavy wire from that big terminal will now go to the amp meter output side mentioned above (must be 10 gauge). The amp meter leads must be swapped so it reads charge correctly with the battery polarity changed. (all leads switched side to side. The battery must be reversed to negative ground. If not the smoke will be let out of the alternator as soon as it is hooked up. The ignition coil should be reversed so the + terminal goes to the points, and the - terminal gets voltage. No other changes are needed. Jim
Jim, thank you for the info. The generator had already been replaced previously with a Delco Remy, I not sure if it is a 10SI or not yet (almost bedtime)and the regulator is gone also. The alternator has 3 wires hooked on it. I was following what you said on the I-460 wiring diagram, this diagram has the generator on it, I couldn't find a diagram with an alt. anywhere. That helps very much. Larry
Larry, Take your diagram, take a marker and eliminate the wiring that goes to the VR/Genny, ALL OF IT. Add in the wiring as shown for the alternator (2 wires back to the dash) One should be 10-12 ga and the other 14-16 ga. Add in a wire from the IGN switch to the coil. Add in a jumper from the Alt post to the light switch. Everything else should be the same as in the diagram.
Rick
Rick
Rick and Jim, Thanks for getting back to me. I was looking at the alt. again today on the tractor and the wires are not running the same way as what you guys recommended. May be why it shorted out, but it was running ok this summer. Out of the 2 small wires on the alt. that plug in with the plastic connector the 1r is going to the ign switch and the 2f is connected to the pos. post on the coil. And the big wire on alt. post, do not know where that one is going yet. Just thinking they may not be wired right. Also there was no jumper wire going from alt. post to 2r. I was trying to draw out a wiring diagram going by what you guys explained along with the diagram I printed out from Carter & Gruenwald.com . On the amp gage which one is considered the output terminal + or -. I'm trying to get all this figured out before I start tearing it apart. Hope everyone has a good night. I think I'm dreaming about tractors now in my sleep!!!!!!! Larry
Larry, the best explanation for that is that most people really don't understand automotive wiring.They wind up with extra wiring that's not needed or makes a mess or is hard to trouble shoot if there is a problem sometime down the pike.
If like on your 460 the tractor isn't stock (alt conversion) there is no need to try to keep the wiring stock. You can make the harness simple and easy to trace.
You have to remember that residential electricians may not understand automotive wiring and the opposite is true too. I know guys who are pretty good mechanics but at a loss with electrical problems too.
You also have people who put conversion kits together that try to make a conversion as simple as possible without concern that maybe there is a better way to do it.
There is a guy on one of the forums here that got an electric ignition conversion for his tractor that included a 12 volt coil to replace the original 6 volt. The kit also included a ballast resistor to used ONLY if the 6 volt coil was used. The instructions were not real clear and he had to ask advice on it to find out that he needed to remove that resister from the circuit. Now I'm pretty sure that what happened is the supplier was selling a pre packaged 12 volt plus IE kit designed to use the 6 volt coil. As a customer convenience they were shipping the kit with the optional 12 volt coil without additional instructions. Most likely an oversite on the sellers part. Not a real big deal as long as one has something like this forum to fall back on or the seller has good customer support. I'm sure that some 12 volt conversions have had similar things done to make it easier on the installer.
Sorry for being long winded.
Rick
Rick, thanks again. I was hoping that I wasn't testing your patience by asking all those questions. Like I said before I'm not an elect. guy have limited knowledge. I think I'm a jack of all trades ,BUT.... master of none!!!!!! I do like to try to figure things out. I am going to try to peel and seperate all the wiring in the harness and go from there and follow you guys instructions. Larry
Janicholson
Well-known Member
Clearing up the amp gauge output question.
An amp gauge is measuring the power flowing through it. it is polarized so the current flowing into the battery from the alternator (in this case) moves the needle to the right (charge) direction. When the lights are on, and the tractor is not running, the amps are flowing out of the battery, and the needle moves left, discharge.
There is no standardization on the markings (if any) on the meter. If it was originally positive ground with the amp meter doing as above, the meter leads need to be moved to the opposite terminals to be correct with a negative ground. The battery is connected to the amp meter with a heavy wire from the solenoid connection coming from the battery. This gives the amp meter a connection to the battery non ground terminal.
The other amp gauge terminal is considered the load side (or output side). I am making a diagram and will post it later tonight here and in the parts and pieces. Jim
Janicholson
Well-known Member
Here is the diagram Jim
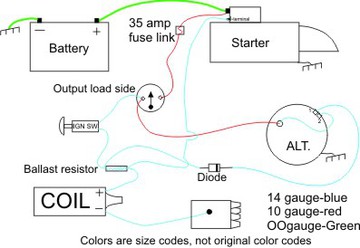
Jim, thank you for printing a picture of the wiring diagram. That has help me a 125% +. With the help of you and Rick (old tanker) I can start on rewiring this Old Red ( she is a little bit younger than I am)with a little more confidence. I love reading this site, learn so much. Wouldn't it be something if everyone could attend a "Yesterday Tractors Reunion" somewhere????? Larry
Similar threads
- Replies
- 2
- Views
- 205
- Replies
- 0
- Views
- 218
- Replies
- 7
- Views
- 489
We sell tractor parts! We have the parts you need to repair your tractor - the right parts. Our low prices and years of research make us your best choice when you need parts. Shop Online Today.
Copyright © 1997-2024 Yesterday's Tractor Co.
All Rights Reserved. Reproduction of any part of this website, including design and content, without written permission is strictly prohibited. Trade Marks and Trade Names contained and used in this Website are those of others, and are used in this Website in a descriptive sense to refer to the products of others. Use of this Web site constitutes acceptance of our User Agreement and Privacy Policy TRADEMARK DISCLAIMER: Tradenames and Trademarks referred to within Yesterday's Tractor Co. products and within the Yesterday's Tractor Co. websites are the property of their respective trademark holders. None of these trademark holders are affiliated with Yesterday's Tractor Co., our products, or our website nor are we sponsored by them. John Deere and its logos are the registered trademarks of the John Deere Corporation. Agco, Agco Allis, White, Massey Ferguson and their logos are the registered trademarks of AGCO Corporation. Case, Case-IH, Farmall, International Harvester, New Holland and their logos are registered trademarks of CNH Global N.V.
Yesterday's Tractors - Antique Tractor Headquarters
Website Accessibility Policy