Need 3 point top link bracket for WD with large photo

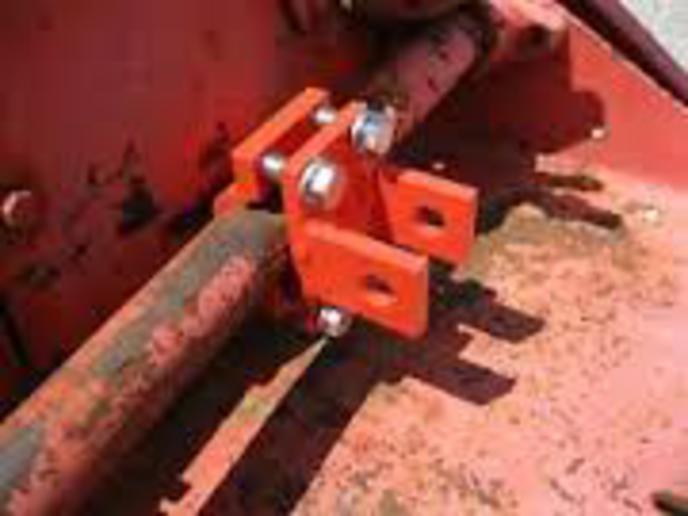
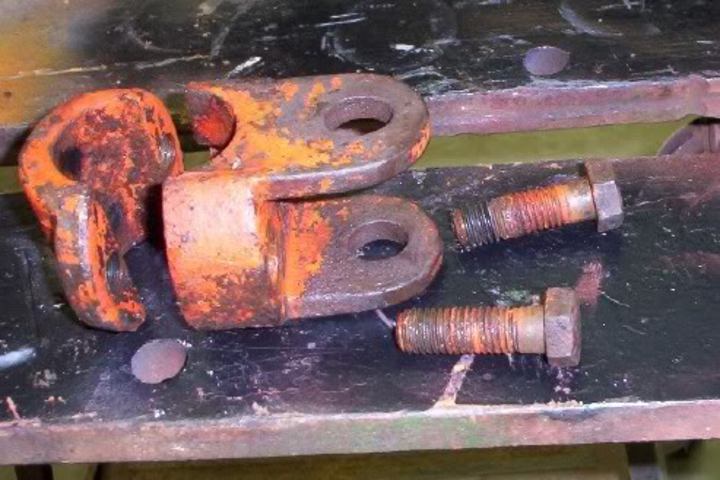
I have a converted my WD's two point hitch system to a 3 point system. The top link bracket on the rocker-arm bar was built by a previous owner of the tractor, and as you can see from the photo does not exactly work as intended.

So my question is: do you have any ideas how to fix the existing top link bracket? I have no cutting torches or welding skills, so any mods will be through the local machine shop.

The easiest and quickest way to fix it is to purchase a new bracket for about $35 plus shipping. But those brackets are a simple U-shaped clamp. What I don't like about those clamps is the the top link pin fits through the holes in a vertical fashion rather than a horizontal fashion. I saw an old AC 3 point system with the top link bracket fashioned very similar to my photo, except the bracket allowed horizontal top-link pins. Seems like that would offer better movement of the top link.


https://picasaweb.google.com/lh/photo/CSE04scInfEIJ_9pLAj4dOF1zo1mZjy5cGhdE6n4VhU?feat=directlink
 
Your top link should be between those loops, not under it. If it won't fit, a few seconds with a grinder on the top link swivel should give you clearance. Doesn't really matter which way the link is pinned as long as you have a lynch pin to keep it from falling out.
AaronSEIA
 
I would have to go out and look at the WD45 I have to remember what it has for a top link but I do know it works just fine or at least has for what I have used it for
 
here is a couple to look at:
a190508.jpg

a190509.jpg
 
(quoted from post at 15:58:20 05/03/15) Look under AC, then look down the page, dirt cheap and EZ.
Untitled URL Link

Thanks 504. I wouldn't call a used top link bracket for $40 exactly "dirt" cheap, as Steiners sell the same thing for $34 brand new. Maybe Tony would take $15 for his used bracket. That would be dirt cheap. Anyway I appreciate the thought.
 

Wellmax, thanks for posting the pics. That's kinda what I had in mind. I've checked a few places, including the parts section on YT and founding nothing. Any idea if someone is making them?

Thanks
 
Aaron, you are correct that top link will not fit between the loops. And if I grind the swivels down, the top link will in effect be tight
between the loops, so I won't get much play. That's why I was inquiring about loops that would allow the top link pin to be fastened so that
it is horizontal rather than vertical. For now, I've taken the bracket in the picture off and able to use one of the U shaped loops to hold
the top link. While the holes in the loop are slightly too small for a pin, if it works out, I'll simply drill a larger diameter hole. So for
now that is my dirt cheap option that I'll try. Thanks for the help.
 

I used 2 muffler clamps to keep it "Centered" and let it float..mine is a "U"-shaped piece, with one vertical bolt to keep it in place and the opening extends for the upper link pin to drop in ( I use a bolt with a securing pin to keep the nut in position)..

I made vertical pieces that are bolted to the "Bail" that act as Elephant ears and work very well..

Ron..
 
(quoted from post at 23:54:44 05/03/15)
I used 2 muffler clamps to keep it "Centered" and let it float..mine is a "U"-shaped piece, with one vertical bolt to keep it in place and the opening extends for the upper link pin to drop in ( I use a bolt with a securing pin to keep the nut in position)..

I made vertical pieces that are bolted to the "Bail" that act as Elephant ears and work very well..

Ron..

Ron,

A friend drew up this artist's rendering of your verbal description. Is this what you are talking about?????

https://picasaweb.google.com/110628...hkey=Gv1sRgCL_px6G4qrb8NQ&feat=directlink

authuser=0&authkey=Gv1sRgCL_px6G4qrb8NQ&feat=embedwebsite


Guess I'm having no luck posting the sketch into this post.... Gotta do some more reading on how to do this.
 
yikes!!!!!!!!!!! I am still having trouble figuring out how to post a photo in the thread. Are there written instructions anywhere????

So far, figuring this out is kind of like trying to tighten a stripped out bolt on a russian tractor manufactured in 1922, with a broken arm and all the fingers taped up in duct tape with monkey grease on both hands, blind-folded, on crutches, with both legs amputated, working in 30 below weather, with a northeast wind blowing at 60 knots, wearing shorts, and bedroom slippers, and no hat.
 

Well, As I look at the drawing better....

At first I thought it was of the top "U-shaped" piece, with the muffler clamps on each side to keep it centered...

Then, I see what looks like the drawing of "Elephant ears in the same drawing..!!

The "Elephant Ear" parts I made up of 2 pieces of 1" steel, with a Grade 9 bolt welded thru it (that bolts the piece to the "Bail" in the lower hole on each side of the Bail)..

I then welded a 1/2" thick piece above and below the Bolt Head, to even the thickness, so the 3-point conversion will slip up and daow as it raises or lowers..

I bolted a light strap at the top of each one that extends to the Bail's upper mount (rear hole), that makes certain the Ears stay in position..

Sure is better than the sway chains mine had that would bind at times..

I can send pictures if you need them..

Ron..
 

I am not having any luck posting pictures....

Must be doing something wrong or the file is too large..

Anyone have a suggestion..??
 

My upper link floats on the rocker Bar and the "U" is long enough that it extends past the swivel on the top link and that keeps it lined-up..simple and effective..

The attaching bolt is close enough that the "U" will not hit the differential cover..

Ron.
 
Dave, The design is good in that picture.......if......and only if......the top link was able to fit in between
the two steel pieces.
The hookup as shown won't work worth a "darn"!!!
 

We sell tractor parts! We have the parts you need to repair your tractor - the right parts. Our low prices and years of research make us your best choice when you need parts. Shop Online Today.

Back
Top