|
| |
| Project Journal - PTO Shifter O-Ring Refresh |
| Handle: |
YTSupport |
|
| Project Name: |
PTO Shifter O-Ring Refresh |
|
| Tractor: |
AC D14 |
|
| Started: |
07:12 08/27/17 |
|
| Updated: |
16:36 08/28/17 |
|
|
| Expand/Contract all Journal Entries Show newest journal entry on top |
07:26 08/27/17

07:26 08/27/17
07:26 08/27/17
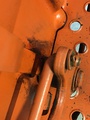
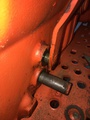
|  07:26 08/27/17 The problem 07:26 08/27/17 The problemThe Allis-Chalmers D14, D15, D17, and D19, all experience an oil leak around the PTO shifter shaft. This looks as if the clutch pedal shaft is leaking, but it's not a through shaft, the problem is the o-ring on the PTO shifter leaks down onto it. I can't say if the D17, D19, 170 and 175 can be repaired this way, but it's worth a look under the right side cover of the Power Director (or shuttle clutch) casing. They use an identical shifter, but it's a matter of how much clearance there is in the case.
This shaft goes into the Power Director case and slides a collar back and forth to engage the PTO shaft or not. Both manuals specify that the only way to fix this, is to split the tractor at the transmission case. I personally like to avoid splitting the tractor at all costs, but the problem is, that PTO shifter shaft, is held to the shift fork (not really a fork but you know what I mean) with a 1 1/4 by 1/4 roll pin, and there is no room to get a punch and hammer in there. Just to make sure, I took my 2 x 1 1/2 chunk of steel and a small punch and attempted to tap it out. The roll pin is not in that solidly, but it will not initially move with such light taps.
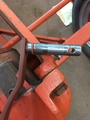
There is room in the case to fit a small "pusher" in and push the thing out, The problem is finding an appropriate pin pusher that will fit in there and have sufficient leverage to push it out. I found one and did the job. So I thought I'd pass on the knowledge I gained. I believe this to be about a 3 or 4 hours job part of which requires a helper. If you have large hands, I'd suggest finding a helper with smaller hands, there is not a lot of room to work in that compartment.
| | |
|
| 
07:49 08/27/17
07:49 08/27/17
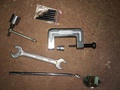
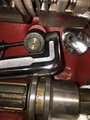
| 07:49 08/27/17 Needed ToolsMost everything is standard tractor lover shop stuff. 9/16s, 3/4, 11/16s and a 1 1/16s set of wrenches, but it's handy to have a short 3/4 open end like the cheap set I got as a kid, thin and not too stout, but good for working in tight places that quality tools won't fit in. I also just happened to have a tiny pot metal ratchet that could fit over a shaft with a 3/8s drive, this let me use a 3/8s drive 3/4 socket on the pusher once I got it on there. It made turning the push surprisingly fast. You'll also need a 3/8s drive 3/8s socket just to take up the slack on the output side of the pusher when it's nearly out. Snap ring pliers and a two jaw puller will be necessary to get the clutch pedal and power director arm off.
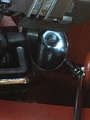
The most important tool took a lot of research. There are numerous little pin pushers that are sold to remove automotive door hinges. Most use coarse threads to drive the pin out, which is fine for an application where you can get a 1/2 inch drive socket and ratchet on it and get enough torque to push the thing out. I found one company producing a pusher (I think for early Fords) with fine thread drive. I just happened on it because they had a nice replacement lighter for the AC, that looked more like a replica than those sold by tractor companies. We don't sell them because they are very different than what is supposed to be on the tractor in appearance, but Mac's does sell a virtual spittin image of ACs original lighter. So I happened on their pusher too.
The part number for Mac's Auto Supply is 32-64595-1 (Mac's Part# V46335PULL) Hinge Pin Removal Tool Kit - Heavy-Duty Forged Steel Body.
If someone wants to make the tool themselves, I can provide the specs of this one since it worked perfectly. I didn't think I could since by the time I got my wire feed up and running, including replacement parts and a fill up of argon, I would have exceeded the 25 dollars I paid for it.
Of course you'll need some gasket material for the Power Director case cover and a replacement o-ring. The shaft it's going to go on, is a 3/4 shaft and it fits in a massive groove that is is so deep, you will want a fairly stout o-ring to fill that groove.
I almost forgot, there is one more "tool" that's handy to have. A 3 1/2 to 4 inch 3/4 diameter bolt. The reason you want this, is it's going to hold the inner shift "fork" in position while you have the PTO shifter shaft removed. | | |
|
| 
08:27 08/27/17
08:27 08/27/17
08:27 08/27/17
08:27 08/27/17
08:27 08/27/17

08:27 08/27/17
08:27 08/27/17
| 08:27 08/27/17 RemovalBefore we talk the actual removal, I can't remember if I needed the clearance to pull the Power Director arm allowed by having the fender (wheel guard) off on the right side. I already did because I'm restoring the tractor right now, I don't think it hurt, but it increases the pain by having to remove it and the tool box if necessary.
REMOVE THE BATTERY CABLES ;-). Most important step in the process. You'll have your hands in a case where gears will turn if somehow the tractor inadvertently starts up or even turns over given the wrong set of conditions.
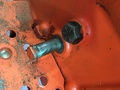
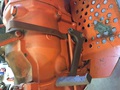
The first things to come off are the Clutch pedal and Power Director arm. The clutch pedal is easy, remove a cotter pin and the clutch actuating arm will slide out of the pedal, then pull the snap ring and washer, and the pedal slides off, it's not a tight fit. The Power Director arm is a bit more of a challenge, you put it in neutral, loosen the lock nut on the bottom and back out the 3/4 head self-centering pin below it. Remove the bolt completely. If you then move the arm, hopefully you'll get a little play where the arm moves and the shaft does not and can wiggle if off. Since that is not going to happen on a 60 year old tractor, you have to put the 2-jaw puller on it and pull it off. Mine didn't break the castings but be cautious, I was expecting it to. Once both are off, you can then access the right hand case cover, don't remove it. Drain the oil or you will have a 2 1/2 gallons of transmission/hydraulic oil on the floor. The drain plug is right underneath the case, let it drain completely before replacing the plug. If you are on a level surface, there will be a little at the bottom you'll have to sop up as you clean the case.
Then you can remove the side cover's 6 cap screws taking special note of which one comes out of the top center. That bolt goes through the casting and the clearance, between the spinning Power Director and it's tip, is tight. Somewhere in the life of my tractor, the power director clipped it and damaged the threads at the tip. Too thin of a washer on the bolt? Make sure yours isn't damaged and keep it separate if so, so you can replace it. I happened to have all new hardware since I"m restoring, so mine got tossed.
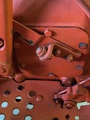
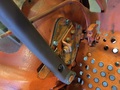
If yours was like mine, the case was in awful shape, the bottom needed a thorough cleaning to eliminate the sludge. I cleaned everything up and then stuffed paper towels down under the shaft at the front of the case. The importance of this is that it will be very difficult to get parts out of there if you accidentally drop them and they fall in the oil channel casting that runs from the the front of the case, underneath to the oil drain plug. The channel is just the right size to let a roll pin slip down inside and disappear forever.
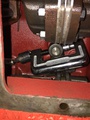
At this point, you'll be able to get the pin pusher on the shaft using the second pushing pin included in the set. Then either use a short open end 3/4 or a tiny ratchet with a 3/4 socket and start pushing. The initial push was tough enough that I had to use the open end, but as soon as the roll pin budged, the small ratchet could produce enough torque to push it through smoothly. Once the pin is mostly out and protruding from the front (front of the tractor) side, I pulled the pusher out, put a shorter pushing pin in, and slipped the 3/8s drive 3/8s socket in between the output side of the pusher (toward the front of the tractor) and the over the protruding pin. Eventually the pin fell out.
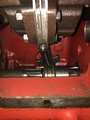
At this point, I held the shift fork in place while my son moved the PTO Shifter back and forth, then started to pull. With me pulling on one side and him pulling on the other, it gradually came out. Be very careful to hold that shift fork in position. You don't want the spring/ball detent to come loose or the shift fork to come off the sliding collar. I held it there, while he slipped the 3/4 diameter (very clean) bolt in to take the place of the shaft temporarily. Then we cleaned up and painted the shifter arm and refreshed the O-ring.
I resumed holding the shifter fork, he removed the bolt, put some assembly oil (half 90w and half STP) on the shaft and slid it in. It took some pounding to get the shaft back in using a nylon hammer, not too much force but it had to be shocked into place, just because I couldn't provide a solid enough hold to counteract the hard push necessary. Once it was all the way home, I used the mirror (or an endoscopic camera would have been better) and told him exactly which way to move the shifter to get the roll pin holes lined up. From there, I was able to tap the pin in just using my trusty small but heavy 2x1 1/2 steel block and wrist action.
Now before you forget, if you stuffed paper towels in the oil drain channel, remove them now. I would have forgotten except the PTO wouldn't disengage when I tested it (fortunately) before putting the side case back on. | | |
|
| 
09:25 08/27/17
09:25 08/27/17
| 09:25 08/27/17 Other reassemblyGetting the side cover, Power Director arm, and clutch pedal back on is self-explanatory. I will mention that I used an extra washer on the top middle bolt of the side cover. If I'm lucky, it will never conflict with the Power Director arm, there appears to be clearance on the outside. They used only a single thin copper washer, but somehow that was not enough to stop the power director from clipping the end of the bolt internally.
I presented a pessimistic estimate of how long this took, but if one were all ready, the job could be done in an hour. I would not be able to split the tractor even close to that fast. I spent longer just locating the right pusher. I will point out that since I'm restoring, I also wanted to clean and sand most of the surfaces involved. | | |
|
| |
|
| | Return to Journal list |
|
What are Project Journals?
Project Journals are a place where YT Community members can document their tractor and farm projects. Each journal created, can have many photos and accompanying text entries. You can also enable comments to allow other members of the YT Community to comment on your journal. If you do enable comments, it is up to you to moderate what people enter in your journal according to the site policy of Yesterdays Tractors. Journals may also be used as photo posting area, to post your photos of your farm, tractors and related photo topics. If you would like to create a journal, just be sure you are logged in to the Classic View of the forums, and a link will appear to do so when you next come to this page.
. |
Home
| Forums
Today's Featured Article -
Oil Bath Air Filters - by Chris Pratt. Some of us grew up thinking that an air filter was a paper thing that allowed air to pass while trapping dirt particles of a particles of a certain size. What a surprise to open up your first old tractor's air filter case and find a can that appears to be filled with the scrap metal swept from around a machine shop metal lathe. To top that off, you have a cup with oil in it ("why would you want to lubricate your carburetor?"). On closer examination (and some reading in a AC D-14 service manual), I found out that this is a pretty ingenious method of cleaning the air in the tractor's intake tract.
... [Read Article]
Latest Ad:
Super WD9.
[More Ads]
Copyright © 1997-2024 Yesterday's Tractor Co.
All Rights Reserved. Reproduction of any part of this website, including design and content, without written permission is strictly prohibited. Trade Marks and Trade Names contained and used in this Website are those of others, and are used in this Website in a descriptive sense to refer to the products of others. Use of this Web site constitutes acceptance of our User Agreement and Privacy Policy TRADEMARK DISCLAIMER: Tradenames and Trademarks referred to within Yesterday's Tractor Co. products and within the Yesterday's Tractor Co. websites are the property of their respective trademark holders. None of these trademark holders are affiliated with Yesterday's Tractor Co., our products, or our website nor are we sponsored by them. John Deere and its logos are the registered trademarks of the John Deere Corporation. Agco, Agco Allis, White, Massey Ferguson and their logos are the registered trademarks of AGCO Corporation. Case, Case-IH, Farmall, International Harvester, New Holland and their logos are registered trademarks of CNH Global N.V. Yesterday's Tractors - Antique Tractor HeadquartersWebsite Accessibility Policy |
|


